Drawing, Sheathing, and Holding the Weapon

            Often, sheaths and scabbards slightly press against the blade, so you may need to hold onto the sheath with the left hand when you draw with the right. Easy, right? Just make sure to keep your shoulder down. Lifting up with the shoulder as you draw makes the subsequent movement ungainly.

            What really gives a lot of actors a problem is sheathing the weapon. The action stops while the actor stares down at the scabbard opening and tries to poke at it with the sword tip until it finally finds its mark. Sometimes they slowly chase the scabbard opening, turning in a counterclockwise circle much like a puppy chasing its tail. There is an easier way.

            Grab the top of the scabbard with the left hand and let the web of the hand [the part between the thumb and index finger] ride high, just above the opening. Lay the flat of the blade against the thumb and draw the sword up and across the body until the tip simply pops right into the scabbard opening.  If the blade is curved, you’ll need to then give the sword a half twist so that it aligns with the curve of the scabbard. From there simply allow the sword to slide all the way in. With very little practice actors can sheath their swords without even looking at what they are doing, which not only maintains the flow of the scene but also looks really cool.

            [Practitioners of iaido, the Japanese art of drawing and attacking with the samurai sword, practice this sheathing endlessly. As they work with “live” fully sharpened blades, and do not use gloves, most have sliced their thumbs or fingers at least once. Be glad that all stage weapons are dull.]

                        Holding the weapon

            I’m going to remind you again here to use gloves, and not only to prevent injury. There are times during a sword fight when part of the hilt can pinch the flesh of the palm. Not enough to cause damage or even appreciable pain, but just enough to cause the perfectly normal reaction of instantly releasing your grip. Dropping your sword in the middle of a fight is embarrassing, and the simple use of gloves completely prevents that eventuality. The accompanying photographs show the hands ungloved, but only so that you can easily see the finger placement. For stage combat, use gloves.

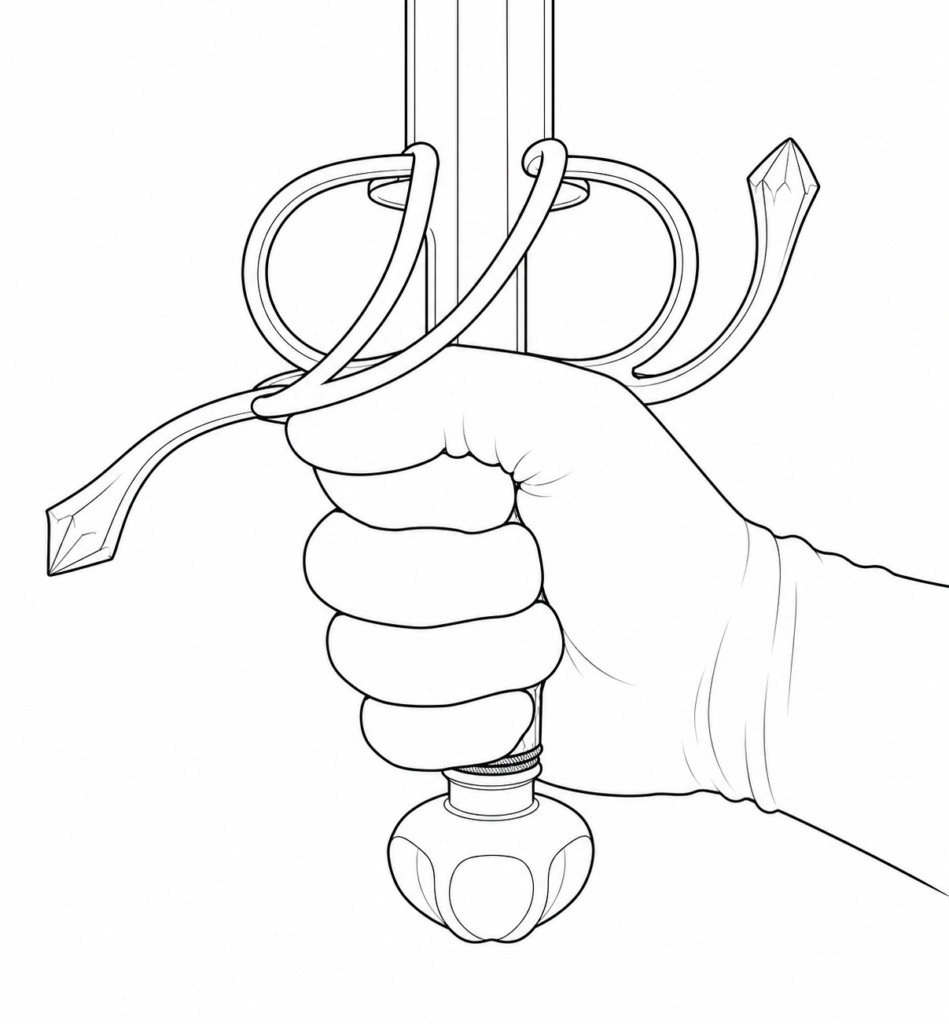
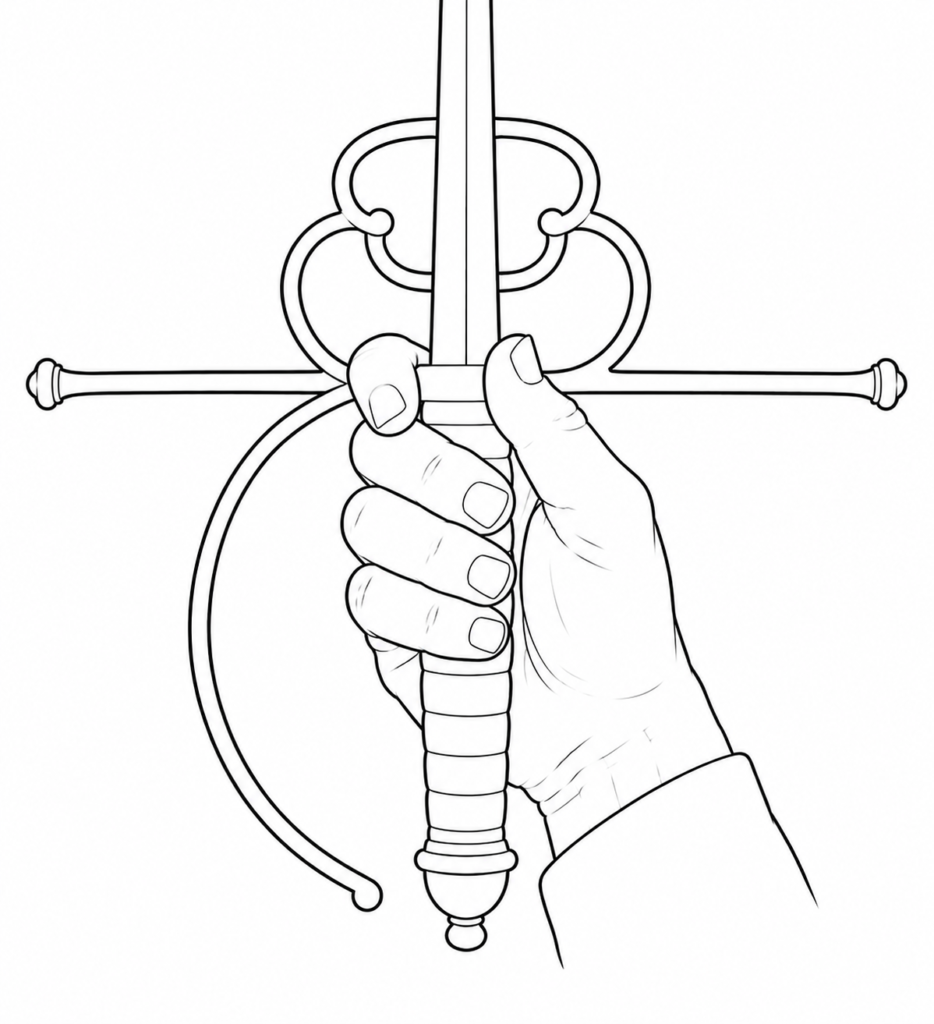
            There are several basic grips in stage combat, depending on what kind of sword is held. The weapon dictates the grip, the grip dictates the fight. But no matter which grip is used, one must keep the hand relaxed. There is an old saying regarding holding the sword that compares it to grasping a small bird. You want enough strength in the grasp so that the bird cannot escape, but not enough so that the bird is harmed. And the hand is always kept as close to the guard as possible to maximize your control of the blade.

                Hammer grip                     French grip                        Rapier grip                     (tighter grasp for cut)             Italian grip

            The simplest grip is the hammer grip, obviously used for the heavier weapons such as the broadsword or heavy sabre. But even this is not a death grip, for the hand must constantly grasp and release, tighten and relax, allowing the handle to move slightly in the palm as you fight. If you don’t, the sword will unrealistically always stay at 90 degrees to the forearm, which limits your reach.

            For longer weapons, a two-handed grip is necessary. It is helpful to give each hand a separate function: the left hand actually lifting and lowering the sword, and the right hand primarily guiding it to its target. [Note: Unlike the European broadsword, the Japanese katana was held with the pommel secured inside the grip of the pinky finger of the trailing hand].

            The French grip is the one used for light dueling swords as well as for Olympic sport fencing. The handle rests diagonally across the palm as the fingers gently close around handle. [When you grab a small flag that’s on a stick and wave it, or when you grab and flair a small fan, you are using a French grip.] Most of the tension to hold the sword is in the thumb and first finger, the others supporting the weight and directing the point as needed. When the sword is pointed at the opponent and the hand is in supination (palm up) tightening the little finger will make the tip jump up to the high line of attack. Relaxing the little finger allows the tip to point to a low line of attack. Neither forearm not wrist movement is necessary to raise and lower the tip if that little finger is kept active.

            The most common grasp for stage is the rapier grip, which is very similar to the French grip except that the first finger hooks around the quillon. This allows the hand to get much closer to the center of balance of the sword, and the first finger can control the movement of the blade far better than with either the French or hammer grips. (Even broadswords were sometimes wielded with the rapier grip (long before the rapier was invented, although it certainly put the hooked forefinger at a great risk of being lopped off!) Because of the variety of motions required for rapier fighting, the grasp cannot be locked into one position but must be very lively and constantly shifting.

            Almost unseen these days is a variant of a sport fencing grasp called the Italian grip. In this grip, not just the forefinger but the middle finger as well hook over the cross guard. In this style, the blade passes between the first and middle finger. It is not nearly as strong as the rapier grip, but it does put the handle in-line with the forearm, giving greater tip accuracy during thrusts and more control during difficult pronated parries. Not a useful grip at all for stage combat, since cutting motions with this grasp are very weak.

            No matter what the sword, cutting motions and strong blocks will feel more comfortable with the hammer grip, while finesse tip-work, thrusts, and deflective parries require the French or Rapier.  Always relax the hand so that the sword can move freely between the various grasps as you need to employ them.

                        Stances – En Guard

            When the fighter is not actively engaged in attacking or defending, he normally takes a position of “readiness”, usually beginning out of distance, and then closing in to allow the blades to touch and slightly cross. These stances should never be stiff but rather still have a feeling of fluidity, even when the body is still. It represents a readiness to either attack or defend, without having committed to either action.

            All stances will have the same basics in common – a slight bend in the knees, weight shifted slightly forward towards the balls of the feet, the torso erect and resting directly above the hips, not bending forward at the waist, shoulders relaxed. The head is held back – an observer of the fight in which the body is engaged.

            Put a sword in an actor’s hand and he immediately goes into the standard Olympic fencer’s stance – left foot turned out and directly behind the right foot, left shoulder turned away from the opponent, and the left arm held up behind the head, elbow at shoulder level, with the left hand dangling down loose at the wrist. The sword is held at solar plexus level throughout the fight, the hand merely moving from right to left, parallel to the ground. This is fine for competitive fencing where the target is only the front of the torso and the fencing area is limited to a long and narrow piste, or runway, which does not allow for any sideways action. It doesn’t make any sense for a duel or fight, where side stepping and use of the left hand is assumed. (To be honest, it has been many decades since they even take this stance in the Olympics.) So, instead of this severely linear stance, the stance for a sword fighter becomes more and more open as we move backward in time.

            The smallsword of the 18th and 19th centuries is very close to the above competition stance, but the left hand, often gloved, is often held in front of the body near the face to protect the face or grab the opponent’s blade, so the left shoulder is turned in a bit. Alternatively, the left hand could simply be held behind the back. By all accounts, the fighters stood much more upright than have fighters in other periods of history. This would seem to indicate that the emphasis was in using the sword to deflect attacks rather than relying exclusively on the legs for evasions. The left foot is turned out but is not directly in-line with the right foot. This gives better sideways stability and allows for quick evasions and attacks to the left and right. Since the face is unprotected, a common variation to the solar plexus on-guard is to hold the sword with a straight arm pointing at the opponent’s face, but of course for stage this is modified to pointing no higher than armpit level.

            Military sabre fighting in a duel is similar, which we would expect since it comes out of the same time period. But the weapon is completely different in weight and size and balance, therefore in the way it is used. The left hand, useless against the heavy hacking blade, is always held behind the back to keep it out of the way. Generally the weapon hand and lead foot would be opposite during an enguard, as it is assumed that in order to generate enough momentum to delivery a powerful one must drive the movement with a strong crossing step forward. the crossing steps allows the hip to apply more torque, therefore more power, than can be generated by simply moving the lead foot forward in a standard advance. Because the sword is heavier, the arm tires easily trying to maintain a dueling position, so the weapon is held either low at hip level with the tip pointing up, or above head level with the tip aiming down. Simply moving the sword from side to side can affect the fighter’s balance, so the legs need to be bent and about a yard apart to provide a more stable base than is used in smallsword dueling.

            The rapier of the 15th through to the 17th century is a brawling weapon, so the strict formalities of the duel of this period have more to do with the etiquette of issuing, accepting or avoiding getting a challenge to fight rather than how the fight itself should progress. Since both hands are expected to be engaged in fighting, the stance opens up tremendously to at least shoulder width apart, often more. The shoulders and the hips stay square with the opponent, so the feet cannot be in line with but rather will be set wide, wide enough so that at any time your opponent should be able to roll a bowling ball between your legs. There are many variations to the en guarde stance, but most fighters tended to hold the left arm out straight while holding a dagger, and the right arm kept more closely to the body and holding the sword. The height of the hands will move from waist to shoulder level as the needs of the fight require, and most importantly the left foot rather than the right, will lead. The idea was to keep the tips of both weapons at an equal distance to the opponent, not showing a weakness to or preference for either side. Movement patterns were circular, with the look of modern boxers trying to find an opening to attack. Most fighters were trained to bat-away an incoming attack with the left hand and almost simultaneously thrust the sword at the opponent’s face.

            The medieval broadsword was a battlefield weapon, so even in a knightly tournament the look here is of battering the opponent into submission rather than a show of elegant swordplay. The stance should be proportionate to the weight of the weapons, so that with the two-handed swords or with sword and shield we should see the legs in a full horse-riding stance, legs very far apart, the sword held at hip level. There is no preference for right or left foot leading. Indeed, leading strongly with either foot reduces the ability of the fighter to swing the sword from both directions.

            For the earlier shortsword of bronze and iron-aged cultures, there is no studied posture to copy. The sword is light enough not to affect the stance, so the fight will have the look of brutal accepting and giving punishment until one person falls. If two fighters face each other, it is possible that one might take a defensive wide stance much like a boxer, left foot forward, with most of the weight on the right [back] foot.

            Samurai warriors of Japan were the only group of fighters that developed a fighting style designed not only for war but also for dueling. The stance might at first be confused with that of the broadsword, but since the sword is so much lighter, there is no need for the deep stance of medieval European warriors. In single sword confrontations, the basic stance was the everyday normal stance, with either foot leading, and the sword held at a relaxed stomach height and slightly extended from the body. If two swords or sword and dagger were used, the stance looked more like that of the rapier. With elbows bent and the tip aiming up and toward the opponent’s face, the samurai was trained to look for the decisive moment to attack, and then to kill with one blow. Just as in European rapier fighting, most duels were over in two or three moves. A successful attack would need no further action, and a failed attack would lead to a usually successful counter attack by the opponent.

                        Distance

            With the actors facing each other, have the taller of the two slowly thrust with the sword and take a half lunge with the lead foot. Adjust the foot placement so that the tip of the sword is about three or four inches away from his partner. Keeping the back foot where it is, recover back from the lunge, and this is the correct distance for stage combat. Memorize this distance and go back to it at every opportunity, for actors invariably shorten it as soon as they start moving.

            Distance of course will change. A vertical head cut must start from much closer than a thrust to the torso, so adjusting for the demands of the fight is constant. But actors will always tend to end up too close rather than too far apart, for we all take shorter steps when walking backwards than we do when going forward.

            The main concerns are not only safety for the actors but also for the believability of the fight. When the fighters are too close it sends a message to the audience that completely undermines the tension you are trying to create, namely that it is a battle of life or death. What the audience instead sees is that the swords must not be dangerous at all if the characters are so comfortable being within striking distance. The actors have to sell the concept of the tip of a blade being white-hot and instantly deadly to the touch in order to create an exciting fight.

                        Attacking

            There are at most only two things you can do with a sword in order to hurt someone: hack at him with the edge or stick him with the tip. [Yes, I know you can hit someone with the pommel or the guard, but those are really augmented unarmed techniques.] Whether cut or thrust, stage attacks are slower than real fighting. Stage attacks unfold; they do not strike, but rather develop.

            All of swordplay is one person doing one of the above and another person preventing success. We can create swordfights on stage because, unlike real fighting, we can make sure that most of the attacks actually fail.

            Audiences have no depth perception. You must trust in this for it is the one thing that makes all of stage combat possible. It’s also what can make a sword fight confusing to the audience. From their point of view, an attack to the left looks the same as an attack to the right, and a sword tip that has disappeared upstage of an actor has gone through the character. Remember that you are creating a two-dimensional picture, so what looks right to the actors may not look right from the house.

                        The Five Basic Attack Targets

            Of course in a real sword fight, any contact anywhere on the body has the potential of causing damage, so attacks are only limited by opportunity and creativity. For stage, we reduce all of these possibilities to only five spots. Why? Specificity and safety. It’s hard for the audience to follow a sword fight as is it, and adding too many targets can confuse them. [There are choreographers who teach up to twelve attack points, but even they use the basic five for the majority of moves in the fights they choreograph and use the others sparingly.] Too many targets can also confuse the actors, making them miss their defenses and muddying up the fight.

            The five attack points are

            1)         left hip
            2)         right hip
            3)         right shoulder
            4)         left shoulder
            5)         head

            These are just nicknames that everyone uses for the five points in space where the two swords are going to meet, not really the part of the body that someone in a fight would actually try to attack.

            For the first four positions, we want the audience to believe that the target for the attacker was always the same: dead center of the defender’s torso, the solar plexus. But of course the actor isn’t really going to aim for the solar plexus, because if the defender fails to make the block, you end up with a damaged actor. So the actor/aggressor aims his weapon tip for the point in space where the progression of the attack is going to be successfully thwarted.

            We have to be extremely specific as to what the attack points are, and not allow the sword tip to wander. The difference between a high line attack and a low line attack is only a matter of a few inches. As a matter of fact, I often find it beneficial not to have my actors think about attacking high or low but simply call all of the body attacks “flank”, either left or right. Students tend to allow their focus to drift anyway, so high becomes higher and low becomes lower with each fight rehearsal. By call all of the attacks Flank and having them drive the blade to the same spot, he point drift tends to be minimal. By performance time the tips usually will end up right where they need to be, as described below.

            For the five attack points the aggressor’s sword tip will land exactly at the following: 1) left hip – the point in space at belly button height, natural waist level, the top of the hip bone, two inches to the left of the outside plane of the body and four inches in front of the body. 2) right hip – the point in space at belly button height, natural waist level, the top of the hip bone, two inches to the right of the outside plane of the body and four inches in front of the body. 3) left shoulder – the point in space at nipple level, armpit height, solar plexus level, two inches to the left of the outside plane of the body and four inches in front of the body. 4) left shoulder – the point in space at nipple level, armpit height, solar plexus level, two inches to the left of the outside plane of the body and four inches in front of the body. 5) head – the point in space no higher than seven inches above the head, aimed top dead center.

            Try locating these points and you’ll see that the first four attacks, the ones to the body, all end up slightly in front of the defender. The audience must always see some daylight between the attacking tip and the defender’s body. This allows the tip to appear to be more dangerous and it also gives us somewhere to go when we need to do the kill shot. On the other hand, for the head cut we have to allow the tip to get past the frontal plane of the defender, for we what to have good solid contact between the two swords for safety’s sake, and in this case (and only this case) it means we have to close distance a bit.

            To be honest with you, I really dislike the terms “hip” and “shoulder” for stage combat. As I mentioned earlier it makes the attacking sword tip drift far too high on the “shoulder” attacks and far too low on the “hip” attacks. But the terms are almost universally used by choreographers, so we’re stuck with them. What I want the audience to see is an attack always parallel to the ground, with only the tip pointing slightly up or down, just above or below the defender’s hand. So again, when I teach, I simply refer to all body attacks as flank. That way the tips land just above or below the defending hand.

            We should also discuss the concept of inside and outside, which always refers to the defender. In fencing it is considered best to keep the sword held at the center of the body. That way any attack to any quadrant is equally covered, but the reality is that the hand tends to drift a little bit in the direction of the shoulder to which it is connected. So if you are looking at a right handed fencer, the left side of the body is going to be a little bit more open to attack than the right. That left side is his inside (think of the inside of his forearm). His right side is his outside (think of the outside of his forearm). But if he switches hands and starts fighting with his left hand, his inside and outside are reversed.

                        Thrusting

            The thrust is an arm movement that attempts to stab someone with the point of a sword or knife. It is not a lunge, which is a lower body movement. The thrust refers only to the arm extension that makes the point of the sword more dangerous to the opponent. The thrust begins with the arm bent, with the tip of the sword aimed at a specific target on the opponent, and the hilt held close to the body. A line drawn from target to blade tip to attacking hand should form a perfectly straight line. The sword tip then moves in that straight line to the target as the arm is straightened. The thrust may be executed while lunging, or while stepping forward, or standing still, or even stepping backward. Again it only refers to the arm movement. There is no need to lean into the attack by bending at the waist. Keep the head up and the torso balanced on the hips. (The illustration to the left is a thrust as would have been commonly aimed during Shakespeare’s time – directly at the face. Of course for safety’s sake in stage combat we never thrust above arm-pit level.)

            There are such things as “diving” and “scooping” thrusts, which begin with the tip pointing up or down respectively, but these are advanced techniques best left to experienced combatants. On the other hand, there is no reason to assume that the hand must be returned to the center solar plexus position before beginning the thrust. If the hand happens to be, say, down by the left knee because of a previous move, the thrust can start directly from this position so long as hand, blade tip and target form a straight line when the thrust is complete.

            On stage, since the audience has no depth perception, we don’t actually thrust at the other actor, but instead thrust very slightly away from the actor, to just outside of the plane of the body. This would be a point in space where the sword tip would end up if effectively blocked. So even though a real thrust would always be aimed at the center of the torso, directly at the solar plexus, the thrust targets for stage combat are four: Left high, right high, left low, and right low. Again, high is called “shoulder” by instructors for simplicity, and low is called “hip”, but these are misnomers, for the sword tip should never be higher than your partner’s arm pit [nipple level] nor lower than your partner’s natural waist [navel level]. Think about that for a minute and you’ll see that the difference between an attack to the high line and one to the low line is only about six or eight inches. Also, the tip should end up a couple of inches in front of the actor so that the audience can see that the attack failed. But remember that the actor’s job is to sell an illusion, the conceit that the middle of the body was the intended target and that the defender deflected it away at the last nanosecond.

             Notice that for thrusts, we left out the fifth target, namely the head. We never, NEVER, thrust to the face. The margin for error is simply too great, and the possible injuries are too frightening to risk. So for the thrust, we have only four attack points.

            So as not to confuse the actors, I prefer to use the terms left and right according only to the point of view of the person actually doing the particular action. So you thrust relative to your own left or right, or you block to your own left or right. Don’t worry about what your partner is supposed to do.

                        Lunge

            As I said before, the lunge is what the legs do, not what the arm does. Real competitive swordplay involves a lot of attacks that may not all have the intent of actually striking, but are part of a constant probing and testing of the opponent. The bodies dance around and the swords are thrust and parried, but there will come one moment where a thrust is made and the opponent has left himself just a little too open. This fraction of a second is the opportunity that must be seized, so even as the thrust is beginning its extension, the body lunges forward to suddenly close the distance and hit the target. Touché!

            Thrusts without the lunge are usually made just outside of striking distance. Adding the lunge is an act of great self-confidence, because if it fails the attacker is left hung out there vulnerable to counterattack.

            The lunge provides the maximum extension of the sword to the target, so if the fighter is right-handed it is always performed with the right leg. The left foot is anchored to the floor, turned out to 90 degrees. The right leg steps forward into the deep lunge while the left leg straightens completely. Fencers will actually lock that knee joint for maximum stretch, describing the feeling as punching the ground with the left heel. That popping extension might even propel the fencer another half meter or so in the direction of the lunge. In order to avoid excess strain on the right knee, don’t allow the leg to lunge too deeply.  At the full lunge, the right knee should be right above the heel. To protect the left leg, straighten it but don’t hyperextend it.

            To get out of the lunge, fencers simply push off with the right leg, giving them really powerful right thighs. It’s also exhausting, so a much easier way is to bend the left knee first and then just evenly “squat-walk” out of the lunge. Of course, one can also recover by bringing the back foot up to meet the lunging foot and then standing up, but naturally that drives the actor forward rather than back, so is usually used if the defender has retreated a considerable distance.

                        Riposte

            This is a fencing term that is used often in stage combat, although the actual technique itself has no use on stage unless the actors have been intensely trained by an excellent choreographer. The riposte is an immediate attack following a successful parry, but so immediate that it becomes one movement with the parry. This is known as single-time fencing, the basis of all modern sport fencing. When the riposte is done effectively it becomes a true counterattack, one that strikes even before the opponent has finished his intended initial attack. Fencers are trained to riposte automatically, even instinctively, but the blending of movements is impossible for the audience to discern, therefore they cannot see the character’s intention. All they can see are a series of simultaneous attacks, and this takes them away from following the story of the fight. For stage combat it is preferable to have the actors use only double-time actions: completely finish one move (the parry) before attempting another (the thrust). There are enough choreographers out there who use the term riposte, so you should know that they simply mean an attack that immediately follows a successful parry.

                        Cutting

            For stage combat purposes, a cut is not just an attack using the edge of the blade, but an attack that has been successfully blocked.

            Just as with the thrust, the target to aim for is where the sword would stop in air when a cut is successfully blocked. This is a mere two inches away from your partner, and again the terms high and low are nipple and navel respectively. The tip should end up a couple of inches in front of the actor so that the audience can see that the attack failed. So when all is said and done the tip of the sword is going to end up at the same precise point in space whether the attack was a cut or thrust.

            What changes is the look of the attack as it unfolds toward the defender. Just as with the thrust, we want to start by forming a straight line to the target. But this time, the order is elbow, hand, then blade tip. That’s right; the blade tip will be behind you before you start the attack. The movement of the hand will be the same – in a straight line to the target. The tip will make a gentle half circle, with the pivot point being the attacking hand, not the shoulder.

            To the previously explained four body targets, we add one more – a vertical head cut. This one is scary at first but it can be made very safe so long as one key point is carefully practiced. As the sword blade drops down to make the cut, simply never allow your hand to drop below the level of your partner’s eyes. So long as you don’t lose sight of your partner’s eyes, your sword blade cannot possibly touch him, and you cannot possibly hurt him. For this cut we allow the sword tip to extend past the front plane of the defender, which is far closer than we do for any other attack. The sword tip will stop directly over the center of the defender’s head, not in front of the defender. This way the defender is certain to have enough incoming blade to make solid contact with the block, avoiding the straight-arm “reaching” block. The final image must have the defender keeping his arm bent when blade contact is made. If the defender has to reach forward to make the block, then there really wasn’t a threat that is going to be obvious to the audience.

            Cutting motions with the sword should not be confused with tree chopping, which unfortunately is what you’ll usually see performed on stage. The problem is that the natural tendency of the actor is to execute the cut using a bent arm, like a baseball swing, and that’s fine if we don’t want the swing to stop. But if the cut stops in midair before reaching the victim (as it will in 99% of the choreographed fight) we have to believe that it was the block that did it, and that can’t happen with an attacking arm that is bent. Why?

            When the arm is bent at the elbow, the elbow leads the motion of the swing followed by the hand and then the blade trailing behind. This is what happens when you slash with a sabre – by the time the blade actually makes contact with anything, all of the body momentum and even most of the weight of the sword has already passed by the target point. There is nothing that is going to stop the progress of the slash. If the defender holds up his sword for protection, the attacking sword will glance off of the defending blade, but the path from one side to the other will not be impeded.

            But what we get onstage (and in most action movies) is a sword coming in with that full bent-arm swing, and then inexplicably freezing in midair just because the other blade touched it as though it were some sort of powerful electromagnet. With both actors keeping their elbows bent, it also becomes harder to figure out who is attacking whom. After a while it merely looks as though both are hacking away at an invisible cabbage floating halfway between them as they prepare coleslaw.

            We need to get the same clear attack vs. defense that we get with the thrust, and we do that by allowing the cut to develop as it is performed, rather than simply hacking. How?

Ø    Make sure that your arm, hand, and sword form a straight line at the very moment that your cut is blocked. If the elbow or wrist is bent, the impact point of the sword looks weak, the hilt has all of the momentum, and the blade cannot logically be stopped. It looks as though you just wanted to slice the opponent, not cleave into him. To the audience it looks as though the aggressor simply gave up. But if the arm and sword are straight (just like a thrust) then it gives the appearance of having tried to reach the opponent in order to cut into him with the far third of the blade, a point on the cutting blade known as the center of percussion. If the intention was to cut and not slash, then that far third, not the hilt, is going to be “loaded-up” with energy. If the blade is then blocked right at that center of percussion, the momentum to the sword is going to cause the blade to try to continue, not in front of the block, but by wrapping around behind the block, straightening the arm even more, even hyperextending it. This is a cut and block simulation that now obeys the laws of physics.

Ø    Remember the three P’s of cutting motions: point, push, point. When you start your cut, the blade tip is going to be slightly behind you, so to begin you first point your elbow toward the target. This is important so that the audience and your partner can get a good visual cue as to what part of the body is being threatened. (If you’re right-handed, the cut coming from the left is going to be easier than from the right. You won’t actually be able to point with the elbow from that right side, but you should still try to get the feeling of leading with the elbow first.) Relax the shoulder – tension there isn’t necessary for a cut. If anything push your shoulder down; then push the pommel toward the target as you straighten the elbow. This makes the hilt of the weapons travel in a straight line from your body to the target point. Once your arm is straight, then and only then engage the point of the sword to the target using only your wrist. It is during this last motion that the blade of the sword will swing around in an arc, but notice that the hilt went only in a straight line. This will both look far more real than the traditional “hack”, but it also has the added benefit of completely dissipating the energy of the cut before it reaches your partner. As you get better, this three part break down will smooth out and look very convincing.

             point with elbow       push the pommel        point the tip             point elbow   push pommel   point tip

Ø    Lastly, you’ll need the slightest hint of a bounce-off after contact has been made. Keep the mental image of striking a crystal bell with your sword: if you come in chopping, you’ll shatter the bell; if you don’t flick your hand at the moment of impact, your strike will not resonate. (If it helps, imagine trying to reach behind your partner with your sword tip.)

The character’s intent is to cut.

The actor’s intent is to send the energy out to his partner, not through his partner.

            To recap: each cut is an attack that unfolds as it develops, with the hand (hilt) moving in a straight line while the blade tip swings in an arc. Contact is made with the first third of the blade, not the midpoint.

            To get the stage cut to look clean, aggressive, and still be safe, here are a couple of great exercises:

Ö                   Get a plastic bottle of any size, fill it with water, and stand it on a tall stool. Try several full speed cuts to both sides of the bottle. How close can you get while not knocking it off of the stool? Make sure that from the blade tip to your shoulder is a straight line at the end of each cut. Until you can touch the bottle but not knock it over, you really don’t have control of the sword.

Ö                   Is the above exercise easy? Great! Now try it with an empty bottle.

Ö                   Play catch. No, really. Just stand about two or three yards apart and use a soft rubber ball or tennis ball or bean bag. Catch and toss with the same hand, and try to have the ball only go to the five attack points discussed earlier. No fake outs here, really indicate your intended target. Don’t make your partner reach for the ball – your job is make the ball land exactly where his target hand is waiting. If you swing your arm around in an arc as you throw, that ball will go everywhere. If your hand travels in a straight line, the ball will reach the exact target every time.

Short-Snap Cut

            A slight variation to the full sabre cut is the short-snap cut, which is also the only kind of cutting seen in the Olympic sport of sabre fencing. The short-snap is performed with the arm already fully extended or nearly so, the sword is worked using only the wrist, allowing for a much faster series of attacks. As such attacks would not have any true cutting power behind them, they are usually added in fights as feints or set-ups for the real, more powerful attack. They are also often used for combination attacks, the first part of the attack being a regular full cut, and then the second part as a short-snap going immediately to a new target without having to waste time in pulling the sword back. It allows for more variation in timing, for the short-snap takes only a third of the time to perform than the full cut. Naturally, most combatants can only perform this action when the sword has a relatively light blade. In order to do a snap cut with a true military sabre blade, one would have to have Popeye forearms.

Long Sword Two-Handed Cut

            Two-handed broadsword cuts are not dramatically different than cuts from any other weapon, except that we need to endow the prop with more weight. I say endow because military sabres actually feel heavier than broadswords, and so tend to move more slowly in air. But part of our job as actors is to not break the illusion of the broadsword being a weighty beast, so we generally pantomime a bit more prep and pretend to absorb a lot more crashing force.

            The work of cutting with the longsword is divided into two distinct jobs – one for each hand. The dominant hand (for most people, the right hand) guides the tip, the non-dominant carries the weight and guides the hilt. In other words, the left hand does most of the heavy work, carrying the weight from side-to-side and forward-and-back, keeping the muscles of the right arm rested and fresh, ready to carefully guide the tip to exactly where the fighter wants it to go.

Defending

            Just as there are two ways of using a sword to hurt someone, there are two ways of using a sword to defend yourself. Blocking refers to stopping the incoming motion of a cut, while parrying is a deflection of a thrust. It gets a little confusing because most people end up using the terms interchangeably. I’m just as guilty as anyone else, but we should always try to keep a distinction between the two. For both types of defenses the incoming attack is kept as close to the body as possible. But although the sword movement may look the same, the body response must be different. Your job is to understand your intention so that the meaning behind the move can have clarity.

            Parrying is a finesse move, one that diverts the incoming energy and allows it to skip harmlessly away. Parries require very little effort and have more of a look of guiding the offending sword tip away from its target. Because a mere deflection is needed, either the strong (true-edge) or the weak (back-edge) parry may be used. A strong parry leads with the knuckles; a weak parry leads with the thumb side. Don’t push the attacking sword away, for your partner is supposed to be thrusting just outside of the plane of your body already. All you have to do is gently meet the blade at a prearranged point in space.

            Blocking, on the other hand, meets force with force, so we need to see that impact accepted by the blocking arm. Every movement has a specific consequence, so match the effect of your block on your own body to the amount of force your partner is pantomiming. Big cut, big reaction; light cut, light reaction. But it is, of course, a pantomime, for the blades will in reality only kiss on contact, not bash. The hand stays light – the effort is in the acting, not the sword. Blocks by definition need to be strong, so blocking with the weak or back-edge just isn’t done unless you are showing a desperation move. Again, don’t push the cutting sword away, merely meet it. The closer that the meeting point can be to the defender, the more exciting the fight will appear to the audience

            Whether strong or weak, always block with the edge of the blade, never with the flat. Using the flat is slapping, not blocking. I know that there are several people who teach the opposite, but this is not a polite disagreement between differing stage combat philosophies. The others are WRONG. The only way to ever block is with the edge of the blade. Yes, the edge to edge contact will cause burrs and nicks along the edge, but those are easy to file off. You can’t glue a sword blade back together if it snaps in half. Blocking with the flat is a great way to break a sword. [To those who think that blocking with the flat is a good idea, try breaking a blade. You can only do it by forcing it along the flat, not along the edge.]

            Whether block or parry, the broad mechanics are the same. Audiences don’t know from swordplay, so you have to help them understand what they are supposed to be seeing. They get the idea of attacking pretty quickly, but defense is harder to see. The more clues as we can give to them, the easier for us to tell the story. Since the attacking arm is straight, make sure that the defending arm is bent, especially at the elbow. Since the attacking blade is roughly parallel to the floor, the defending blade should have the tip pointing up or down, in other words, obviously not a threat during the moment of the block. The reaction of the defender must be proportionate to the amount of force coming in, so blocking a cut from a fencing sword will require very little arm strength, while absorbing the force of a broadsword cut will shake the entire body.

            In order to sell the idea that the attack has come in on the low line, our defense will usually have the tip pointing toward the floor. If we are matching an attack to the high line, we generally show a defense with the tip pointing up. (There is something called a “hanging parry”, in which the tip is pointing down even though defending against a high line attack. Used sparingly, it makes a nice choreographic statement and benefits some combinations.)

            Try as much as possible to have the swords form a good right-angled cross at each move. Real fencers don’t do this, of course. They try to keep the angle during the parry extremely shallow so that the tip is ready to thrust right back at the opponent even during the parry. This is excellent fighting technique, but very difficult for an audience to follow [one reason why competitive fencing is so hard to watch and requires that the combatants be rigged with wires connected to a panel of scoring lights].

            We are trying to create the illusion that all of the thrusts and cuts are aimed for the center line of the opponent, but we can’t actually attack center, so it becomes the defender’s job to sell the illusion. The only way to do this is for the defending sword blade to cross in front of [protect] the center of the body before reaching the attacking sword. That sounds easy until you try it. As we will later see, many times the shortest distance when moving from one block to another doesn’t go past that center point, therefore we must take a long route to get there so that it can.

            I mentioned earlier that actors often develop a bad habit of attacking too high and too low on attacks to the body. This tendency is often dramatically exacerbated by defenses that either reach down or up in order to make the block. It becomes a vicious cycle: the attack goes a little high, the defense reaches up for it, so the next attack goes a little higher, the next defense goes a little higher. And of course the same happen with the low attacks. Pretty soon you have all of the high line body attacks going to the forehead, and the low line body attacks aiming towards the knees. I wish I were exaggerating here but that is the literal truth.

            As the hand moves across the body to make the parry, it is critical that the hand stay in one line parallel to the floor and reaches neither down nor up to meet the incoming attack. This must begin from the very first rehearsal or the habit becomes nearly impossible to break. When the attacks drift too far from the defending hand, don’t chase after it, but remind the attacker to cut or thrust back to the actual target.

            While the attacker looks at the target, the defender’s eyes should stay glued to the incoming tip, as this helps the audience follow the flow of the action. When contact is made, it must always be with the forte (the area of the blade close to hilt) of the defender against the foible (the area near the tip) of the attacker.

            The timing of the defense should be different from the attack so as to increase the dramatic tension of the fight. An all too common outcome of rehearsing the fight is that the attack and defense happen simultaneously, but this looks like “ESP” fighting. [“How did the defender know exactly where the attack was going to go?”]. Instead, let the attack be 90% developed before allowing the defense to even begin, then quickly bring the sword in for the block at the very last possible second. During rehearsals, this is also a great way for the partners to help with targeting, for as the attack is just about to finish, the defender should not begin his block if the tip has drifted too high or too low. Instead, he just grabs the tip, places it where it should be, and then begins his defense.

                                                *           *           *           *           *

            Here’s the part I hate: the French fencing numbering terminology of the parries. You may need to know it because it is so often used, but it doesn’t help you become a better combatant. These terms refer only to the defense, not the attack, and are hand specific, so if I attack you to your left shoulder and you block with your sword hand palm up it is called parry quarte, but if you use your dagger hand it is parry quinte. Unless, of course, you are left handed, in which case they are both reversed.

            Way too much time is spent trying to teach the fighters the names of the moves when they should really be rehearsing the moves. After all, in an entire acting career a performer may be involved in only one or two sword fights. If an attack is coming to a certain target, you need to know how to respond to that attack, and learning the fancy French terms won’t help you memorize it any faster. And yet, we’re stuck with it, so for what it’s worth, here goes:

            First the concept of inside, outside, high and low. There are entire glossaries out on the internet right now that get this wrong, which really makes it confusing, so we need to get this clear. Outside means a movement which brings the attacking tip to the side of the body near the sword arm of the defender. Inside means a movement which brings the attacking tip to the side of the body away from the sword arm of the defender. (When in doubt, just stick out your arm as if to shake someone’s hand. Your palm will be facing “inside”; the back of your hand will be facing “outside”.) So outside is generally the right-handed defender’s right side, and inside is the defender’s left [this is fencing terminology: martial arts nomenclature is exactly reversed]. High means a movement which brings the attacking tip to solar plexus height, or arm pit level, so the defending tip points up. Low means a movement which brings the attacking tip to just above hip bone height, or belly button level, so the defending tip points down. Low is at waist level, not lower than waist level. [Calling low and high hip and shoulder respectively is great shorthand, but tends to cause the actors to aim too high and too low with their attacks.]

         high outside           low outside           low inside       high inside                  head               “TV” head

            High Outside. With the hand palm up (supine, back-edge) it is called parry siste [6]. But it is sometimes called parry 5-A. With the hand palm down (prone, true-edge) it is called parry tierce [3].

            Low Outside. With the hand in supination (back-edge) it is called parry octave [8]. With the hand in pronation (true-edge) it is called parry second [2].

            Low Inside. With the hand palm down (prone, back-edge) it is called parry septime [7], but only for Olympic foil and epee fencing. With the hand palm up (supine, true-edge) it is called parry prime [1]. But in stage combat, those terms are reversed. A variation of parry [1] still leads with the knuckles but the wrist is turned around almost completely and the thumb pointing to the ground (true-edge). Meant for a very strong block, it is called the actor’s parry or better yet the “look-at-your watch” parry. 

            High Inside. With the hand palm up (true-edge) it is called parry quarte [4]. With the hand palm down (back-edge) it is considered parry quinte in epee and foil fencing, but stage combat tradition does not recognize this parry, so they do not name it.

            Blocking a Head Cut – With the elbow rising normally, it is parry quinte [5]. But it’s also sometimes called parry 6. When the elbow swung across the body before lifting the sword, it is called 5-A, or the “TV” parry, because it frames the face so nicely. True-edge is used either way.

            Why is the numbering so difficult? Because it comes from many sources, none of them specifically meant for stage combat. If you practice the first five numbered parries in order (especially starting with the actor’s parry of prime) you’ll see that they are all very strong block, all leading with the knuckles, meant for stopping strong cuts. That makes sense when swords were heavy bashing tools. The other three [6,7,8] can only be used as true parries since they use the weaker edge, the thumb side, to deflect a thrust. They developed as rapier play emphasized the easier to deflect thrust. As I mentioned before, the action called parry quinte [5] in competitive fencing is unnamed in stage combat. Interestingly, the action is actually used quite a bit, but there you are.

            I should also mention something about the hand position. We call it prone or supine because, again, the terminology is a legacy of real fencing. When they do a parry, the blade is pointing only slightly up or down, so the hand really is either prone or supine, that is palm down or palm up. But in stage combat we try to pull the tip either straight up or straight down, so really the hand should be described as either palm towards the opponent or towards yourself. But there you are – another legacy that adds confusion rather than clarity.

            There is real value in knowing when to use tierce instead of siste, or second instead of octave, but the benefit is in the movement, not the naming. A combination such as 2,6,2 is faster and easier on the wrist than 8,6,8, even though both sets of moves protect against the same combination attack. Choreographers will work out those details when designing the fight, so the value is huge for them, but I just hate seeing actors trying to rehearse a fight and calling out to each other the order of the parries. Inevitably it ends up confusing to both.

            “8, 3, 5, 7, 6, 1, 3, 6, 4, 3…”

            “Wait, I thought it was 7, 6, 5, 3 …”

            “From the 1 or from the tierce?”

            “Is tierce 3? Which one? The first 3 or the second 3?”

            “The 3 after the 1”

            “That’s an 8 before the 3…”

            There is a better way, and we’ll get to that a little later in this chapter.

                        Moving

            It seems obvious to say that you can’t have two actors simply stand and trade blows for a while and call it a fight scene. The intent of the character is more apparent when the body moves across the stage, but what is easily forgotten is that the legs don’t have to mimic what the arms are doing. Just because the sword is blocking doesn’t mean that the legs can’t be stepping forward. Likewise, attacking with the sword can occur while the character is stepping backwards. Feel free to move sideways as well, for it is far more natural and interesting to have the actors not rigidly maintain a profile view during the entire fight. It’s fun on some of the finesse fights to include a phrase where one combatant is full-back to the house so that the audience gets to see what its like to have someone directly attacking them.

            When stepping, keep that nice wide stance for a solid base. And unless you are replicating a modern fencing style, be sure to keep your hips and shoulders square to your partner. This will open up the body for left and right hand techniques as well as make evasions and sidesteps more stable. It may help to think of both actors’ feet on railroad tracks as they fight so that the feet don’t go linear.

            Two basic types of stepping are described for swordwork. When the combatant simply moves one foot in front of the other, it is called a passing step, and the movement itself is directionally referred to as passing forward or passing back. Taking one passing step means that whatever is considered the “lead foot” will of course change with each step. This is also known as “walking”. (I realize that seems absurdly basic, and yet it’s good to have everyone start on the same page. Also note that the lead foot always points directly at the opponent, while the rear foot is allowed to turn out slightly if needs be.)

            The more “fencing” style of movement has the lead foot stepping forward and then the rear foot catching up, called an advance. A retreat is the opposite, with the rear foot first stepping back and then the lead foot catching up. Advancing and retreating move the body a shorter distance than will a passing step, but the lead foot is maintained and overall it is a more stable and balanced movement. 

            Remember that no matter which stepping style is used, we naturally walk backwards using shorter steps than when we walk forward. So exaggerate your retreating steps, really reach with your feet, or you will soon have your partner on top of you. Don’t lead with your head when stepping forward, but let the hips initiate the movement even as you push off with the balls of your feet. It’s the torso that moves in and out of the fight, the legs merely catch up and keep the hips underneath your center. The same applies when moving back, but actors often translate that into sticking the buttocks back in the direction of the step. Tuck your hips forward and keep the torso straight when stepping backward or you’ll get that horrible and all-to-common look that stage fighters get. Oh, you’ve seen it. When they start going backwards it looks as though a rope has been attached to their butt and they are being pulled off stage. Very undignified. Not only does this throw them off balance, but it sticks the head closer to the opponent’s sword. The same feeling of pushing the hips forward is used even in a backwards step. How do you do that? By squeezing the buttocks.

            In general we try to keep the feet from crossing each other when moving sideways, for as the feet cross we are unstable and likely to fall. Crossing steps also make us more vulnerable to attack without providing any advantage. An exception is when trying to quickly get around an opponent’s dominant side so as to thrust into the side of the opponent behind their arm (known as the punto reverso). For almost all the rest of stage combat, we move to the side by letting that nearest foot move first and then bringing the trailing foot to close the gap. Crossing steps are commonly seen in the fencing manuals of early rapier play, especially in the mid 1500’s, but seem to have died out in popularity as the century wore on.

                        Balestra

            This is a very quick leap forward that dramatically closes distance. It is not a jump, but a hop executed from the back foot. In order to generate enough momentum to shoot the body forward, the lead foot kicks forward and the back foot slides very close to the ground. (The common instruction is to pretend that there is a coin under the ball of your lead foot and you need to scoot it across the room.) A reasonable balestra should move the body forward by a good four feet. As a hop, you must land on both feet, but in this case with the weight remaining on the back foot. The balestra can be performed with or without a corresponding thrust.

            The balestra is often followed by a lunge, so often so that many choreographers believe that the term balestra always includes the leap and the lunge. Not so. The balestra does set up the lunge nicely, but they are two separate actions, and one can be performed without the other.

                        Slashing

            For our purposes, a slash is a cutting motion that goes past the intended target without being stopped by a block (or a body). This is different than a cut. Cuts are blocked before the weapon can cross in front of your partner. Slashes move from one side to the other. I should point out that one of the founders of the SAFD (Society of American Fight Directors) detested using different terms, insisting that a cut is a cut, so the society still identifies slashes as cuts. But to be honest the techniques for the cut and slash are completely different for both attacker and defender, so using the same term is not only unnecessarily confusing to the actors, but also just flat out wrong.

            With only a couple of exceptions, every slash in stage combat is accompanied by an evasion, which we’ll get to below, and because of that, slashes are more dangerous than cuts. As already mentioned in an earlier section, in our version of a correctly performed cut, the defender is never in danger of getting hit even if the defender should forget to block. The slash is dicier, for without an evasion, the defender could get seriously hurt. So we need to change the mechanics of this simulation to add several safety valves.

            There are three basic slashes – head [horizontal], diagonal, and stomach.

•              Head Slash – This is a big sweep from side to side meant to look as though it could decapitate. Start by pulling the sword hand all the way back to your own neck level with the sword tip pointing behind you. Focus on your partner’s forehead because that is the level that the blade tip is going to travel. Point your elbow there. Now wait. At some point your partner’s eyes will widen, and the knees will bend as the body begins its drop. Then, and only then, you can begin your slash. The blade must travel on a flat plane parallel to the ground from beginning to end.

            Never let your partner make you begin your slash before he has started his drop. Idiot actors want to do that, but it is foolish and unnecessary. And don’t misunderstand: I don’t want the audience to notice that little timing shift. If you rehearse it enough it will be a very subtle sign just between the two of you, and no outside observer will notice any break in the timing. But it is vital that you establish this critical safety check.

            Your aim is that point in space where your partner’s forehead was – not where it is now and certainly never the throat.

            If the actors are parallel to the proscenium, the blade should pass over the defender’s body, for if the blade is in front of the defender there was no reason to duck, was there. But if they are staggered a bit, the attacker can keep the wrist bent during the slash so that the blade never gets any closer to the defender than about a foot away. In that situation we can keep the blade further from the defender by taking advantage of the audience’s lack of depth perception.

•              Stomach Slash – For the attacker this is just like the head slash, except you have a different set-up and cue. Start with your sword at your own belly level with the blade tip pointing behind you. Stare at your partner’s belly, point your elbow there, and wait. Your cue to begin the slash is when your partner raises his arms and sucks in his stomach.

            This is one that requires the slasher to keep his wrist bent for safety. That way the tip will trail the hand and is kept away from the victim. The aggressor can always lengthen the arm and straighten the wrist after the blade has past his partner, and still be able to get a good “swish” sound.

•              Diagonal Slash – This looks really cool, and is much more believable than the other slashes. The look is that of trying to chop off someone’s head or limb with a powerful sweep from either high-to-low or low-to-high from one side to the other. Because it moves diagonally it is harder for the audience to discern how close the blade was to the opponent.

           Aggressor creates the picture … the victim begins to react … aggressor begins the action … and both complete the illusion.

            It’s also a bit harder to give a clear set-up for the diagonal going from low to high. Usually the hand is held low near the hip with the tip almost toughing the ground. Some body English is needed here – a look of starting a baseball pitcher’s wind-up – or either rising up while straightening the knees for high-to-low or bending the knees even more for a low-to-high can help. Wait for your partner to begin the lean to step to the side, and then begin your slash. The focus, as with the head slash, is a point just outside where his head was, not exactly where he was, and certainly not where he’s going.

•              Slashing to the feet – leaping over the blade. This is just like the stomach slash, but done much closer and really extending the blade during the sweep. The look of it is improved if the attacker’s body can already be fairly low and he really is reaching with full extension. But, no matter what, this bit usually looks dorky. So unless your partner is Gene Kelly and can clear his feet to a height of forty inches with a barely visible prep, don’t bother with this move. [I once was fight director for a production of The Three Musketeers in which our D’artagnon was able to do a standing one-legged back flip. For him, I added the slash to the feet.]

                        Evasions

            One way of not getting killed in a sword fight is to not be there when the sword comes at you. Evasions are only limited by the imagination, but the timing will always be the same. Recognition, reaction, action. See the threat, respond to the threat, and then the threat becomes an attack. If you don’t allow the audience to read the fear in your face before you make your evasion, they get cheated out of being able to enjoy the moment. But you will have to move when your partner preps – don’t wait for the actual attack. This of course is the opposite of what you would do in a real sword fight, but it will also insure that you won’t get hit on stage. Don’t get me wrong. I’m not asking that the aggressor come to a full stop and then wait for the victim to make his move. That just looks silly. “Now, this overdone, or come tardy off … cannot but make the judicious grieve”. Lets take a look at a few possible evasions, all the while repeating the mantra – recognition, reaction, action (images are on the previous page):

•              Ducking a head slash – Actors always want to do this one, but too many times you’ll hear the victim tell the aggressor to “go ahead and swing; I’ll duck in time”. Very dramatic, but very dumb. Instead, the aggressor preps by pulling the sword back to his own shoulder level and waits. Once the victim begins to squat down, only then does the aggressor begin the slash. The slash should be aimed at that spot in space where the forehead was before the victim began the drop. You think it looks hokey? Too bad; it’s safer.

•              Evading a stomach slash – Just as with the head slash, the aggressor preps first and then waits for the victim to begin the move back before beginning the slash. The victim should “suck-in” his stomach to help the illusion, and it can be exaggerated by letting the arm reach out towards the opponent, but make sure that you aren’t throwing your arms into the path of the blade.

•              Diagonal evasions – Just as with the stomach slash, the aggressor preps first and then waits for the victim to begin the move back before beginning the slash. The evasion is really just stepping sideways away from the course of the blade, but it can look a lot more stylish and dramatic by having the defender’s body match the line of the attack. The evasion is either to the left or to right, depending on the direction of the slash. Let’s say the attacker is swinging from his high right to low left. From the defender’s point of view, this is coming from high left to low right, so at the attacker’s prep the defender steps deeply to the left, keeping the right foot planted. The entire body from right heel to the top of the head should have the same line that the attacking blade will mark in space about 12 inches away. (Again, look at the pictures on the previous page.)

            The diagonal evasion of an attack coming from high to low can also be augmented with a hanging parry, one in which the hilt is held higher than the tip. In addition to the step to the side, the defender lifts up the sword as though blocking a vertical head cut. The attacker’s blade will skip off the sword when the slash is performed. Since the defender has stepped to the side, the contact point on his blade will be on the mid to weak section rather than at the forte, so it makes sense that the blade will yield a bit, and end up matching the angle of the attacking follow-through. Naturally, you will need to have the sword tip pointing away from where the attack began. So if the slash is coming from your high right, you start with the hilt up to the right. If it comes from the high left, then your hilt goes up to left. Either way, you want the audience to see a head block that is parallel to the ground until contact is made, then allow the tip to dip to match the line of the attack.

            For slashes coming low to high, the defender can use the sword in much the same manner, but of course the hilt is held low with the tip going straight up. Again, after contact is made he’ll want to angle the blade to match the angle of the attack, but careful not to have him hit himself in the face (it happens).

•              Limb avoidance – of course, it means pulling a hand or foot quickly out of the way in response to a corresponding attack. As with the other avoidances, it is simply a matter of recognition, reaction, action. The tough part is in giving a good motivation for the attack that the audience can appreciate. Just going for the limb is going to seem either sloppy or cliché unless we can recognize that either the limb was close but the rest of the body wasn’t (so a target of opportunity) or that the attack to the limb is being used to distract the opponent (setting up another attack opportunity).

•              Passata Soto: One way to avoid a thrust is to duck underneath it. An elegant way of doing that is to drop into a deep reverse lunge (shooting one leg straight back while squatting deeply with the other). Think of it as a deep lunge that goes straight down to the floor rather than forward. The passata soto is performed so deeply, that the chest will press below the level of the forward knee and usually the left palm has to press on the ground for balance.

•              Volte: A method of pivoting the body, removing it from the line of attack by shooting the rear foot behind the other and then straight out to the front, so that the trunk is violently turned 180 degrees to the line of attack. Since the pivoting foot stays where it is, the body has shifted over the width of one stance during the spin. Also called the “bum in the face” move, it is sometimes combined with the passata soto technique of dropping down so low that the left hand touches the ground for support.

•              Demi-volte – You can probably guess this one already. A far easier method of removing the body from the line of attack by swinging the rear foot behind and straight out to the opposite side, so that the trunk is turned 90 degrees to the line of attack. A lunge is not necessarily added to this move.

                        Combination attacks

            We have spoken so far about simple attacks and basic parries. These of course can be combined in an infinite number of ways, just as the 26 letters of the alphabet can be combined to form all of the words in the dictionary, and then those words can be combined to form sentences and paragraphs. String the paragraphs together and you have a story. Good choreography will tell an interesting story through the expression of the strategy and tactics used by both combatants. This story is told through the expressive use of combination attacks. Settling for less than that is simply bashing away until someone loses.

             When the same fighter performs two or more consecutive attacks, that is a combination. The idea is that perhaps only the last attack was the real intention; the others were feints or attempts to open up a poorly defended part of the opponent’s body or simply taking advantage of a sudden opening. One form of a combination attack is a compound attack. A compound attack is an even more skilled combination, where the blade may attack more than one target but the arm has made only one thrusting motion forward. Compound attacks are fencing techniques, always done with a straight elbow, and should be learned under the guidance of an on-site instructor. These are wonderful finesse moves, but if learned incorrectly will look very sloppy. I’m going to go ahead and describe the four safest ones here if only because they are so often used onstage. You should have at least a passing familiarity with them before the fight director arrives. The fancier versions must only be practiced under direct supervision or they will detract from the show.

¨             same-side shifting-heights – let’s try thrusting to high right (that’s your own right side; your partner’s left). Since your partner has responded by blocking with the tip up, he’s left the lower part of the body open, so a follow-up would be to pull your arm back and then thrust low. That’s a fine combination, but we’re going to turn it into a compound attack by not pulling the arm back.

            If you are a right-handed actor, perform that high right thrust with the palm down (prone). At the moment your attack is parried, keep your arm perfectly straight and roll your arm from the shoulder until the palm is up (supine). Your blade tip will almost magically spin around and end up directly underneath your partner’s hand. Wait for the parry low, then roll your arm again so your palm turns down (prone) and your blade tip is now attacking the high line again. There you are: a triple compound attack high-low-high, with only one thrust but the hand turning prone-supine-prone. The defender is going to have to move awfully fast to pick-off all three threats.

            Now try the other side of the body (your left, your partner’s right). You also want to try a compound high-low-high attack, but now you will thrust with the hand supine, then turn it prone, then supine again. We’ve arbitrarily stopped at three, but it could continue on as long as you wish. And if you wanted to start with the low attack on the left, then you would simply start with the hand prone, etc. No matter what, these same-side compound attacks work because the arm is kept straight and the forearm rotates to automatically change the attack targets for the blade tip.

¨             degagé [Fr. = disengage]          This one goes from high line to opposite high line. Let’s try that thrust again to the high right, and this time the hand is going to stay supine. As the defender starts to make contact, relax the grip. As the tip of the sword dips slightly, going under the defender’s hand, draw your arm slightly across to the left. Then re-grasp the sword with strength and the tip will pop back up to the high target level. The arm stays straight throughout, merely moving straight across from side to side. Only the wrist will move slightly to help guide the tip around. The degagé only works when the parries have the tip pointing up.

¨             coupé   [Fr. = cut]          Also called the cutover, for this is similar to the degagé except that the tip goes over the defender’s hand rather than under. How? With a tiny wrist flick, a little salute, a lifting up of the fingers just as the parry connects. This one works whether the parries are high or low, but of course if the parries are high the cutover must be more exaggerated so as to clear the defender’s blade. Again, the arm stays straight on this, merely moving straight across from side to side.

¨             doublé [Fr. = doubled] This compound attack always goes right back to the same target, merely by making a small circle around the defender’s hand as he attempts to make the parry. (For some inexplicable reason, the Society of American Fight Directors only considers it a doublé if two circles are made. They are alone in this.)

            The obvious defense is to chase that sword around in a full circle, in what’s known as the counterparry, circular parry or universal parry.

                        Combination Defenses

            I mentioned earlier that when doing combination attacks, one doesn’t need to bring the sword back to the en guard position between each move. The same holds true for defenses. Obviously, if someone is attacking you four times in a row, you’re not going to waste time moving your hand back to en guard in between each move. I also said that even as an attack develops, you want to hold your last position until the very last possible second. You must wait until the attack is 90% developed, and then make a lightening fast move to pick off the incoming threat.  However …

            … when moving from one block to another you still have to make sure that the center of the body is covered before you land at the next position or you might accidentally find your block outside of the attack. Here’s an example: you are attacked with a vertical head cut followed by a thrust to your right shoulder. Naturally on the first block your arm will rise straight up, elbow pointing right. Now, for the second block, if you just drop your elbow down in an arc to the next block position, you have only a 50-50 chance of being on the correct side of the incoming blade. So what you need to do from the vertical head block is drop your hand to the center of your body first before you swing it out to the right, picking off the second attack.

            You have to carefully look to this every time you have two or more consecutive defensive moves. We’ll come back to this in a few pages, but I want you to ruminate about it first.

                        Attacks on the blade

            There are times when a fighter finds it necessary to use his own blade to move the opponent’s sword out of the way in order to expose a target for attack. They are mainly used in fights where the blades are light enough to quickly respond to wrist movements (they tend to look clunky when performed with heavy swords), and are especially used during the initial moments of a duel when the participants are testing each other. Small or large, these attacks work best when the opponent has already extended his arm on a prior attack. Just as with the unarmed fighting techniques, the opponent does the real work of moving his own blade, the attacker merely following the movement and both working together to sell the illusion.

            Attacks on the blade should be kept to a minimum, and when used, performed with great precision, as actors tend to overdo them and ruin the believability. Some attacks on the blade are listed below, in ascending order of force required. Remember, on none of these moves should either blade tip ever cross in front of someone’s face.

            ¨         Prise de Fer: [French term meaning “taking the iron”] From a successful parry, the attacker moves the opponent’s blade to a new position while both blades maintain contact. The opponent must keep the arm and blade straight if the audience is going to have any hope of understanding what is going on. It also helps if the attacker can use the forte against the opponent’s foible. It is neither an attack nor a defense, merely a preparatory move from which one intends to initiate a successful attack. There are three kinds of prise de fer, namely;

            1             Croisé: [pronounced – k(r)wa-say’] from the French, meaning “crossed” the blade is moved from high to low or low to high, but on the same side of the body, not diagonally across like a bind. (You would think that something called a “cross” would have a cross shape, but there you are.)

            2             Bind: the blade is moved only in a half circle, ending diagonally opposite from where is started – for example high-left to low-right.

            3          Envelopment: the blade is moved in a complete circle right back to where it started. If large, the opponent’s tip is directed around the body; if small then only around the hand – never across the face. Why is this not a counterparry (or circular parry)? Because the envelopment is controlling the movement.

            ¨         Beat Attack: a sharp tap with the forte or middle part of one’s blade against the middle or weak part (foible) of the opponent’s blade – to remove a threat, open a line for attack, or to provoke a reaction.

            ¨         Glissade: also “glide”. A flowing attack on the sword that displaces the opposing blade by gently sliding down the weapon, foible to forte, pushing the sword out of the way. It can be combined with an attack if, at the same time as the glide, the tip is pointed at a thrusting target. The corresponding move to the glissade is the yield parry,  (also called the ceding or yielding parry). The glissade is normally a thrust, but can also be used as a cutting attack, the important thing being that the sword blades stay in contact during the entire move. If the glissade is supposed to be especially forceful, it is called a pressure glide.

            ¨         Throw-off. Immediately following a block, the incoming sword is pushed even further away. The throw-off is always under the control of the person whose sword is being thrown off.

            ¨         Disarm. The ultimate attack on the blade, in that it removes it from the actor’s possession. There are hundreds of variations on disarms, and some of them even have some relation to actual moves. I am only going to describe one that is both simple and believable to the audience:

            Let’s assume that Actor A has thrust to Actor B, and that the attack landed low and to the right of B. B parries with tip down and sword to the right. Actor A simply remains in place, and points his sword backward and to his left. Actor B merely follows the movement, pushing his parry in a glissade along A’s blade, his own sword moving as one unit. B’s hand can even lead a little bit. When the glissade reaches the end, A allows his sword to drop from his hand, gently landing on the ground.

            No matter what the specific disarm is, don’t violate some basic rules. 1) the person being disarmed is the person who controls the movement from start to finish. 2) Have the energy slow down. 3) Have the energy move upstage. That last thing you want is a weapon freely traveling toward the audience.

                        Pommel Attacks

            I’m a little leery of including mention of pommel attacks, but I also know that they are popular, so first let me again strongly suggest that you get someone with experience to teach these to your actors. These are attacks delivered with the pommel of a weapon, and that means that the actors are going to have to move in close to each other. So we have the danger of unarmed techniques augmented by the danger of unforgiving contact with a ball of steel. If you get hit with a blunt blade tip it can smart: if you get hit with the pommel it can knock you out.

            Because of the heightened danger, the most important aspect of a pommel attack is to make sure that every element of the simulation keeps the victim out of danger. Let’s go through the most common one, the blocked pommel attack to the face.

            Set up: both actors on the same plane and lined up parallel to the proscenium, facing each other. Since this is a blocked attack, it doesn’t matter who is on what side, left or right. The victim (let’s say) steps in to close the distance between the actors.

            Picture: The aggressor’s right hand moves up to his own right ear, allowing the sword tip to move safely behind him. The pommel is now aimed at a spot to one side or the other of the victim’s head.

            Action: The pommel is pushed in a straight line to that spot either up or downstage of the victim’s head.

            Reaction: Only the victim has a reaction here, and that is to have an open palm rise up and meet the aggressor’s hand, providing the illusion that the pommel attack was successfully blocked. Do not ever try to block the pommel itself or you risk some nasty damage to the blocking hand. To add a little more realism, slightly shift the head away from the attack at the moment of the block. In a larger house, you may need to add a body lean so that the audience can follow the action.

            From here you can probably imagine many variations, but the concept is always the same.

                        Feint Attack

            When an attack is begun but not completed, the intention being to provoke a response by the opponent, it is referred to as a feint. Most often it is an attempt to have the opponent begin to block in a certain direction, with the hope that in so doing he’ll leave a part of the body open and unprotected. During that moment an attack to that newly exposed spot might be all but impossible to defend against. Most of sport fencing has a lot of feint attacks, but it is difficult for the audience to see the difference between a feint and a simple combination attack (as it is very difficult for fencers as well). For stage we have to exaggerate the feint slightly, but by all means we need to read the expression of panic on the defender’s face when he realizes that in making a block for an attack that isn’t real he has made a grave mistake. For the same reason, use of the feint must be kept to an absolute minimum.

                        Punto Reverso

            In historical as in modern fencing, most thrusts were aimed to the center of the body. But especially in rapier fighting, since the defending hand was not held in front of the center of the body but was a little bit closer to the outside (for most people, their right side) most thrusts by default were “inside” thrusts. Thrusts to the outside were considered risky because they usually either were easily blocked or merely nicked the forearm. The Italians gave outside thrusts their own name – punto reverso – literally “reverse point”.

            Since the right side, the outside” is so well guarded, why would anyone try a punto reverso? For a clever fencer, it can be the very effective culmination of a series of thrusts or cuts that continually land to left of center. If the opponent is over-eager, after a while he may let his natural guard drift from right or even center to a ready position which is decidedly left of center. Once the opponent has been conditioned to this left-side protecting guard, the right side becomes vulnerable to a strong thrusting attack to his right. The punto reverso. As the name implies, it is always a thrust, never a cut.

            Of course, in stage combat we thrust both inside and outside with equal frequency, so punto reverso has taken on a slightly different meaning. It is still a thrust to the outside, but exaggeratedly so, so that the thrust is delivered almost sideways into the victim’s flank. Imagine a thrust aimed so that it runs through the pelvic girdle, right hip to left hip. In order to do that, the aggressor must take a deep crossing step to the left and forward with the right foot, practically a lunge. This is really an all-or-nothing move; if unsuccessful, the aggressor is left very vulnerable to counterattack.

            The defender usually blocks the attack while taking a step forward and to the left with his left foot. This will move both participants in a slight clockwise turn. If they continue, trading punto’s back and forth, they will naturally move in a large circular pattern. Again, the defense is always performed while taking a forward crossing step with the left foot. The attack is always accompanied by the right crossing step. In order to add a little finesse to the attack, it is helpful if the right foot makes a large clockwise semi-circle, almost touching the left foot half way through. Just at the instant that the right foot is near the left, the sword hand should pull tightly in to the left shoulder, with the blade almost parallel to the chest and the tip pointing to the right. The look should be something like that of a matador, with the following thrust moving left to right while the lunge drops forward and slightly to the left. To the left? Yes, or else the combatants will be too close to perform a realistic attack with the tip of the sword.

                        Stabbing/ Thrust-kills with the Sword

            Have I mentioned before that less is more? Nowhere more so than in finally finishing the fight and killing off a character. Always remember that the sword or knife is just a prop, and the audience gets its information from the actor’s eyes and body language.

            Keep it a firm rule never to have the audience see the sword go “through and through” the victim. It has been used in so many movies that it is now merely a cliché, and often provokes laughter rather than an honest gasp.

            Where a character has been wounded is shown by the reaction of the victim more than the placement of the blade. If the actor can perform a movement isolation, pushing that part of the body slightly in line with where the force supposedly penetrated, the actual sword can be safely placed upstage of the actor. The audience has no depth perception, so they’ll never know the difference.

            The simplest thrust kill effect is a perfection of the old sword under the arm bit. The aggressor should initiate a slightly angled thrust to upstage of the midsection. The hand is aimed towards the stomach, but the tip is moved to outside of the body outline. When the tip of the sword has just passed the front of the victim’s stomach, then the aggressor’s blade can strongly slap the side of the victim, then press forward with the rest of the thrust. Only two or three inches of the blade should disappear upstage of the victim. Never allow the blade tip to appear on the other side of the victim: it destroys the illusion – and gets a laugh. As long as the victim doesn’t turn in the direction of the actual blade going upstage, but stays focused and reacts to the imaginary blade hitting him dead center, the illusion will be effective. A slight contraction of the stomach muscles adds realism. When the blade is removed, the victim can perform a reverse of the prior stomach movement, as a real sword would find a good deal of resistance in both going into and coming out of the body.

            If the audience is close to or surrounding the action (and the blade is flexible enough), the victim can bend the blade with his forearms to make it appear that the blade has gone right into the center of the belly. The downstage hand reaches out towards the opponent, hiding the upstage forearm which presses against the blade. Opening the fingers (not grabbing the blade) helps sell the illusion. It is amazing how realistic this simple technique can appear.

            Other kill-thrusts involving placing the tip directly on-line with the victim must only be attempted under the direction of an extremely competent and experienced professional fight master.

                        Slicing/Cutting kills with the sword

            There are two kinds – contact and distance. Believe it or not I am actually going to suggest that you stay away from the distance kills and use the contact variety. Contact slicing is a simple matter of placing the middle of the (dull) blade along the intended body part to be cut and then pulling the sword across the body. This must not be rushed, for not only is it safer to go slow, but the audience needs a little change of timing here so they can be prepared for an important change in the storyline.

            At the end of the cutting motion, the sword is carefully placed with the flat of the blade right on the body part, preferably the stomach or a large muscle and not on a joint. Whether the sword is then pulled directly out [a side cut] or across the body [a drawing cut] the aggressor pulls the sword hand back to his own body center, removing the energy away from the victim. As always, keep the sword away from the head at all times. In fact, add in a slightly downward course for the blade instead of rising or even strictly horizontal. If anything goes wrong, the tip has a better chance of dipping towards the floor than popping up to someone’s face.

            There are times when a joint is the intended target, especially behind the knee. This bit is often used where one character has to deal with multiple attackers. A quick cut to tendons of the leg and one attacker is immobilized. Be especially careful if you do this bit that you don’t smack the joint but instead very carefully lay the blade against it without any pressure, or better yet lay the sword just above the joint. By the way, here is some information which you might find interesting but won’t be able to use. Normally, the above bit is done and the reaction of the victim is to bend the “cut” leg and kneel to the floor. This is exactly what the audience expects so you shouldn’t stray from that. It’s just that you should know that that isn’t what really happens.

            Our limbs move because of the opposing action of complementary muscles. A muscle can only contract and then relax; that means it can only pull a bone, not push it. So in the leg, for example, the quadriceps in the front of the thigh straighten the leg at the knee and the hamstring behind the thigh bends the leg at the knee. If the tendons are cut behind the knee, that muscle behind the leg contracts immediately but isn’t connected, so no bending. The quads on the front of the leg aren’t damaged, so the leg straightens and stays straight. But that looks really odd and the audience thinks that the actor got it wrong, so don’t do that reaction. (Just another example of how reality can get in the way of telling a story.)

            Cutting kills in which the actors are out of distance from each other and the sword is swung in an arc that simulates the slash must not be performed without expert supervision. It is different than the common slashing described in prior pages and very dangerous for it requires precise placement of both actors on the set. It’s great for film work, but they have the time to take a half hour to set up the shot and do several takes to get it right. They also have better liability coverage than you do.

                        Corps à Corps

            From the French, literally “body to body”. This is when the two actors close distance so that literally the bodies are practically touching, chest to chest and face to face. This is usually the moment in a movie fight where one character will say something to the other along the lines of “You’ve come to Nottingham once too often.”

            In order to keep this safe, we just have to make sure that the sword hilts are kept away from the participants faces. The easiest way of doing that is to have the weapons go hilt to hilt and keeping the arms straight, low, and off to one side. You would think that something so simple wouldn’t require actual actor instruction. You would be wrong.

                        Throwing and Catching the Sword

            Here is a safe way to toss a sword to another actor – safe so long as you practice. Grab the sword by the blade with a gloved hand and then lower your hand to your side. Point the hilt towards the floor so that the blade rests against the back of your arm. Then gently point to the spot that you want the sword to go as you relax your grip. Your gloved hand will guide the blade as it is tossed, and with just a little practice the sword will gently arc to your partner without tumbling, hilt first for an easy catch. But this is critical: toss the sword upstage of your target. That way, if you partner misses the grab and bats the sword instead, it will fly upstage rather than out into the house.

            Catching the sword should be fairly easy, so long as the sword is moving slightly upstage of where you are standing. If it starts to drift downstage, then move quickly to keep it to your upstage side. Why is this so important? Because again, more dangerous than missing the catch is to bobble the catch. If the sword drifts downstage of you and it bounces off of your catching hand, it could be accidentally swatted out into the audience. Better instead that your energy be turning towards an upstage toss when your hand makes contact with the sword.

Choosing the right swords

            Unfortunately this often comes down to a never completely resolved conflict of what the director wants vs. what the choreographer wants vs. what the actors want vs. what the props master can squeeze out of the budget.

            There is no right or wrong here; you can justify just about any blade choice so long as the hilt matches the production design and everyone is on the same page as to the requirements of the fight. The fight is the key, so ultimately the fight choreographer has to make the final call. Certain moves are mandated by the specific blade strength, so it doesn’t make sense for the director to ask for big slashing movements and still want to use a very light thin blade. The weight of the blade will determine the speed of the fight and even what moves are possible. Compromises will have to be made.

            Go back to the Weapons for Stage section and read the descriptions of the various blades that are out there for stage combat. Also keep in mind that if the actors have been trained correctly and have good control, even the lighter blades can be used to give the impression of very strong cuts. I’ve even used different blades within the same fight [The Three Musketeers is great for this] and not had any more weapon breakage than in other shows. Different blade widths and lengths can be more interesting for the choreographer and the audience. But ultimately, the blade choice will need to be made by the choreographer.

            Once the fight choreographer has picked the blades, then the director needs to choose the hilts, or at least provide enough guidance on what the look should be for the show and each character. The hilt is the look of the sword, and often a wide choice of blades can be mounted onto a staggering variety of hilt styles. The blade determines the action: the hilt determines the look.

            Now is the time for the props master to take the information provided from the director and choreographer and perhaps the costumer, look at all of the options available and the budget allowed for the show, and to narrow down the choices to something realistic for the production. All of this has to be decided well before the show goes into rehearsal; indeed, before the choreographer begins to write out the fights. Nobody needs the frustration of having to throw out prior work and start creating new choreography from scratch simply because the weapon availability changed during rehearsal.

            The last input will come from the actors. They only get to have one moment of input, and that relates to any injuries or physical limitations they have that would preclude the use of certain moves, and by extension, certain weapons. That’s it. They are not allowed to complain about a hilt being ugly or a sword being too long. Their job is to deal with it.

            Ok, ok, maybe I was being too harsh there. Actors should always be allowed the opportunity at any point in the rehearsal process or even during the performance schedule to bring notice concerning a valid safety concern, and that includes their opinion on their props, their partner, their choreographer, or even their director. After all, it is usually an actor who will first notice a small problem on its way to becoming a major issue. But I must say that nine times out of ten an actor will complain about a prop for the same reason he complains about some aspect of his costume – he isn’t used to it, and is too lazy to try to work with the object first. Far easier to have it changed rather than do his job as an actor.

            As long as we mentioned blade lengths, let’s not get too hung up on precise equality for every combatant. It certainly didn’t happen in Shakespeare’s time, and it provides very little benefit on stage. Many will insist that equal blades mean better control of distance between the actors as they move across the stage, therefore insures a safer fight, but that can only be true if the fighters happen to have the same arm, leg, and torso length. (I actually would like to see shorter actors have the benefit of using a longer blade, but the look is comical so will never happen.)

“How heavy is that sword?”

Perhaps the most common question I used to get, week in and week out. And I usually answered with the weight of the sword, all the while having a nagging feeling that that information isn’t really what the client needs. What the client is asking is actually how heavy does the sword feel, and for that I have three answers.

Weight measures the mass of the object. Put a hammer on a scale and you know the weight. Hold the hammer by the head and you can confirm that.

But when you hold the hammer by the handle, all of a sudden it seems a lot heavier, and after a while your hand will feel the strain. That’s because holding a hammer by the handle requires more effort to keep it from falling to the ground compared to holding it from the head.

A scale will give you the weight of the sword, to be sure. Let’s say it’s a Veneto, one of our lighter swords, outfitted with an epee blade and a cap-nut on the end – no pommel. The total weight of the sword is only 13 ounces.

But the balance point of any sword is not right in your hand. It’s a few inches down on the blade. When you hold a sword, the blade wants to dip toward the floor. Your hand has to grasp the sword a little bit tighter in order for the sword not to fall. Not as much as a hammer, but more so than if you were holding a 13 ounce ball. This apparent weight is described as effort, and for this particular sword the effort is a little over two pounds, 2.2 lbs to be exact.

Sometimes, on that same Veneto, I’ll put a 4 ounce pommel instead of a cap-nut. Total weight of the sword is now 17 ounces. But the balance point has shifted closer to the hand, so the effort in holding the sword is now 1.7 lbs. I’ve increased the weight, but decreased the effort. The sword is 4 ounces heavier, but feels a half pound lighter!

The balance point of any sword is affected by many things: the weight of the pommel, the length of the grip, the shape of the guard, etc. For example, we build two styles of swept hilt rapiers. The Gossamer Swept and the Standard Swept are made of identical components and weigh exactly the same on the scale. But the particular sweep of the steel forming the hand guard shifts the balance point on the swords. So even with the same pommel and same handle length, the Standard Swept requires an effort of 6 lbs, but the Gossamer Swept only 4 ½ lbs.

Let’s go to the other end of the spectrum. The biggest sword I ever had was a five foot Bannockburn. It weighed 6 ½ lbs [ I know. You thought it was going to be a lot more, didn’t you? ] The balance on this behemoth was pretty good, but the effort to hold it was still a bit over 29 lbs. Seems heavy, but consider this: I also used to have short steel maces, less than two feet long and weighed only 2 ½ lbs. But the balance point on a mace is so far away from the hand that the effort on it was almost 33 lbs!

So far we have only been talking about the sword as a static object. But swords are swung, and when they are we compound the weight by adding speed. The faster it moves, the more difficult to stop. And whatever momentum isn’t removed by the actor doing the swinging, his partner will have to do by blocking. The amount of energy that has to be stopped by the partner’s block is force. *

I am sorry to say that in the vast majority of theatres and schools, actors are allowed to use (or, worse, are actually taught) cutting motions with incorrect technique. Swings are coming in way too hot, and their partners are forced to make their blocks in order to stop the incoming swords. I have described earlier on how to cut correctly. It is prudent to take a look at that, and to include daily exercises so that cutting motions are always performed under control. Why? Because I’m not talking about stopping three or four pounds of steel from striking an actor’s arm. When we combine velocity to mass, we get force, and the numbers are shocking.

weaponbladeweighteffortforceforceforce
[in pounds][bad form][good technique][good technique
& good targeting]
Venetodemi-epee0.82.24,866410
Gossamerepee2.74.55,702250
Bannockburnzweihander6.529.37,425670
Combat mace2.532.55,6253660

I want you to read that chart again, because those numbers are not typo’s. When someone grabs even the lightest sword and swings away, it can generate an impact force of thousands of pounds at the impact site. The light epee blade can’t withstand anywhere near that force: it will bend and shatter at half that theoretical maximum. So it might break skin but probably won’t break anyone’s bones. The heavier, stiffer blades are not nearly so self-sacrificing. A rapier can crack a rib: a broadsword can snap a leg like a twig.

Look how the numbers drop when correct technique is used. And if you add correct target placement, that number can drop to nearly zero.

* [Yes, yes, and yes, to all of you who have studied Newtonian physics. I’m taking great liberties here with terms, and decided to call the collision force, or more properly the reduction of momentum by the colloquial “force”. I’m happy that you are aware of the difference, but I didn’t want everyone else to get stuck in the weeds on this. So, yes, of course, I’m doing a disservice to precision in science. But I’m trying to get everyone to stop bashing their weapons!

                        How to memorize and rehearse a sword fight.

            Here is a repeat of other exercises mentioned earlier, but they are invaluable so I can’t stress them enough:

•              Find the Intentions. Usually a fight is composed of small groupings of a handful of moves, called a “phrase”, each expressing a certain plan that the fighter had in order to make a successful attack. If it’s not obvious from the choreography, make it up. It’s much easier to remember a connected series of 8 clear emotional impulses than 153 random individual attacks and parries.

•              Progressing in Reverse. I have my actors memorize their lines this way too. Start with the last phrase, practicing it until comfortable and memorized. Then add the next-to-last phrase, working it carefully, but always adding the other, already memorized phrase. Then tack on the third-to-the-last phrase, and so on until you have the fight down. So in a fight that has, let’s say, 15 phrases, you will have worked number 15, then 14-15, then 13-14-15, then 12-13-14-15, and on and on until the fight is polished. Why this way? The part that they have practiced most will be to them the easiest, and after a while the fight will seem as effortless as rolling down a hill.

•              No Weapons/Finger Fight. No kidding, the best way to perfect a sword fight is to leave the swords in the props cabinet several times. The actors stand much closer than normal and go through the entire fight using just the hands. Fingers should actually reach out and try to touch the intended target [hip, shoulder, head] and the defensive hand merely makes contact with the incoming fingers. Don’t let them be sloppy on this. Attacks must be focused to the exact square inch, and defenders are not allowed to push the attacks away unless it is part of the choreography. Since the focus is on the finger tips, the intention of attack and defense becomes much clearer and the techniques improve dramatically. This is the best single way to take someone from novice to expert. Have the actors do this at least once a week and all of the attacks and defenses will stay sharp.

•              Sit-Down – This is also a perfect way to rehearse when swords aren’t available or when space and time are limited. The hand-work of a sword fight must become second nature to the performers, for it is simply not permissible to have the actors struggle to remember their next moves. It is the above No Weapons rehearsal, but without using the footwork, and done as quickly as humanly possible. After a while the actors will feel the flow of the pattern, rather than beat out each move like a metronome. The two combatants can always steal 30 seconds here or there, grab two chairs and sit facing each other, and “speed-through” the fight the same way we often do “speed-throughs” for our lines.

•              Look, Ma’, No Hands – Here is the flip side of the Finger Fight. Go through the fight using all of the footwork but with the arms doing nothing. They can keep them dangling at their side, or crossed in front of their chests, or clasped behind their backs, whatever, because for this exercise they are useless appendages. Let them call out the attacks so both know where they are in the fight, but the focus here is showing attack and response with the eyes, torso and hips. They must keep distance, but also “push” their opponent using the force of their intention. This should be done on the actual set if at all possible.

•              Dropped Parries – This is scary but an excellent way to improve arm control and mental discipline. Go through the fight as normal, with weapons, but one actor [without warning and in no discernible pattern] simply does not make the appropriate defensive move. If the attacker doesn’t have excellent control, the partner gets hit. This exercise is good to use when you see that the actors are getting too aggressive with their moves, or if they start breaking blades..

•              Unfair Fight – One actor has his sword, the other actor is unarmed. Go through the entire fight at 3/4 speed, with the unarmed actor blocking and attacking with forearms and hands. This will show them (and you) if they were striking the blades too heavily.

•              Water Bottle – Without question the best way to develop controlled cuts that look real. Get a plastic bottle (water, juice, milk) fill it with water and put it on a stool. Have the actors practice full speed horizontal cuts both right and left. Remind them to snap the cuts (like snapping a towel) with a fully extended arm. The game is to see how fast they can snap the cut and still touch the bottle – without knocking it off the stool. When that gets easy, have them try it with an empty plastic bottle.

•              Slide & Steal – Not an all-around exercise for an entire fight, but it helps when working on sharing the energy of the fight using the blades, especially with the lighter rapier swords. The actors should imagine that there is a fiery ball of energy that is generated by the character’s intent, which flows down the attacking arm and continues to move down the blade. With each attack, the defender’s sword meets the incoming blade at the foible as normal. Then the defender takes that aggressive intent, “catching the fire” with his blocking sword. The defender slides his own forte along the aggressor’s blade until it slips off of the tip, as if “stealing” the incoming energy. The defender slides the sword towards his own body, so no pushing away of the opponent’s blade is allowed. This drill also helps establish correct distancing, as it is harder to do the slide if the attacker is allowed to stand too close. As you slip off the tip, you must still have your hand slightly in front of you (except after blocking a vertical head attack).

•              Rope Fight – This is a good exercise (along with Slide & Steal) to use when one of the actors starts “pushing” his defenses, extending the arm toward the attacker or way off to the side as he is blocking. Correcting this has to be done at the earliest fight rehearsals before it becomes an unbreakable habit. Have the actors put aside the weapons and give them a three foot length of rope. Each actor holds onto one end, and then they run the entire fight. The only rule is that the rope has to be taut at the end of each move. Of course, the only way to do that is to pull the defending arm back towards the defender. After just a few runs, the “pushing” blocks disappear. Remind the actors as the defender should let the rope go slack during the beginning of each corresponding attack, even let the center touch the ground, so long as it is tight at the completion of the block.

•              Chase ‘em Down – There are times when the fight seems memorized and understood, but has no heart, no passion. Often this is because one actor feels disconnected to the idea of sword fighting. Find an open area without any obstacles [I like a good-sized grassy field at least three times the size of the performance stage] and let the actors reach for the other during the attacks – not just with the sword, but with the entire body. For each defense, have them run backward to get away. Except in making sure that the sword tips are safely kept away from each other, don’t worry at all about correcting technique here. Encourage them to take huge leaps or even four or five steps for every attack, with the feeling of blasting their opponent across the field and then running like hell backwards in order to avoid getting hit.  This is an aerobic workout that is also a lot of fun.

                True Stage Weapon Story:  I once had the joy of playing Macbeth as well as choreographing the fights. For the fight against Young Siward, he had a two-handed broadsword and I used a two-handed axe. Young Siward was played by Johnny Moreno, an accomplished actor and fighter who was my fight captain for this show. He rehearsed all of the other fighters (it was a very physical show) and had even memorized all of the fights. When he and I fought, it was my time to relax, for I had absolute trust in him as a performer and as a combatant. Our fight had a nice sequence of moves which ended with my swinging the axe to his downstage side, which he would block and then bind overhead into a sweet disarm, pulling the axe out of my hands and sending it deep upstage. Then just as he delivers what he thinks is going to be a killing thrust, Macbeth simultaneously deflects the blade with his arms, grabs the sword, does a 180º spin, and reverse-thrusts to kill Young Siward. Extremely cool.

            Well, in one performance, Johnny came rushing out to the stage and as he was about to start his first move, his eyes went wide and he slightly but vigorously shook his head as his body stayed still. I knew what it meant instantly – he had forgotten how the fight started. This is perfectly normal and can happen to any actor at any time, no different than going up on your lines. Instead of trying to fake the choreography, I figured that we should just dump the full fight that night and go right to the final sequence. I jumped towards him and got into a corps-a-corps and hissed into his ear “disarm”, then jumped back. His eyes stayed wide; he didn’t understand. So I jumped in again into a corps-a-corps and hissed once more into his ear “disarm”, then jumped back. Then it clicked. The relief washed over his face as he relaxed and slightly smiled. I stepped in and delivered the downstage swing, which he parried and then bound overhead to upstage. I let go of my axe to see it go safely deep upstage … along with his sword. He had disarmed himself! The look of panic was now on both of our faces as we stood downstage facing each other without any weapons in our hands. Having not planned for a double disarm and knowing that Young Siward had to die, I ran up to him and did a stomach punch simulation. He instantly dropped to the ground as I ran upstage, grabbed his sword, ran back down, hurriedly stabbed a few times at the floor upstage of his prone body, and then ran back upstage to get my axe as I made my exit.

            I mention this as a reminder that even the finest actors will find that strange things occur sometimes. The brain is a funny instrument, and it just happens that on certain nights the moves or the lines are simply not there for a moment. There has never been a show in which at least one actor didn’t go up on his lines, even if only for a second, and the audience never noticed. In the same way, there has never been a stage fight in which at least one combatant didn’t forget at least one of his moves for at least one performance. The important thing to remember is that the audience will never notice – unless you go out of your way to show them that you messed up. Did your attack go to the wrong target? The audience will just assume that it was part of the fight.  As long as no one got hurt, who cares? You’ll fix it tomorrow.

            The other lesson from the story is that neither of us panicked and tried to force something unilaterally. When Johnny knew that the fight wasn’t in his brain that night, he did the right thing, which was not to fight. But he was so well prepared as an actor and as a fighter that I knew that we could work out an unarmed simulation on the fly and that it would look good and neither of us would be in danger. This would have been unthinkable if we had not put in hundreds of hours of practice time together. I wouldn’t have attempted it with anyone else.

              In moments of stress,

we do not rise to the level of our expectations;

we drop to the level of our training.

                                Choreographic Notation

            As promised, I’m going to show you a much easier way of notating a fight than using the French parry numbers. I have seen that this is also the best way to memorize a fight. The following system isn’t mine, but I have made some modifications to it over the years. It uses numbers at their most efficient – showing the sequence of moves using regular counting numbers, because everyone knows how to count.

            This little stick figure is not poor representation of the human form but instead a way to show the division of the five common target points for attacks and defenses. This is always going to be used to diagram your view of your partner.  But the numbers are to indicate what you are going to do. Anything written in the upper V portion refers to an attack or defense for the head. Anything on either side of the center line is an attack or defense to the high line, and anything on either side of the lower box refers to moves on the low line. [Remember that high line means exactly armpit level; low line means belly button level, not an inch or two above]. The inside of the box is left for those things not part of regular swordplay, such as attack to the foot, throwing a punch, etc.  When there is a “+”, you are attacking; when there is a “-”, you are defending.

            The following is a completely arbitrary sequence of attacks and defenses:

            The numbers in this case refer only to the order of the moves. It doesn’t matter that the “3” is higher than the “1”; they both go to the same target, namely, to the left (your partner’s right shoulder).  If there is a “+” in front of the number, it means that it is an attack. If there is a “-” in front of the number, it means it is a defense. Slowly go through the motions shown in the above filled-in figure. If you still aren’t sure about the mechanics of sword work, don’t worry. If the number has a “+” just stick your arm straight out and point at the target. If it has a “-”, bend your elbow and bring your hand all the way to your own body.

            So looking at the above figure, we would describe your seven moves like this:

                                1)         attack to the left high line (your partner’s right)

                        2)         parry an attack to your right low line

                        3)         attack to the left high line (your partner’s right)

                        4)         block a vertical cut to your head

                        5)         parry an attack to your right high line

                        6)         attack to the right low line (your partner’s left)

                        7)         attack to the left low line (your partner’s right)

            Now let’s see your opponent’s view of the same fight sequence:

            As you can see, your partner’s choreography is the mirror image of yours, which makes sense because each attack will have a matching defense and one person’s left is the other person’s right. And while your parter is doing the above choreography, he sees you doing this:

            See: that’s you doing the first set of moves, but from your partner’s vantage point.

            What’s really great about this is that two actors can practice the hand movements without their partner being present, even without swords in their hands, and still memorize what is the hardest part of the fight – the sequence of attacks. I usually provide my actors with the written transcription of the fight on the first rehearsal, and even with complete novices they are able to read, understand, and replicate the entire fight within 30 minutes of instruction.

            But what about the foot movement? What about the palm being prone or supine? What about cuts vs thrusts? There are some fight directors who need to have every body movement transcribed, but the actors don’t need that. They’ll pick-up the foot movement and the fine tuning of the sword movements very quickly in the course of teaching them the choreography, just as they pick up intention and emotional response in the course of rehearsing their acting. If the actor needs a reminder here and there that a certain move must be a thrust rather than a cut, then he will make his own notation of a “t” rather than a “c” next to the number.

            When I hand out the printed choreography to the actors, I’ll usually add a written description of each move next to the diagram as a record of what the moves are supposed to be. That way if there is a question and I’m not there they can simply go to the master instruction list. But I try to keep the diagram itself as clear and simple as possible. The actors need to memorize the fight first before they can feel comfortable enough to add anything approaching finesse. From what I’ve seen, using this diagrammatic notation is the easiest way to do so.

                        Getting from Move to Move

            Let’s try an even simpler pattern and see how to link some of these attacks and defenses. There is very little absolute right and wrong in this except that we must never violate the two cardinal rules of sword play: 1) protect the center and 2) stay away from the face. Protecting the center is all about maintaining the illusion that your opponent is actually trying to kill you, so the defenses must always radiate out from the center of what is being protected. And staying away from the face is about the very real danger that these even blunted weapons can cause. The tip of the sword must never point at or cross in front of anyone’s face at any time for any reason.

                                                     Side A                                             Side B

            As you can see, we have side A  doing a series of four consecutive attacks. But right now, we’re going to focus on side B, the defenses. Let’s assume that B starts with the hand at center in a standard en guarde. The first parry is therefore going to be a very simple drift of the hand to the right and lifting the tip up. Moving to the second parry is really just a wrist movement. The hand can stay where it is as the blade makes a counterclockwise half circle in front of the body until the tip is pointing down. That half circle has to be big enough to go around the level of A’s head.

            The third parry is as simple as the first, simply moving the hand from right to left and leaving the tip pointing down. The fourth attack continues the circle, and here is where some actors get into trouble. They will often try to follow the attack in a clockwise half circle. What they don’t anticipate is that once that chase catches up with the attack, their own blade will push the attacking tip right into their own body. What went wrong? They forgot the first commandment of blocking – clear the center. To get from the third to the fourth parry, the hand stays where it is as the wrist makes the blade do a counterclockwise half circle. Again, it has to be pretty big to both cover the center and stay away from your partner’s face.

            Let’s go back to the arbitrary choreography that I laid out before.

            There is a standard back-and-forth on the first three moves, and then if you are right handed the head block on move four leaves your elbow pointing to the right. If from there you go to number 5 by just dropping your elbow, there is a good chance that the incoming thrust is going to get inside your block, putting you in real danger. Instead, from 4 your hand should drop down to the center of your torso while lifting the tip, and then move the sword to the right.

            Now, for fun, try making move number five a hanging parry, that is the hand held high but the tip pointing down. From the head block on four, you can almost leave the elbow where it is and let the blade swing down to protect the high line, and then continue nonstop to the attack on six. Which way is right? Whichever serves the storyline better.

            Looking at the complementary moves, again the first three moves are simple back-and-forth, and the attacks of four and five are likewise fairly intuitive. But the natural reaction of continuing straight down on the left side for the parry (#6) can get you into trouble if you don’t clear the center. From five you’ll need to pull the tip back and to the left, parallel to the floor, and then make the blade travel in a 270 degree clockwise circle between the two of you until it make the block on the lower left.

            To get to the last move, one of course would normally slide the hand from left to right. But what if instead, you make a full counterclockwise circle? Added to the previous move it makes for quite a flashy combination. What does it suggest to you, compared to the simpler version? Arrogance? Panic? Think of variations whenever you work through choreography and see how a slight change can affect the emotional tone of the pattern. Don’t change the moves, just the way they are presented.

Adding the Dagger

“what is his weapon?”

“Rapier and dagger.”

“Well, that’s two of his weapons, but no matter.”

      A little joke from Hamlet.

            Fighting with the dagger uses the same techniques as those for the rapier. All of the cuts, thrusts, and blocks for one can be used for the other, and with two weapons we have a few other options as well. Simultaneous attacks are possible, as well as using both weapons to block a single powerful cut, either as a parallel block [both weapons pointing either up or down] or a cross block [the weapons forming an “X” in the air and catching the incoming cut in the formed “v” shape of the crossed blades]. The sword is the historically the primary attacking weapon and the dagger is the primary blocking tool, but in a staged fight both weapons are used in both capacities for added visual excitement. For example, the sword might be used to parry an attack, but then the dagger is brought up to replace the sword, “holding” that attacking blade in place (called a transfer parry), which frees the defending sword to initiate its own attack.

            When two weapons are used, the stances of the fighters usually change. You’ll recall that in single rapier fighting the lead foot and the sword hand are on the same side, usually the right. In rapier and dagger, with the rapier held in the right hand, by standing with the left foot and left shoulder forward both weapon tips are equally distant to the opponent, and therefore equally dangerous. Which hand is held high and which is held low is up to the fighter, and would change constantly during a fight anyway in order to confuse the opponent.

            Let’s go beck to the previous fight phrase that we worked out to see a little rapier and dagger fighting. In notating the moves, we’ll add “R” and “L” to each number so as to designate which hand is to be used, right or left.

     And, of course, the opponent’s moves:    

                           Side A                                                                                           Side B

            If we try to extrapolate a little story from side A, we might say that he starts off by confidently using only his dominant weapon for the first three moves (the sword), then has to use a cross block with both weapons on move 4 in order to protect his head, immediately uses the sword to protect his right flank, and then aggressively uses the dagger to push his opponent back in move 6.

            For side B, he is playing it conservatively, rather predictably using his right hand on the right side, left hand on the left. However, he does take advantage of an apparent opening when, after the vertical head shot on 4, he goes right to a high line attack on move 5 with the same weapon, probably as a compound attack.

Just for fun, let’s try different hands doing the same sequence.

     And, for the partner:     

                                      Side A                                                                 Side B

            So the pattern of attacks and defenses hasn’t changed, but the phrase now has a very different feel. For side A, there is a strong feeling that he’s holding his sword in reserve, waiting for the right moment to strike, which he finally does in the last two moves.

            Side B has what at first seem to be ungainly combinations, but this can be used to the actor’s advantage. Taken one way, the character could be in dire straights, desperately attempting to survive the fight without being able to construct a viable strategy. On the other hand, get creative with all of these moves that make the arms cross in front of the body. They open up great opportunities for elaborate circular arm moves or even spinning the body from move to move.

                        Shortsword/Broadsword

            For our limited purposes I have made no distinction between broadsword and rapier techniques. The careful application of the same actions can be used for both weapons, and I make the assumption that the director and actors will endow the weapons with the weight and speed that would be appropriate for each weapon. Naturally, within the choreography there will be fewer thrusts and parries in a broadsword fight, mainly because the very width of the battle blades make them very ineffective thrusting tools. [To be blunt, a thick, wide blade gets held up by the victim’s bone and connective tissue.] And of course all of the fancy compound attacks are only meant for fencing weight weapons and are completely inappropriate for heavy battle weapons. But a cut is a cut, a thrust is a thrust, and the blocks are performed in the same way as the rapier.

            The shortsword fight, on the other hand, will have a very different feel to it altogether. Here we’re talking about using the swords of ancient Greece or Rome [or perhaps combatants of WWI fighting with their long bayonets?], pirate cutlasses and machetes. For all of these the blade length will be between 18 inches to 24 inches long. With such short blades, the actors are going to be right on top of each other, so it’ll look strange to have them fight in a prolonged cut and thrust of a rapier or even broadsword fight. Some major modifications have to be made in the fight.

            First, many more unarmed techniques should be included, since punches, kicks, grabs and throws will be easily possible and even obvious at such short distances. Secondly, the regular thrust coming from solar plexus level now makes no sense at all. These short blades of the bronze and early iron ages were very thick, and it is unlikely that sufficient force could be generated by a standard fencer’s thrust to do much more than knock back an opponent. Instead, it seems clear from archeological evidence that the successful thrust was performed with a straight arm, usually as an upthrust into the belly. We can approximate this by holding the sword down by our side with an arm held straight at the elbow, and then pointing the blade tip to either the left or right flank of our opponent.

            Arcing thrusts were also performed with a straight arm held high and off to the side, thrusting parallel to the ground at the flank. This simple move should be considered an advanced technique for stage combat. This move brings the arc of the weapon from outside to inside, and the attacker cannot follow the track of the tip with enough certainty to keep his partner safe. This type of move should only be performed under the direct supervision of a competent instructor.

            Machete blades make fine weapons for a theatrical fight, but they are more wobbly than standard stage combat weapons. A lighter hand during cuts is crucial, and augmenting the blocks with the second hand supporting the backedge near the foible helps considerably.

                        Military Sabre

            Whereas the civilian weapon of the 18th and nineteenth centuries was extremely light and exquisitely balanced to rest as easily as a feather in one’s hand, the military sword was heavy, brutal and cumbersome. With a heavy cutting blade and no counterbalancing pommel, the sword once in motion is very difficult to stop or re-direct. These are purely practical design elements, for the weapon is designed for use in the maelstrom of battle, where there is no stand off between two equally matched opponents in an honorable duel. The sabre is built for maximum damage on the first swing, with absolutely no thought given as to trying to use the weapon for defense.

            And yet, it was used at times for “fights of honor” between military officers. And in many Shakespeare plays that have been set in more modern periods, fighting with the military sabre is going to be the only option. But the sword simply will not handle the way that does, say, a rapier. Instead, it should be treated as a single hand broadsword, with allowances made for its special characteristics.

            First, the sword does not rest easily in the hand. With all of the weight on the blade and no counterweight, the blade pulls down strongly, requiring more hand strength throughout the fight simply to keep the weapon from dropping. So the first change will be in the en guard. Instead of a fully extended arm, the fighter will find it easier to drop the arm somewhat, letting the hand remain at about waist height. The blade tip should lift up so that it is at shoulder level. This allows the hand to rest in a natural position while keeping the entire blade length ready to defend the full torso.

            An alternate en guard is to raise the sword arm completely overhead, elbow pointed back and sword tip pointing towards the opponent. This position threatens a thrust while still providing some protection to the body by simply allowing the blade to drop down if needs be.

            Assuming that the sabres you are working with have curved blades, you’ll soon find that thrusts with the tip are somewhat impractical, as the tip will not strictly align with the path of the hand. One can still thrust, but great care must be taken to track that tip, for it can easily get away from you and pop up to a spot much higher than intended. Turning the hand slightly so that the blade comes in a flat path parallel to the floor can help, but that puts the fighter at a higher risk of having the tip arc in towards the opponent’s body or foolishly away from the opponent.

            The stance for the sabre needs to be rather wide, in an effort to stay underneath the momentum of the cut and not get thrown forward.

            Most of the defensive moves will be hard absorption blocks rather than deflections. Because of the inertia of the sword, moving the weapon for multiple blocks may prove difficult to control. Some little shortcuts may prove useful. For example, when blocking high line attacks from one side of the body to the other, you might find it easier to leave the tip of the sword hanging in space about six inches above head level on the center line, and let the hand swing back and forth. The sword will look like a giant suspended pendulum, and the hand will be able to move much more quickly than if you had to shove the whole weapon from side to side. The unfortunate trade-off is that it weakens your block. I would say to get good instruction from a choreographer who has a lot of experience working with military sabres, but there are very few out there.

                        Moulinet

            A strong cutting attack is difficult from either opening stance, so a move particularly suited for the sabre was developed, known as the moulinet (French), molinello (Italian), or windmill (English). With the sword held out in front, and gravity tugging strongly on the blade, the hand is allowed to relax its grasp for an instant. The blade tip will immediately drop toward the ground. Even as this happens the hand will begin a tight outside turn and then quickly regrasp the handle, so that the tip of the sword swings closely by the knee and then continues a grand circle past the right ear and then forward toward the opponent, building up momentum on the way. By strongly pushing the hand forward at the end of this circle, the sabre can deliver a cut as powerful as any from a broadsword, without having to pull the arm back in a big prep. No need to move the elbow. As a matter of fact, if the elbow drops during the execution of the moulinet, your really doing just a big cut and not a moulinet at all. And no matter what, the blade has to stay very close to the body and your head as it rises behind you.

            The moulinet can be delivered from the left or the right side, and choreographers love to link these in a series for some very flashy filler moves, either multiple circles staying on one side of the body or back and forth circles. I myself like adding moulinets when the character is going to fight with a sword in each hand, fighting multiple attackers. By having him do chasing moulinets or parallel moulinets, it gives the audience a chance to anticipate the fun fighting to come.

            Of course, choreographers throw in moulinets not only with sabres but more commonly with rapiers and broadswords. This has led to a minor controversy amoung fight directors. Many insist that the move is only appropriate for the sabre for it is only in the nineteenth century that it is first described. Others point out that it cannot be proved that it was not performed before that time, and that there exists at least some (extremely weak) evidence that it plausibly occurred in medieval times. I for one would like to have both sides remember that all of stage combat exists to please the audience, not to create a documentary on military practice. Do what works for the play.

Samurai-style sword fighting

            Many of the movements of swordfighting throughout history remain the same, and therefore it is no surprise that the basic cuts and blocks of stage combat broadsword work will be used for fighting with the Japanese katana. What we need to add is the ritual and sense of control that was part of samurai life.

            On the other hand, many of the techniques described below are somewhat difficult to master, and you simply might not have the rehearsal time necessary to really polish them, or even gracefully perform them by opening night. And it is certainly the case that although the style is popular, there are very few stage choreographers that have any training in it themselves. And you certainly don’t want a martial artist without stage combat experience to work out a fight for your show.

            So read the section below, but feel free to go back to regular broadsword techniques. If you can add some of the flavor of the Japanese style, great. Safety first, believability of acting second, and historical accuracy last.

                        Wearing the Sword

            Traditionally the sword is not only tucked into the obi (the wide fabric belt) but also secured with the use of the scabbard cord. That is a bit much for our purposes, so we’re just going to tuck it into the obi. Even this will require a certain protocol. Hold the scabbard in the right hand with the blade edge (outside curve) pointing forward. Make sure your right thumb clamps onto the guard to prevent the sword from falling out. With the thumb of the left hand, pull the obi slightly away from your clothing at a point just two inches left of your midline. Gracefully bring the right hand slightly up and with a clockwise swing bring the bottom of the scabbard to the opening you have made at the obi, sword edge now pointing up. Push the scabbard in about three quarters of the way with the right hand, then smoothly continue the movement with the left, remembering to cover the sword guard now with the left thumb. The fingers of the right hand can still gently touch the handle until this movement is complete, ready to draw the sword if need be. The sword guard (the tsuba) should rest directly on your midline.

            The placement of any second weapon, the shorter wakizashi or the dagger known as the tanto, was not as strictly proscribed, and could end up almost anywhere on the obi, although just as with the katana always with the cutting edge of the weapon pointing up. The singular exception is the katana-like sword known as the tachi. This was a sword worn when on horseback, so was hung edge down in a ringed scabbard, much like the western cavalry sabre. Another sword, the nodachi, was an extra long sword that was normally worn across the back. Just as with European fighters, the sword would be unslung and then unsheathed just before battle, the scabbard left behind before engaging with the enemy.

            When bowing, be sure to grasp the top of the scabbard with the left hand and hold the guard with the thumb. Nothing is more embarrassing than to have the sword slide out and hit the ground while in the middle of your bow.

                        Drawing and Sheathing the Sword

            Grab the top of the scabbard with the left hand, the left thumb gently pushing the guard up by a quarter of an inch to raise the sword a bit out of the scabbard. As you draw the sword with the right hand, push the scabbard slightly down and to the left with your left hand. This will make the sword pommel point forward. You might even add a little clockwise quarter turn of the scabbard, so that the blade moves out parallel to the floor.. In this way the energy of the draw is directed towards your opponent instead of harmlessly up and to the right. Once the sword is drawn, bring the pommel back to your center and complete the grasp with the left hand.

            In order to return the sword to the scabbard, grab the top of the scabbard with the left hand, making sure that the “eye” (top) of your fist is just a little bit higher than the rim of the scabbard. At the same time, the right hand gently swings the sword blade around in front of you and to the left until the back edge drops gracefully onto the left hand. The back edge (the unsharpened inner curve) of the blade is now pointing down and the true edge is pointing up, and the forte of the blade is touching the web of the left hand, left thumb almost touching the guard, the entire blade parallel to the floor. With the left hand gently pull up the scabbard and give it a quarter turn to the left (counter-clockwise). Push the right hand a little to the left at the same time, so that the pommel points at your opponent. The blade is now pointing behind you and to the left. Now push the right hand forward with a very slight rising motion, and the backedge of the blade will ride along the web of your left hand. As soon as the tip passes your web, the tip will drop magically into the opening of the scabbard. Immediately push the scabbard opening down with the left hand, so that you can slide the sword in with the right, still aiming the hilt at your opponent. Once the sword is in, let the left hand move the sword back to a comfortable wearing position, the fingers of the right hand still gently touching the hilt.

            As you can gather from all of this, the essential meaning behind all of these moves is that the fighter was always ready to launch an attack or respond to a threat.

                        Holding the Sword and Basic Stance

            The concept behind fighting with the katana is to take advantage of the one crucial instance where it is possible to strike before your opponent can react. In order to move from a completely motionless en guard to a lighting fast cutting attack, the body must be completely relaxed. Any muscle tension will slow down the reaction time for attack or defense. For actors to approximate this look, we must constantly work at relaxing our neck, hands and shoulders, dead giveaways to the audience of an untrained fighter.

            The sword is grasped with the right hand lightly but firmly with the fifth and fourth fingers. The middle finger should hold with less pressure. The index finger will be relatively straight, almost touching the guard. The thumb will gently curve around the grip and rest lightly on top of the third finger. This is not a tight hammer grip, but a more relaxed and slightly angled grip, so that with the last joint of the index finger touching the guard, the web of the thumb will be about an inch away from the guard. With this placement, the handle will lay diagonally across the palm of the hand. The fingers of the left hand will be much the same, and if possible riding fairly high on the handle, preferably with the pommel of the sword cradled in the heel of the left hand and the little finger. If this feels very uncomfortable, go ahead and slide the left hand down so that it rests against the right hand, European broadsword style. For some actors, I’ve suggested that in order to keep a better grip on the weapon they use a modified golfing putter’s grasp, with the left index finger interlocking with the right fifth finger. But as soon as the sword feels more natural, it is better to switch to a grasp in which there is a good two inch distance between the hands.

            The wrists, elbows, and knees should be slightly bent so as to relieve any tension. One foot (either one) will be slightly in front of the other in a natural stance, usually with the toes of the lead foot pointing directly at the opponent and the trailing foot slightly turned out, but no more than 45 degrees from center. The balance on the feet should be about a 50-50 distribution. Hold the sword so that the pommel is about six inches away from the body and the blade is pointed forward with the tip at roughly shoulder height and to either side of your partner, not directly in line. The upper body must be completely relaxed, shoulders back, and the head must seem to float on the neck, but with the chin slightly tucked in to give better peripheral vision of the opponent’s feet.

                        Moving with the sword.

            Whether standing or moving, there must always be a straight line from the top of head to the center of hips. Never lean forward from the waist, but instead initiate forward movement from the center (the “tanden”) and then let the feet catch up. This way you land at the same time that your attack arrives, and are perfectly balanced as you complete the move.

                        Attacking with the sword

            As the katana was not built as a bashing weapon, the fighting style is lighter, quicker, and more subtle than medieval broadsword work. This is a concept difficult for American actors to grasp, made even more difficult if they have watched Japanese sword movies made during the last forty years. The ”chop-saki” B grade movies have the actors flail away at each other as though they are holding aluminum bats, which in a way they were. If we are trying for a more realistic look to the fight, we’ll want to remember that the true Japanese sword had a very strong cutting edge but also a fairly brittle spine, so blocking with the sword was to be avoided if at all possible.

            The attacks themselves had to come in quickly with a minimum of preparation, so we won’t do the broadsword big prep a’ la “Casey at the Bat”, pulling the sword all the way back to the shoulder before each strike. Instead, the cut will come directly from the en guard position. The left hand begins the forward movement, pushing the hilt toward the target. At the same time, the right hand gently pulls the handle, which sharply pulls the tip of the sword back. Almost immediately, the right hand changes direction, pushing the hilt towards the target, overtaking the left hand. This second part of the movement is what quickly brings the tip of the sword to the cut position. Both arms will be almost fully extended at the end of the attack.As you can see from this head cut, the sword hilt may travel slightly back before it goes forward, but the left hand really only goes up and then presses forward.

            It is interesting to note that real fighting with the katana has many of the same elements that are found in stage combat. The samurai were taught to deliver the energy of the cut using mainly the momentum generated by the hips and torso but very little arm, shoulder, or upper body power. Never grip too tightly when attacking, and allow the hands to remain supple during the swinging movement. Only at the last second should there be a sudden tight grasping of the weapon at the very moment that the attack is blocked or we risk dropping the sword. Although both hands are involved, they each have slightly different functions. It is the left hand that actually delivers the cut, the right hand that guides the tip to the target. In order to do so, we have to allow the left hand to take up 60% of the weight of the sword, instead of a 50/50 distribution.

            For stage combat we have to add some levels of safety. In order to maintain control of the sword, and to allow our partner to easily see the incoming attack, the blade is going to move back during its preparation for attack much slower than the actual forward motion of the attack itself. So practice with the sword until you can get the left moving forward at one speed, and the right hand doing its two motions at two different speeds. Back slowly, forward faster.  At the final moment of the cut, the right hand squeezes a bit, with the thumb “pushing” slightly “into” the tsuba (the guard), giving the blade a snappy finish to its action.

            Cuts, thrusts and blocks are all performed to the same five basic target points as in broadsword or rapier stage combat. It is interesting to note that horizontal cuts to the flanks are a modern fabrication for samurai style swordplay, but they are now accepted as normal even in the most tradition-bound Japanese schools, so we can certainly feel free to add them to our choreography.] What we can also add are some of the deflections of attack which is seen in true swordwork with katana. Naturally, we don’t want to have the actors deflect and cut in one terrifying motion – far too dangerous. For the bulk of medieval broadsword work we have the actors have their blocked cuts bounce back in the reverse direction that the cut came in on. But for katana work we can angle many of the cuts so that instead of meeting the opposing blade at 90 degrees, the blade will come in at only 45 degrees, glance off, and then move safely away from his partner by the same number of degrees. The attack of course stays on the same side of the defender, but continues its path from high to low or vice versa. This will require a great deal of wrist control. These kinds of attacks are also more difficult to see for the defender, for they will look initially the same as a simple diagonal attack.

            If we want to add one more level of authenticity to the fight, we’ll have our actors turn the wrists when they block, so that they meet the incoming force with the back edge of the blade, not the true edge nor with the flat. The samurai would never choose to risk damage to the razor sharp edge by allowing another weapon to chip at it, and he would be only too aware that a strike along the flat could snap the blade in half. The back edge, on the other hand, has plenty of meat on it, and can absorb a lot of punishment. [A direct overhead vertical cut is difficult to block in this manner, but a trained samurai would find it wiser to avoid such an attack, with or without a deflection, rather than block it.]

            In seeming contradiction to the above, a katana fight should also include some simultaneous attacks, where both fighters begin to cut, only to have the weapons stop each other half way between them. Of course, this means edge to edge contact, but not because the fighter choose to use the edge.

            A move not commonly seen in broadsword fights but we can add here is a vertical slash. The attacking sword begins as would a vertical cut but the trajectory continues uninhindered until the tip points to the ground. Naturally, the defender steps slightly offline as an evasion. A nice addition is for the defender to bring his own sword into a vertical slash on top of the attacking sword.

            So that the fight does not become merely another broadsword fight, many moves that incorporate the principles of Jujitsu or Aikido can and should be added to the choreography. For example, instead of merely using a standard block against a vertical head cut, perhaps using an augmented block that slides into a press that binds the sword down to the side. From there a number of close-in techniques suggest themselves (elbow strike, thrust kick, pommel strike, pressing slash, etc).

            Modern practitioners of iaito may take me to task for ignoring the many effective deflections using the flat of the blade, especially against direct thrusts and quick head cuts. But as these require exquisite control of the weapon, and if poorly preformed can damage the sword, they are best considered advanced techniques and not appropriate for the majority of stage combatants.

                        Knife Fights

            The use of a knife in a stage fight is supposed to increase the level of suspense for the audience, but unfortunately it rarely does. I just never get the feeling that the actors portray the real feeling of lethality that a knife fight creates. Part of the problem is that knives are small so the audience doesn’t see much of a threat, so if the fight is to be interesting at all, the menace must come from the acting.

            The three scenes often seen on stage are from West Side Story, A View From the Bridge, and Rebel Without a Cause. But for a look at an exciting knife fight, take a look at the film From Here to Eternity. It’s not long, it’s not fancy, and it is filled with menace. Ernest Borgnine and five inches of steel … that’s danger.

            Here’s an exercise you might find useful. When I’m having trouble having young actors develop a sense of fear within the fight, I pass out black felt-tip markers instead of the prop knives. Sometimes it helps increase a level of real tension.

            By the way, here’s a good spot to repeat my warning on using retractable knives – DON’T. It is not possible to use a retractable knife and keep your actors safe from harm. The blades sometimes don’t retract – even on knives that are superbly built and in excellent working condition. If the blade presses even slightly against the inner shaft of the grip, the blade will not retract, and you get one actor impaled with a blunt stick. If I could I would outlaw these things.

            There are two ways of grabbing a knife or dagger. The one we see in most knife fights is the overhand grip, that is to say holding the knife as we do a screwdriver, with the blade controlled by the thumb and forefinger. This makes sense because it gives the fighter the greatest amount of distance under his control. The only drawback to this grasp is that it is a little weak at the wrist, so for an especially strong thrust the grasp may need to shift to something that looks like a hammer grip, although it gives the point a bit of an upthrust. This overhand grip is the one used by most people who consider themselves dangerous with a knife, those who expect to face their opponents. As that opponent is probably also holding a knife, the torso tends to round out somewhat so as to keep as far away from danger as possible. The legs of course will be slightly bent for better balance and ease of movement. Less obvious, but more important, is that the knife arm will be slightly bent, allowing for a quick thrust. A fearful fighter will extend his arm for maximum distance, but then he loses all credible thrusting power. The non-knife hand is actively engaged, ready to punch, grab, or block the opponent.

            The underhand grip has the blade coming out of the bottom of the fist. This grip is used by the two extremes of knife users – either the opportunistic novice or the highly trained warrior. The novice usually has grabbed the knife with the intention of raising the knife up and then bringing it down in a severe stabbing arc, almost always against an unarmed or distracted victim. As such, there is no need to worry about distance, and the body often moves in very close indeed (think of the movie “Psycho”) Invariably, the novice will grab a single-edged knife in such a way that the blade edge is pointing towards himself rather than in the direction of the victim. No reason for this: it just “looks right” to the novice.

            The highly trained fighter by contrast will grab the knife with a looser grasp, more like a reverse French foil grip, and have the edge pointing away from the forearm. This allows him to stab or thrust or cut or even let the unsharpened back edge of the blade rest against the forearm to use as a parrying surface. From this basic grasp he can shift back and forth from a tight reverse hammer grip for thrusting, to a tight reverse French grip for blocking and slashing. This is a very modern style of fighting taught first to special forces units, “commandos”, during the post Vietnam era, and has the look and feel of Chinese martial arts, but stripped down to its most utilitarian. While the novice will have the knife in the dominant hand, the warrior will hold it in the other hand, leaving the dominant free to punch or grab the opponent. This style of fighting is very advanced, and for stage must only be attempted under the direct supervision of a very experienced instructor.

            For cutting and slashing attacks, go back to the section on sword fighting, which is really much the same as knife fighting except for the distance between the actors. But because of the nature of a knife fight, there isn’t going to be the same feeling of a back-and-forth command of weapons. Indeed, trying to pick off a knife attack with another knife as one would in a sword fight strains believability to the breaking point. In a typical stage knife fight, there will be very few actual cuts and thrusts, most of the action being evasions of slashes and feint attacks, with the intent of trying to keep the opponent off-balance mentally while setting up a kill shot. Many choreographers will use the closeness of the fight to introduce unarmed techniques – strikes, kicks, and throws – to help draw out the fight and provide more storytelling opportunities. Other techniques, such as traps and binds, should not be attempted unless taught by an experienced instructor. These are advanced techniques, and not because they are difficult. As a matter of fact, they are very simple to perform and very believable. But the margin of error in performing them is exceptionally small. A slight variation in arm placement can easily dislocate a shoulder or hyperextend an elbow.

            The knife fight itself should have a “jittery” look, as though the knife blades could bring fiery death if it should even happen to touch someone. I mentioned earlier that I once had a heck of a time doing the choreography for a high school production of West Side Story. Try as they might, they just couldn’t convey that sense of danger required for the rumble. So I finally made sure that they all arrived to one rehearsal wearing their regular good clothes. (I told them that they were only going to rehearse the dance scene that day.) Then I passed out black felt-tip markers instead of the prop weapons and had them go through the fight. Finally, I got the panicky look of terror that we needed as the dancers tried to protect their clothes from permanent damage.

            Here are some elements that can add a little bit of safety to knife fight techniques:

•                       Show & Go. Because the actors are going to be standing much closer together than they would in a sword fight, it is imperative that they learn the concept of show & go when thrusting and slashing or cutting. The idea is to give your partner a strong enough visual cue before the knife gets within touching range. As with sword work, people will forget a move now and then, so these extra cues can be enough to clue-in the actor as to what the next move is. They also actually help the audience, so that they get a split-second glimpse of what the danger is before the attack either fails or succeeds. Granted, it’s a slight exaggeration of normal movement, but one that helps the show, so we keep it.

•                       Naturally there will be many times that the aggressor will need to close distance when attempting a slash, so to our “show & go” we add a “step & prep”. The aggressor takes a step in towards the victim, then preps for the cut by extending the arm fully to the side (letting the audience in on what is about to happen).  Be sure to make eye contact on the step in. The next part is crucial. The aggressor’s cue for initiating the swing is when the victim begins his reaction. None of this “go ahead and swing; I’ll duck in time.” That’s how actors get smacked in the head.

•                       Thrust out of distance. This one is easy. A simple one-two movement – show the knife by merely extending the arm and pointing to the intended target, and then take the step forward to close the distance and finish the attack. Sound familiar? Right, it’s the Show & Go while on the move.

•                       Thrust in-distance. Of course, when the actors are already within reach of each other and stepping in is not appropriate, we need to have a different prep. The “show” in this case is pulling the knife hand back to the hip with a little bit of a twist of that shoulder and hip, away from your partner. Then the hip and shoulder turn again towards the victim, leading the arm as it is extended.

•                       Blocking the knife. Some actors take the swordplay analogy too literally and think that they can engage the weapons blade to blade, blocking knife attacks with their own knife. Nice thought, but the look is hopelessly unrealistic. When a knife attack is blocked, it is either lightly batted away with the free hand or firmly blocked with either forearm. But it is not the knife itself which is engaged, only the knife hand or arm.

•                       The Bat-Away. Similar to the block, but actors tend to overdue it. For the bat-away, merely touch the attacking knife hand with the back or the palm of your free hand. The knife hand is not slapped away; this is a deflection only. Even though the look is to really slap the knife away, we only need to make minimal contact and then let the aggressor continue the pantomime of having his arm knocked off target.

•                       For the forearm block, again look back at the swordplay section. The arms will take the part of the sword, using obvious perpendicular blocks forearm to forearm.

            When the time comes to do some virtual damage with the knife, I’ve already made it clear that a retractable knife should never be used. So what to do? Getting help from a fight instructor would be the first choice, because he or she will be able to set up a very realistic stabbing in less than a quarter of an hour. If you need to attempt any of the following without assistance, go very slowly and try a hundred variations from every conceivable angle until you get something consistently safe and believable.

•           The upstage stab.

            This is a variation of the old sword under the arm that has been parodied to death, but if done correctly is still very effective, especially if you have a bit of distance from the audience. The actors stand in profile to the audience and the aggressor merely stabs at the area of the victim slightly upstage of the victim’s body. The hand can still be aimed at the body, so long as the tip is pointing just upstage. If the victim can reach out slightly with his downstage arm, it will help mask the knife. Don’t let the blade go beyond the back of the victim; that will only get a laugh from the audience.

            The reaction of the victim is what makes or breaks this illusion, for the reaction to both the stab and the pull out of the blade must be made to look as though the stab is to the center of the body, not upstage. Too often the victim turns slightly upstage, into the real arm movement, instead to selling the illusion. And notice how, even though the illustration above is from the upstage side, the knife still disappears from view blocked by the victim’s upstage arm.

•           Accepting the blade.

            This is the most difficult illusion to pull off, but also the safest, because only the victim has control of the action. This is used for a direct stab to the stomach and is especially useful when the knife blade is relatively long and difficult to hide. This stab would begin at a bit of distance, requiring the attacker to show, go, and then step in. During the go, which is a thrust, the victim can reach out as though to stop the attack. In reality, he is locking wrist to wrist so as to guide the attacking knife into the intended target. The aggressor can use the victim’s distracting hand to hide the fact that he has turned his own hand sideways, turning the blade safely away. Sounds hard to do? It is, which is why an experienced fight instructor is needed..

•           In-distance punch stab. This is the one which is most commonly used. It’s fast and easy so long as you have a lot of spotters to check for audience sight lines. Go back to the unarmed section for the techniques used for the stomach punch. The punch stab is done the same way, except that at the moment the knife has disappeared from the audience’s view, the aggressor turns his wrist so the knife blade can be pressed sidewise along the stomach, the tip pointing safely away. It almost doesn’t mater where the actors are facing or standing so long as the entire knife hand disappears from audience view during the stab.

•           “Retracting” knife.  While working on a production of No Exit, I had to have the actor do multiple stabs with the victim being only feet away from the first row. Since I wouldn’t allow the use of a retractable knife, we needed to mix up the look of the staged stabs so that the audience wouldn’t be able to see how any one stab was performed. So even though I’m not terribly fond of this stab, here’s a case where it was necessary to thow it into the mix.

            The “retracting” knife bit requires a knife which has a very small guard and an extremely blunt blade. The actors stand very close together, as in the punch stab above, but in this case they align themselves so that the stabbing takes place in full view of the audience. The stabbing arm must have the palm facing upstage and the back of the hand facing downstage, in effect hiding the handle. The blade is pointed at the victim, and the blade tip might even be touching the victim just before the stab. The handle is gripped very loosely. For the stab, the knife stays in the same place in space while the hand travels forward into the stomach, grasping the blade. After the appropriate victim reaction, the hand releases the blade and pulls back and grabs the handle.

upstage view

             All of this has to be done without the audience seeing the fingers grip, release, and re-grip, with great attention to making sure that the handle is blocked from view by the aggressor’s forearm. (It’s also nice if the attacker doesn’t drop the knife.) When done correctly, the audience is completely convinced that they have seen a blade actually stab someone.

            This simulation obviously violates my own cardinal rule about never pointing any weapon at any person at any time for any reason. And, just as obviously, it carries its own dangers. I include this here, with apologies, to show that is always a way around a seemingly intractable problem, and sometimes the choice is between the lesser of two evils. But in this case it is both safer and more effective than an actual retractable knife.

•              Back stab.

            A lot of murder mysteries have this, and it is remarkably simple to do, being a slight variation on the punch stab. Usually the victim is full front and the aggressor comes up from behind, raising the knife nice and high so the audience can see it.

            When the knife is brought down for the stab, it is aimed straight down with the tip pointing to the ground, instead of arcing towards the victim. So that the victim knows when to react, the aggressor merely touches the victim using a slightly extended thumb or finger of the stabbing hand, the knife blade angled away from the victim. But since the aggressor’s left hand can provide the tap instead, the path of the knife blade need never be any closer than 12” away from the victim, for, as always, the audience has no depth perception. For his part, the victim needs to think carefully about the reaction, and not just collapse down. Rather, there has to be included a push out of the chest, keeping in line with the imagined path of the stab.

•              Self stab. Especially made for Juliet’s death scene, but of course can be used for any show which requires a suicide by stabbing to the stomach. The easy way to go is for her to use the upstage stab as described above, but in this case the audience is staring too intently at Juliet to be fooled by that. When they have this much time to focus, they gain back a lot of the depth perception they normally lose. So the following variation can be far more believable and dramatic.

            The actor faces the audience and gives them a good look at the knife. Grabbing the handle with both hands, the blade is slapped against the forearm at the moment of the thrust. The hand higher up on the hilt covers the turning motion of the nearer hand, blocking the twist of the wrist. For more specifics on this illusion read the Romeo & Juliet entry in the Violence on Stage section towards the end of this book.

•              Cutting.

            Again, I refer you back to the earlier sword fighting section for the details, but the basics again include first laying the flat of the blade along the part of the victim to be “cut” and then drawing the knife’s [dull] edge across or better yet back towards the aggressor, of course using the lightest, weakest grasp possible so as to remove any real pressure on the victim.

•              Throat Slash. This is where most directors want to see blood. But blood FX knives are notoriously unreliable, and often drip before the slash. So I prefer using a regular (dulled) knife, and keeping the blood in the aggressor’s control. Since this is a close-in moment, the action itself needs to be performed slowly. This makes it both more horrifying and safer.

            For most throat slashes, both actors are full front, with the aggressor standing behind the victim. The arm holding the knife goes all the way across the victim first, and the aggressor’s thumb gently lands at the throat just under the base of the victim’s jawbone. The slow slash is done with only the aggressor’s thumb making contact with the throat. Blood may not be necessary, but if the director insists on it, it can be applied by the aggressor. How? Somewhere on the set hide a small open jar of a sticky, viscous blood mixture (for this, often just a little lipstick mixed with baby oil is all you need). At some point before the slash, the aggressor merely scoops some blood out with thumbnail. For the slash, he merely paints the victim’s throat as the action is simulated. With a little practice, he can even get some of the blood from her neck onto the knife blade during the slash. The knife will then act as a secondary paintbrush, leaving a wonderfully straight line that the audience will believe is a knife cut. The very slowness of the movement only adds to the realism.

                        Traps & Locks

            There is a whole raft of illusion designed to look as though one actor has immobilized another by either twisting a limb and painfully applying pressure to a joint. Sometimes they are included in a knife fight to allow the actors to get in close for a strike, throw or disarm. Most of these are taken from aikido and its parent discipline jujitsu. Although simple to perform, the margin for error is very small and so the possibility of doing real damage to the victim is very large. It only takes an accidental extra inch of force against an elbow or wrist to lead to some nasty ligament tears. For that reason they are to be considered advanced techniques, and we must relegate them to the list of those that must only be aught under the direct tutelage of an on-sight instructor.

            If it should come to pass that for some reason your actors insist that they need to have one in their fight and that they know what they are doing, offer this challenge. Have the victim stand alone and get himself into the lock/trap. The aggressor must do nothing; standing three feet away, he only demonstrates his portion of the simulation for his only job is to provide the pantomimed justification for the illusion. If you like what you see, let them come within touching distance. But even then, it is ridiculously easy for the aggressor to accidentally twist a tendon beyond it’s capability, so be very leery of including these simulations without expert instruction.

                        The Butterfly Knife

            It’s very rare when a show will have one or more of the fighters use a butterfly knife, and the only reason to do so is get that moment when the character pulls out the knife and goes through a flashy show of opening it. In the right hands, it’s quite impressive, for the parts of the knife flicker and flutter as the actor waves it about. It’s a special skill, not terribly difficult to learn but it has no practical application in a fight. It’s just there for show, kind of like baton twirling or those silly nunchuck moves. It not really a part of stage combat, or a real knife fight for that matter, but if for some reason you want this in your show, here are some tips.

            Keep in mind that there are really only four moves you can do with a butterfly knife: while holding one of the handles, you can swing it open, swing it closed, twirl the free handle left, and twirl it right. That’s it. If you can do that, you’ve already mastered the basics. The rest of the time is going to be spent combining those moves into as many variations as possible so that it appears that the knife is doing a lot more than that. But that’s all just illusion, for you can only open, close, twirl left, and twirl right.

            Of course, the artistry comes in the way you combine the moves while not rapping your knuckles. Opening and closing the knife as it spins in a half-circle twirl (shown above) has one look. Starting in one direction as you open and then reversing as you close has another. So does opening and closing as the hand turns upside down. So does opening and closing left to right compared to forward and back. I enjoy working in a few moves that borrow from cape techniques of bull fighting, and naturally each person will find his or her own style. But no matter what the finished routine looks like, the one constant is that the weapon always remains in motion, never completely closing or opening until the final pose. By working all of the geometric planes, you can really disrupt the audience’s ability to focus on the movement and identify which is the blade and which is the free handle.