
Wherefore the sword?
What is a stage sword? A replica sword that is safe enough for the actor to use in accord with the demands made by the production. Right there you can tell that no one sword can fulfill all of your needs. Certain shows will require light swords, others heavy, and some for purely costume needs – swords that need not be made very strong at all, just enough so that the actor can wave it around but not touch anything with it. And then of course some will have to be fought with. But even what qualifies as fight worthy will depend on the requirements of the fight.
“Fight worthy” is not synonymous with “stage sword”, and it also doesn’t mean actor-proof and unbreakable. Fight worthy means that for a controlled fight using trained combatants, the weapons in use have been constructed of appropriate materials. Appropriate is the key word. The look of the sword has to match the style of the production design, but the blade has to match the needs of the fight choreography.
I have seen swords in props cabinets each made of one solid piece of indestructible steel, but they were so heavy that no actor could ever safely control them during a fight. So the fight worthiness of a sword comes down to the construction of the blade based on its intended use. We’ll get to that in a moment, but first …
Care & Handling of the Sword
For both costume and combat swords, rust and stress are the main villains. Both are always present, and both must be looked to at every opportunity. Maintaining the temper and integrity of the steel is a vital long-term goal.
Temper – is that combination of strength, flexibility, and “springiness” that is built into the steel, and will vary from blade to blade, often on purpose. Temper is a balance: too stiff a blade is also too brittle and can shatter; too soft a blade will gouge easily. Temper is lost by stressing the blade and also by excessive heating and cooling of the blade, so for long-term care of the weapon, practice the following:
- Refrain from grabbing the blade with an ungloved hand. Not only will this prevent cuts and scrapes, but our hands have oils that contain many salts. Salts attract airborne water vapor; water creates rust.
- Oil from time to time with a light weight machine oil or WD-4O (or heavy grease or car wax for long term storage).
- Never leave weapons lying on grass; never stick the tip into the ground. Both actions are an invitation to rust.
- When rust is spotted, remove it. Use a piece of dull emery cloth or fine steel wool.
- If make-up or stage blood gets on the weapon, remove it as soon as possible. Most stage blood is quickly corrosive to steel.
- Avoid storing the sword with the tip resting on the floor. It could create a permanent bend in the blade.
- Between seasons, remove all weapons from their leather sheaths. Leather breathes out water vapor, and leaving the blades sheathed will corrode the steel and rot the leather.
- Keep weapons away from extremes of temperature.
- Never allow power machinery to build-up heat on the blade.
- Always disassemble a sword when repairs to any part are necessary.
- Unless you have experience in cutlery tempering, never attempt to weld a fight-grade sword blade.
Stress All weapons can break. It is unfortunate but true. Even a broadsword can snap in half in the middle of a fight and it will give no warning before it happens. That is because swords are constantly under a great deal of stress, and sometimes adding just a little bit more can be the little bit that causes it to shatter. Where does stress come from? Either internally or externally.
Internal stress comes from over aggressive pommel tighteners who try to squeeze the pommel down as far as it will go in order to make the sword ring louder. [Some choreographers even go so far as to tighten the pommel using a pair of vise grips!] Ringing is just the aural manifestation of unrelieved stress – the more you hear, the more you have. Tighten the pommel using only your hands until you can turn it no further; then and only then use a wrench to give it one more turn to line it up with the blade if necessary.
Stress can cause the pommel to loosen during use. This is normal, so check for loose pommels before each rehearsal.
External stress is the banging of swords when in use. Naturally you need to use the swords, but always make sure that the actors are well grounded in good stage combat basics. All fights should be choreographed by an experienced stage combat instructor. [Not necessarily a fencing instructor. The techniques of competitive fencing are unsafe for both actors and swords.] No actor should ever be in the position of having to make a block in order to save her life. Discipline and control have no substitute.
If a sword must touch another sword, even if only once, or must be dropped at any time, only a fight-grade blade must be used. If the sword is merely going to be drawn and flourished, a costume grade blade may be used.
Things that people tell me (that drive me crazy):
- “I don’t need real weapons, the actors are only faux fighting”
- “The actors are just making ever-so-slight and light contact for comic effect”
- “Oh, they aren’t really fighting; they only have to hit them once or twice”.
OK, I understand what you’re thinking, but that’s like saying that you don’t really need brakes on your car because there is only one stop sign on your way to work. Even if you only need to touch the brakes once all day – at that one time YOU REALLY NEED THEM. The same with swords. Even if the sword only has to touch another one time, or if it has to be dropped, it must be a fight worthy sword.
Everyone thinks that as long as the attacks are kept weak, the swords won’t sustain damage. But strong attacks rarely break a sword. Strong defenses are what weaken the blade, especially near the hilt. In a non-choreographed fight, a hit one night might be 5% stronger than it was the previous night, or might land one inch further away than it did two nights before. The defender isn’t going to be able to second-guess that, so each actor ends up making every block as strong as possible and makes sure that it swings out as far as possible, putting even more strain on the blades.
Another thing that actors tend to do in “fake” fight attacking motions is to keep the arms very relaxed and pull the cuts. Intuitively, it makes sense, and they think that they are being light with the swords. But to make the fight move along, they flick the blades quickly with their wrists, putting far more strain near the hilt than would ever be caused in a full-out “real” fight.
The only way to keep the weapons and actors safe is to have all fights, even the “faux” ones, carefully choreographed. For theatre, there is no difference between a real fight and a fake one, at least not to the sword. There is only appropriate technique used for appropriate weaponry. There should never be any contact between two swords that is not carefully choreographed and meticulously rehearsed. It must always be considered stage combat, for that’s precisely what it is. And never assume that the actors are going to know how to do this. I’ve had to re-teach a lot of experienced actors and even fight directors on how to get back to drilling with correct technique.
Disassembling and Assembling a Sword
The best way to learn about any sword is to take it apart and put it back together again. For some swords this is simplicity itself, for others extremely difficult and unadvisable unless the condition of the item is so questionable that the only options available to you are to either attempt a repair or throw out the sword.
In attempting to take apart an unfamiliar sword you always run the risk of breaking it, so your first step is to find out how the sword is staying together.
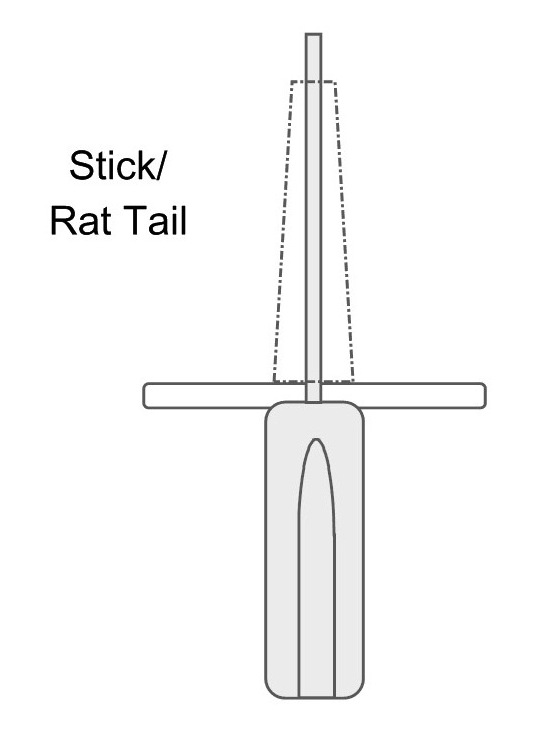
All swords have at the very least two parts – the blade and the hilt, the hilt being anything that isn’t the blade. Carefully look at the hilt to see if it is of one cast piece or if it also is made of many parts. What you are looking for are any signs of imbedded rivets either at the very top of the hilt or along the handle. If you don’t see any, it could be that the pommel [the very top end of the hilt area] simply screws off just like a jelly jar lid. If that is the case, you have a blade with a “rat-tail” tang. About half of costume swords and the vast majority of stage combat swords use blades with rat-tail tangs.
Blades are connected to hilts in one of two ways: they are either riveted in, or they are screwed on. Screwing the blade into the hilt means that you can tighten or loosen the blade periodically to adjust for different temperatures, compensating for the expansion and contraction for the differing metals. Riveting the blade right onto the hilt takes that option away, but it makes the blade secure even if it loosens. When a blade loosens, it rattles. There’s nothing wrong with a rattling riveted swords, but a rattling screwed-on blade is a disaster about to happen.
Screwing on a blade is a fairly recent invention. For over three thousand years, all swords were held together by rivets, and most would rattle as the metal (usually brass) would contract around the rivet head (usually iron). Almost any sword that wasn’t brand new would rattle. We still use the term “sabre rattling” to mean flourishing the blade without actually making contact.
Which is better? Neither, as both are compromises. Tightening the blade is a nice option, but it also means that the sword can loosen during use and fall apart. A rattle in the blade is disconcerting on a riveted sword, but that blade isn’t going to go anywhere.
Things that can go wrong at this step:
• The pommel or pommel nut was tightened down so hard that it is going to take a table vise and channel lock wrench in order to loosen it.
• You misjudged the nature of the pommel and it turns out that it wasn’t a separate piece after all, so that in trying to twist off the pommel you actually broke the hilt. I lost one sword this way, but what can you do?
• The threads that the pommel screws onto were filled with epoxy or a product like Lok-tite, which hardened like cement. It will take some WD-40® and even more strength to break that bond. If the adhesive is too strong, you might break off the tang at the pommel instead of loosening it from the threads, in which case you’ll have a broken, shortened tang and a useless pommel that has the rest of the tang stuck inside of it.
Actually, all may not be lost here. If you are patient, you should be able to drill a new hole right down into the pommel, following where the tang broke off, and tap it to let’s say 1/4 20. Go at least an inch deep. The tang that is still left on the blade might still have some thread on it, but if it doesn’t you can thread it 1/4 20 as well, and here go for about 3/4 of an inch. The handle will need to be shortened some, so slice off about 1/2 inch there. When you reassemble the sword it should be nearly as good as new.
Assuming you were able to unscrew the pommel, you now have access to all of the constituent parts of the sword, which we will evaluate in just a moment, but first we are going to take a look at those other swords which aren’t as easy to take apart.
Top-Riveted Tang
Again, if you don’t really need to, don’t bother to take apart a sword that is held together with rivets. You’d be in for a lot of work and the sword might not fit together as well when you try to put it back again as it does right now. That said, let’s get in there!
If at the very top of the sword you can see that a circle of steel seems to be flush with the brass, then you might be looking at the very top of the blade steel itself, the tang. If that’s the case, the builders of the sword have used the very blade as a giant rivet, stacking all of the parts onto the shoulder of the blade, allowing the tang to poke through the top, and then simply hammering the top until the tang flattened out over the brass cap. This is still a rat-tail tang, but the makers figured that no one would ever take apart the sword, so they just hammered it shut. In other to reverse the process, you’re going to have to weaken that rivet head. Simple: just grind down that section a tiny bit, or better yet drill straight down into the steel at a little less than that visible diameter, being careful to drill only the steel and leaving the brass alone. Either way the steel should now collapse when you hammer out the pommel cap.
Things that can go wrong at this step:
• You didn’t know that there were additional rivets along the sides of the handle, so the hilt can’t come off until those are drilled out as well. The rivets are always made of steel, and the handles are usually made of brass, so locating the rivet heads should be easy. [see below]
• You didn’t know that there was a threaded nut underneath the riveted head, so the hilt can’t come off until it is exposed and removed. This kind of sword is a combination of threaded and riveted tang, and it might require some gentle tapping of the pommel cap until it can come off, exposing the top of the tang and the threaded nut.
Side-Riveted Tang
Some of the finest swords ever made are held together with rivets going sideways through the grip and into the tang, namely the Japanese katanas. Those weapons are all beyond museum grade, articles of incredible value zealously coveted by collectors throughout the world. If the sword in your hand is side-riveted, I’m reasonable certain that it is not one of those exquisite weapons, but rather a cheap replica.
If the sword is not a katana replica, spotting the rivets is fairly easy once you’ve established that it is not in fact one of the other kinds of swords. You did carefully look for a pommel that is not part of the handle, right? And very carefully looked for any sign of a top rivet? I knew you did. Now just look for the one or two or three steel rivets that are showing themselves on the handle of the sword. Side rivets vary in size from about a quarter inch down to less than 1/32 of an inch, and those thinner ones are often compression springs rather than true rivets. You might need to drill through the thicker ones, but most of the thin ones can be hammered out with a finish nail. Then the blade should just slip right out of the handle. Unless the manufacturer also used epoxy to keep the handle secured. If that is the case you can very carefully try to tap the handle pieces off of the tang, but the likelihood is that the handle will break when you try.
If the sword is a replica katana, then you have even more work to do, for you’ll have to remove that fabric wrapping around the handle. Don’t even consider doing this unless you have no other way to make a repair. Memorize every twist and turn, for you will have to repeat it in reverse order to reassemble. The wrap usually ends up tying down the pommel cap and then the end is deftly tucked back into the wrap, unseen by all. After removing the wrap and the end cap, you’ll see (just barely) the two compression springs that act as rivets through the scales of the handle and the tang. You’ll need to use some thin tool which is a little less than the diameter of the rivet in order to punch them out of the handle. I’ve found that a good hardened but blunted finish nail being firmly tapped with a hammer works best.
Assuming you’ve come this far, no matter what sword it was it should be apparent now as to how to take the rest of the sword apart, if it hasn’t already done so on its own. When you are ready to reassemble the sword, it should be a simple matter of reversing the process, unless it was a top riveted tang. If so, you have two choices – go back to a riveted tang, or change over to threaded. I prefer threaded for all swords, so that the nut may be adjusted according to different temperature conditions, but that’s just me.
Either way, your overall tang length on the riveted rat-tail tang is right now just a little bit shorter than when you started, so you’ll have to make up the difference somewhere. One way is to shave off about 1/8 of an inch of the bottom of the grip. Another is to lengthen the tang by welding on a small extension, and yet another way is to lengthen the tang by grinding down some of the blade shoulder. If you are going to do the latter, be careful not to build up heat on the blade, which can ruin its temper. Few people have the patience to do this without causing major damage to a fight-worthy piece, so this should be a last resort only.
If you are going to re-rivet, simply assemble the pieces, including that slightly shortened handle, which should leave a fat 1/16th of an inch of tang protruding at the top. Just hammer that puppy down until the tang end flattens against the pommel. Ta-da! You’ve made a rivet.
If you are going for a threaded tang, then you need more tang sticking out – at least 3/8ths of an inch, more if you can. Then of course you’ll need to thread the tang. Just go for the closest size you can with the deepest grooves. By convention, most costume swords are threaded 1/4 20 English, and combat swords at 6mm metric, but use what works for your tang. Be sure to thread a little beyond what you think you need so that the threads continue down into the handle. Better to have over-threaded than to risk bottoming out the nut and leaving your hilt forever loose.
A cap nut should finish off the sword nicely, and be sure to add a washer so that the nut doesn’t grind into the brass. Choose steel rather than brass for the nut for longevity’s sake. I know that brass matches better, but the threads will strip a lot sooner. Cut off any excess tang poking through the nut and you are ready to rock.
Now let’s talk about the individual parts of the sword.
The Pommel
The pommel is meant to act as a counter weight, so that the sword doesn’t feel so heavy in the hand. In general, heavy blades are matched with heavy pommels, and light blades with light pommels or even no pommel at all, but this is not a hard and fast rule. Military sabres meant for broad slashing cuts often have no true pommel so that, like a hammer, the swinging force is all directed at the impact point, with no chance to take the motion back. Other swords, especially very light dueling swords, sometimes had relatively heavy pommels, allowing the tip of the sword to “jump-up” at the opponent’s face without effort.
The “heaviness” of a sword isn’t all about the weight. After all, even the biggest broadswords, those over five feet in length, only weigh about seven pounds. But if the weight distribution is such that the center of balance is right in the middle of your hand, the sword feels quite light and is easy to manoeuver. It takes a little bit of arm strength to hold seven pounds in your hand, but if it’s resting on your palm it is manageable.
Compare that to a cavalry sabre at only two pounds. At first it seems light, but it has no counterweight at all, merely a cap nut that pokes out just beyond your fist. Since all of the weight is forward of your hand, your forearms, wrist and fingers need to constantly work to keep that weapon from dropping out of your hand. Attempting to cut with the sword, or worse yet to stop the sword that is in motion, puts even more strain on your arm. In a very short amount of time this sabre will appear far heavier than that giant broadsword. [So why don’t sabres have big pommels? Sabres are specifically made to be very difficult to stop once they are in motion, and being blade heavy keeps the momentum traveling forward, much like a hammer or axe.]
Whatever the weight, the inside of the pommel is usually threaded – matching the threads of the blade. The pommel should be made of steel, as the threads inside a brass pommel will strip in a short amount of time. Stay away from aluminum, as those will strip in no time at all.
Pommels will loosen with use. The vibrations caused by banging swords together shake the pommel, which naturally wants to unwind in the direction away from stress. A lock-washer can help hold the pommel in place, as can a drop of Lok-Tite®, found at most hardware stores. Lok-Tite® fills in the gaps in the threads of the pommel and then hardens, keeping the pommel from moving. Once you do that, however, it also means that you won’t be able to adjust the tension as the metal expands and contracts in different temperatures, so it’s not the best choice.
Some pommels are drilled through and then a cap nut is used to hold the sword in place. Cap nuts actually loosen less frequently than threaded pommels, but the threads of the tang can strip more easily if over tightened. But even with that slight drawback, they are preferred over threaded pommels for the heavier broadswords. When heavy pommels are required, the point where the pommel touches the grip is an area of great stress on the blade, for the shear weight of the pommel puts lateral pressure on what is normally the thinnest part of the tang . The pommel literally wants to snap the tang in half. Sending the tang all the way through the pommel and then holding it down with a cap nut divides that strain in half, distributing it to both the top and bottom of the pommel instead of the bottom only.
Lastly, you may come across some pommels that are completely hollow, in essence false pommels that are only for looks. These can collapse with occasional tightening, so after some time they need to be replaced with a stronger, solid pommel.
The Handle
This is the part you hold. It is sometimes called the grip, but technically the grip refers only to the leather or wire wrapping found on some handles. The handle is hollow to allow the tang to run through it, and can be made of almost any material, the most common being wood, but plastic and steel are also used. Never drill sideways though the handle and into the flat of the tang in trying to hold a fight-quality sword together. Many a good weapon has been ruined in the attempt. Some swords, especially those of Japan and some European military sabres, were built using handle rivets, but stage swords should not be held together this way.
Wood handles were the standard throughout history, but today are used only in historical replicas. Wood feels good and looks good, but can split and even rot, and that rotting will encourage the tang to rust. Fine blades have been destroyed by the invisible rusting away of the tang inside a wooden grip.
Some woods are better than others for handles. Pine is just too soft and splits too easily along the grain. Maple, mahogany and walnut work reasonably well, having a nice even grain that resists splitting. Hickory, cherry and ironwood are superb, but their extreme toughness make them very difficult to work with. We have had some limited success with rattan, which resists rotting, but unless the handle ends are perfectly seated they have the same problems in splitting as does pine.
With time the compression of a tightly seated pommel will cause any wood handle to collapse. That failure is sometimes exacerbated by an incorrect facing of the ends of the handle to the pommel or to the guard. When this happens, the force of the pommel tightening down actually drills into the wood and acts as a wedge, causing the handle to split open. To prevent this, wood handles are often protected by shims (metal washers) which help disperse the pressure to the entire handle.
A lot of people hate shims, and I understand why. Shims can take away from the clean look of a sword [when viewed very close-up], and every additional item placed along the tang is one more joint where a sword can loosen. But there are excellent reasons as to why a sword may need one or more shims. We already mentioned the drilling into the wood caused by the rotational screwing in of the pommel. But shims can also add decades of life to the handle by preventing premature warping of the ends. Any piece of wood will have different pockets of hardness and softness, and the use of a shim at the top and bottom of the handle helps prevent uneven compression. Shims are also important when split-ring lockwashers are used, for it allows them to press up against the pommel instead of just digging into the grip. Without a shim, the rough edge of the split-ring gouges a groove into the wood during the final tightening of the pommel, thereby acting as a tiny wedge itself that can split the handle.
Shims can also help isolate the vibrations of the blade from dispersing into the guard, allowing the sword to ring instead of clunk. This isn’t terribly good for the sword blade, for a ringing sword is more prone to develop microfractures in the blade than one in which the vibrations can quickly dissipate. But directors all love the sound of ringing steel, and sometimes one shim at the bottom of the handle is all you need to make the sword ring like a bell.
Where most people hate to see shims is when they are used to fill a gap between the handle and the pommel, a gap that should never exist. What sometimes happens is that for some reason the handle has become a little too short, and when the pommel is screwed down onto the tang the available threading runs out, causing the pommel to bottom out before it can even touch the handle. For a short-term fix, someone will stack 5 or 6 washers to make up the difference. Then the short term turns into long term when no-one wants to take the time to do a real repair job, and the sword goes back into the props cabinet with the half inch stack of washers. Instead, you should really do the proper repair, which is either get a new handle, extend the threaded length of the tang, or re-drill and re-tap the pommel deeper to cover the distance.
So, bottom line on shims: don’t go crazy with them, but by all means use them when you need them.
Metal handles have longevity going for them, but since they have no compression, they tend to lead to pommel loosening substantially more than do swords with wooden handles. A metal handle will almost always require two shims sandwiching a lock washer to keep the pommel from loosening.
All modern swords and many historic replicas now use plastic handles. They have some of the compression characteristics of wood, but none of the grain problems, so they break less often and don’t breathe water onto the tang, so hidden rust is less of a problem. The biggest drawback to plastic is, well, it’s plastic, and some folks just don’t want to have plastic on their sword. Some of the Ren-Faire crowd refuse swords made of modern materials. Another drawback with plastic is that it can bend when exposed to the combination of ambient heat and pommel pressure, and once bent will stay bent.
Any handle might be just the bare material or it might have a covering, known as the grip. The grip is either of wire or leather or sometimes both. Leather grips seldom need more than an occasional regluing to keep the edges down. On the minus side, if held with an ungloved hand it will absorb sweat and rot out over time. A wire grip lasts a long time, but if one strand breaks the whole thing unravels quickly and is a tough fix, so after playing with it a couple of times you may decide that taking it off and simply going with the bare handle is acceptable.
It really shouldn’t matter what the covering of the handle is, for all combatants should wear gloves when using a sword. Many fighters prefer not to do so, for fear of loosing some of the feel of the sword, but actually that “feel” can get in the way of proper technique. The vibrations and occasional sudden pinching of the handle into the skin of the palm often leads the actors to loosening their grip right at the point where they need the most control. So unless it’s simply inappropriate for the character to be wearing gloves, don’t fight bare-handed.
The Guard
The guard is the metal part that protects the hand, and is sometimes also called the hilt. To be precise, hilt actually means anything that is not the blade, in other words all of the parts of the sword that stick out of the scabbard – guard, handle, grip and pommel. The guard proper is merely the piece between the handle and the blade, and can be as simple as a flat cross piece or as complex and ornate as the 17th century cage hilt rapiers. With very few exceptions, guards are made of metal, usually brass or steel.
Parts of the Guard
Naturally, not all sword guards will have all of the parts listed, and each part has a very specific function:
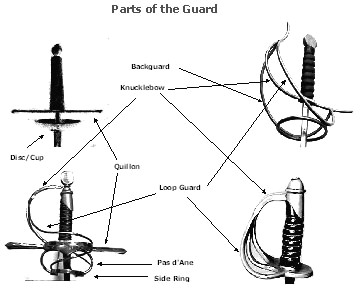
1 Knucklebow – When swinging a sword, the knuckles of the fist lead the action, so this large curve is there to protect what its name indicates. Knucklebows on rapier and smallswords are simple thin strands, while military and sport sabres have very wide bows, sometimes forming the entire guard.
2 Backguard – On some rapiers, there are additional strands supporting the knucklebow that sweep down the “back“ of the hilt. In this case the back is considered that part of the hilt that rests against the body when the sword is worn, or, stated another way; the backguard protects the fingernails when holding the sword. (You’d think that it would be the part protecting the back of the hand, wouldn’t you?)
3 Forward Quillon – Quillons are merely the crossguards of a sword. On broadswords, they form the entire guard. The forward quillon is the one on the leading edge of a sword swing, or the knuckle side. Quillons are the most common form of hand protection found on swords throughout history. Their main function is to keep incoming cuts from sliding down the defending blade and cutting the arm.
4 Rear Quillon – You’ve probably guessed that this quillon is the one on the trailing side of a sword swing. On true two-edged swords such as broadswords there is no designated forward or rear quillon.
5 Cup/Disc – When rapiers were invented, fighters quickly realized that a simple thrust to the sword hand could finish a fight in one move. It took a little while, but sword makers learned that quillons are good protection against cuts, but very poor against thrusts. For that, a solid circle of metal is the best. The largest discs, called full cups, on 17th century rapiers were half spheres enveloping the entire fist. The smallest were simple flat circles barely covering the forefinger.
6 Loop Guard – On cage hilt or swept hilt rapiers, many strands form one or more loops so as to provide protection for the back of the hand against sword cuts. In other words, these are the protections for the back of the hand. The opposite of the backguard, we see the loop guards as the part of the hilt that faces out, away from the body when the sword is worn. Loops are both light weight and strong, but give little defense against a direct thrust
7 Ring Guard – If a loop comes out of the quillon center at 90º, it is called a ring, not a loop. Ring guards tend to be simple, with one ring on a dagger or two on a sword.
8 Forward Pas d’Ane – When trying to maintain control of a sword, it is really tempting to let the forefinger swing out over the forward quillon. It dramatically improves tip control but it leaves that finger exposed to a sudden slicing off by an incoming cut. A little half circle loop of steel coming down from the forward quillon and almost touching the blade keeps the finger shielded. First seen on some broadswords of the 14th century, pas d’anes became indispensable to rapier play of the 16th and 17th centuries.
9 Rear Pas d’Ane – As rapiers became more elaborate, the pas d‘anes became a handy place from which to connect further expansions of the guard. By the late 1800’s the forward and rear pas d’anes provided a secure place from which a new fencing grip was developed. The Italian grip uses the index and middle finger passing through the forward and rear pas d’anes respectively, putting the thrusting blade in line with the hand and forearm (but losing the ability to perform an effective cut).
The Blade
The terms blade and sword have sometimes been used interchangeably, which is unfortunate nowadays when someone tries to purchase a weapon. Many ask for a “blade” thinking that they are getting a complete weapon, when all they get is a strand of steel but no way to hold on to it. It’s not all that dissimilar to what would happen if you tell a salesman at a Ford dealership that you need a “set of wheels”. You’ll get something very different from what you would get with the same request at a Goodyear tire store.
Parts of the Blade
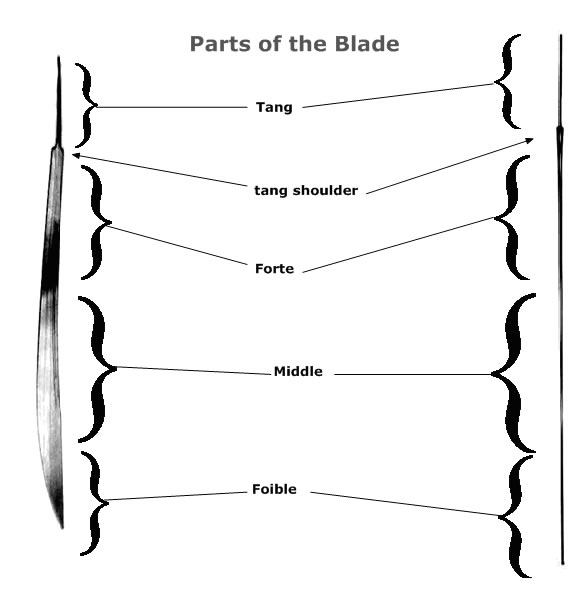
• Tang – that part of the blade you don’t see, the part inside the grip. In the strongest swords, the width of the tang is the same as the blade [called a full tang], and the two halves of the handle are simply riveted or pinned onto the tang. But it makes for more difficult construction, so usually the tang is trimmed a bit narrower than the rest of the exposed blade. On some the tang only extends a short distance into the handle. Called a push tang, it is usually held on by some epoxy, and makes for the weakest swords. Other tangs narrow to a rod that runs the length of the handle and beyond, called a rat-tail tang. Depending on how the sword is assembled, the rat-tail tang may be threaded or smooth.
• Shoulder – the sudden narrowing of visible blade to tang. The sword guard normally rests against the shoulder. This area of the blade is under great stress when used, and is always a potential breaking point.
The pommel-tang-blade balance
No one ever wants a blade to break, but it happens. It is of course true that any sword is going to take the most stress at the spot where it is struck. But the thicker the blade, the less likely it is that that is where the blade will break. That’s because stress travels up and down the steel, so the blade will break wherever the steel is weakest. If there is a flaw in the manufacture of the steel, a crack will develop there. But there always exists an inherent design weakness as well, and that is at the tang. The tang is the part of the blade that you don’t see: the part that is inside the handle.
The heavier the blade the more stress it must endure. Stress from missed cuts – stress from successful cuts – and stress simply by having heavy pommels
Each time you swing a sword and stop it suddenly without hitting anything, the blade wants to continue in that same direction. Because it can’t, there is a build-up of stress near the guard as the blade literally tries to bend around your hand. Conversely, each time a sword does strike something, the blade wants to move away from that impact. In other words, it wants to bounce away from it. But your hand keeps driving the blade in the direction of the strike, precisely the opposite. Those two opposing shear forces meet exactly at where the guard is. And that spot is the “shoulder”, that place where the tang begins. In short: with each swing of the sword, hit or miss, the blade proper wants to tear away from the tang.
A heavy pommel (such as on a broadsword) is also on the move when a sword is swung. When the sword comes to a sudden stop, the pommel wants to continue to move in the original direction. So the very mass and movement of the pommel stresses the tang also. Naturally it isn’t as much stress as at the shoulder, but then again the tang is much thinner up top where the pommel is, so the stress does more damage. With use, both the bottom and top of the tang will weaken and ultimately break.
The longer the tang, the more momentum on the pommel, therefore more stress on the tang. (By the way, the length of the tang is the result of the intended use of the sword. If you want to primarily chop, you use as short a tang and as light a pommel as possible. If you want to primarily thrust, you want a longer tang and a heavier pommel to better counterbalance the blade weight. But a longer tang can bump against your forearm. A short tang gives you less control, but adds more power to the blade during a cut. So it’s a trade off, and there is no standard length or proportion.)
The strongest tang possible is one that is nearly the same width as the blade proper. This is the way that samurai swords (katana) and most knives and machetes are made. The shoulder is very slight, and instead of a hollow handle that slides over the tang, two halves of the handle (“scales”) are riveted directly onto the tang.
The only problem is that there is no way to attach a pommel on such a tang. That isn’t a concern on katana or knives or machetes – they don’t have pommels! On the other hand, this style of tang is not useful for Western broadswords or rapiers, which need the counterbalance provided by a pommel.
A tang that starts out wide and then gradually gets thinner is the best shape for wide-bladed swords. The tapered shape can dissipate stress throughout its length and then be the right size to hold pommel.
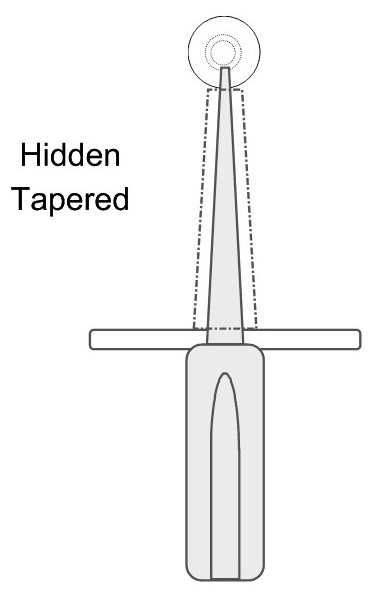
In this example it’s called a hidden tang because not one part of it can be seen from the outside. The top of the tang is threaded, as is the inside of the pommel. So the pommel simply screws-on like the lid of a jar.
Anything that screws-on will loosen under stress. So a screwed-on pommel has to be checked for tightness periodically.
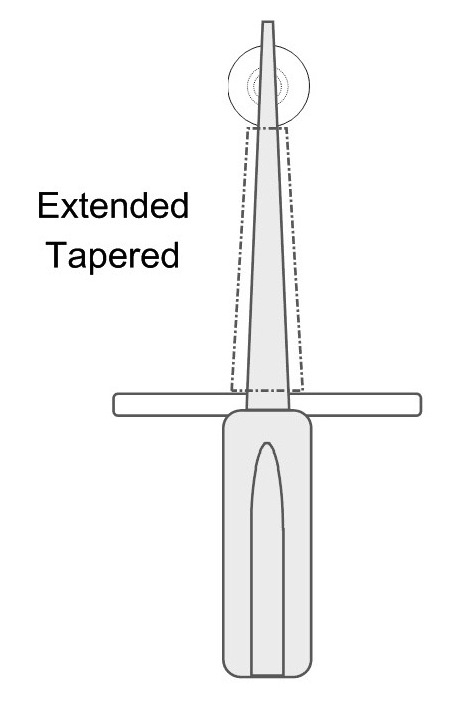
In this example the tang is extended so that it pops out the top of the pommel. This style is the best for heavy broadswords that have very heavy pommels. With an extended tang there are two points of pommel stress instead of one, and each point is hit by only half the torque stress from the pommel at each point. So the tang lasts much longer.
The top of the tang can either be hammered down onto the pommel (which makes the blade a giant rivet) or the top can be threaded to accept a screw-on cap nut (which make the blade a giant bolt). No matter which, it is the pommel pressing down onto the rest of the parts that holds the sword together.
Which is better: hammering the extended tang onto the pommel, or threading the inside of the pommel for a hidden tang? Just as with a threaded pommel, a threaded cap nut can loosen with use. On the other hand, steel expands and contracts when temperature changes. So something that is threaded also means that you can adjust it as the situations change.
A tang that is hammered down to make a giant rivet isn’t going to have the pommel vibrate off. On the other hand, if the blade loosens in colder temperatures you have no way of tightening the pommel, and you’ll have a rattling sword that you can’t fix. (Looks as though we have too many hands here.) The short answer is that there is no perfect answer. Everything is a carefully considered compromise.
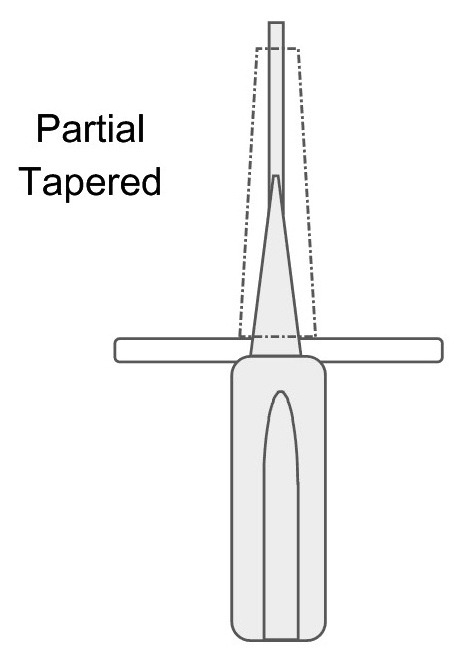
In an effort to reduce construction costs, many sword makers use a tang which tapers up to the middle of the handle. They then weld a simple steel rod for the rest of the tang. Normally one wouldn’t weld on a blade, for that forms another weak point. But since the stress on a blade is at the shoulder and the pommel, if one must weld then the center of the tang is the best place to do it. It makes it much easier to carve out the wooden handle, and the rod can be made of softer steel than the blade, therefore easier to thread or hammer.
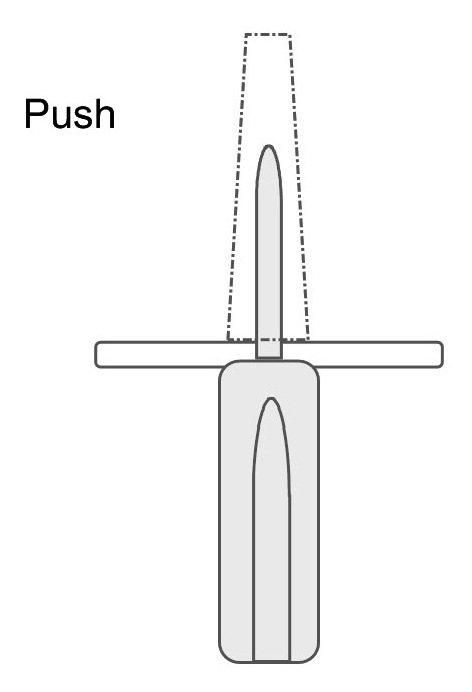
On purely costume (tourist) swords, the tang might only go partly into the handle. It’s called a push tang, and is often held in place by merely some glue. Although it can also be affixed by rivets, the handle will soon break if the sword is swung about, for the tang will break through the handle. Any pommel would have to be hollow and attached to the handle, or perhaps made as part of the handle. A sword with a push tang is suitable for wall-hanging only.
Just one step above the push tang (but still horribly unsuitable for stage combat), the rat-tail tang is nearly as useless as the push tang. Found on most swords from India and Spain, the narrow tang (usually about 1/4″ rod of soft steel) can barely hold the weight of the blade. The tang is guaranteed to bend and break at the shoulder within a few swings. And since this type of tang is welded onto the blade at the shoulder instead of being part of the blade proper, that alone would make the weapon useless.
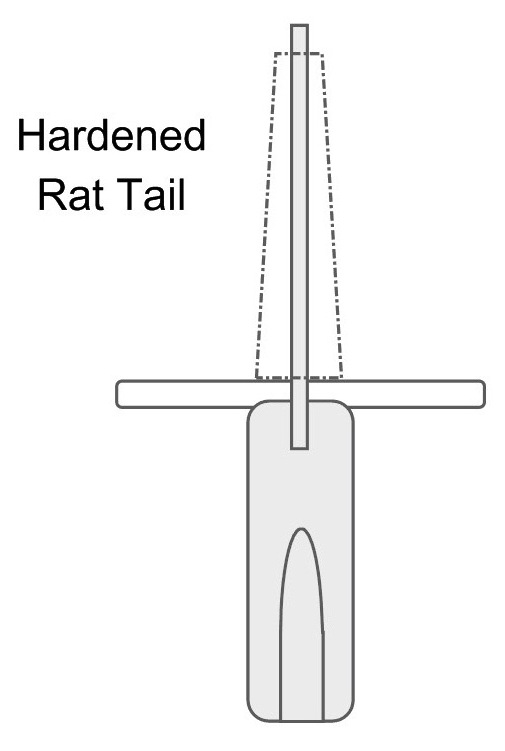
And yet ….. we at Weapons of Choice have made some excellent fully fight-worthy swords using a rat-tail tang, but with some critical modifications.
1) Instead of “soft” easily workable steel for the stick, we used tool-grade hardened steel rods with a threaded top end. I dare you to break that.
2) We didn’t weld the rod onto the edge on the shoulder. Rather, it was welded deep into the body of the blade proper, away from the shear stress.
3) We only did this on blades that are exceptionally thin, such as machete blades.
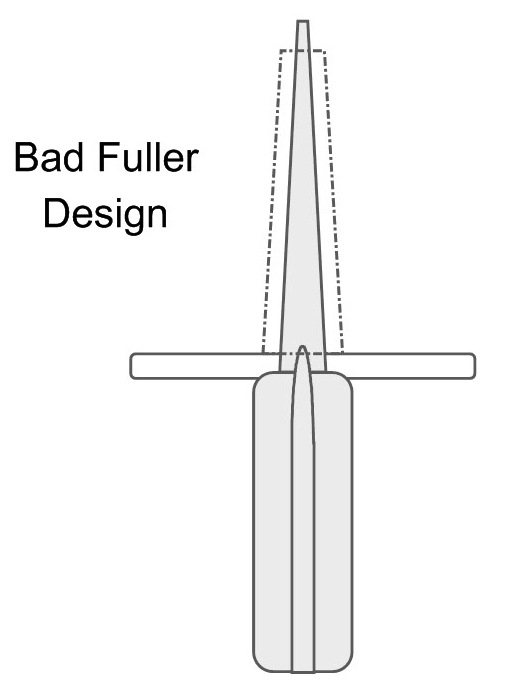
Here is an example of what would be a good sword, only to be ruined by a critical design flaw:
Notice that I have drawn the blades as though they have a central groove. This is known as a “fuller”. Dome-shaped, it allows the swordmaker to remove as much weight off of the blade as possible while still retaining its strength. It even improves both its flexibility and rigidity. But now notice what’s wrong with this particular example. That’s right: the fuller extends past the blade shoulder and slightly into the tang. Far from strengthening the sword, now the blade has become much weaker right at the shoulder. Blade breakage at the shoulder is a common problem with the blades designed this way, sold by a particular Chinese company very popular in the Ren Faire world. They also happen to suffer from edges that are too thin, leading to deep gouges of ¼ inch and more along the striking and blocking edge. Those become yet more possible breaking points.
• Ricasso – on those swords in which the index finger loops over the guard [rapiers, for example], that part of the blade the finger will touch. It is the final part of the blade before the shoulder and is always left unsharpened.
• Forte – the strongest part of the blade, considered approximately the first third of the blade beginning at the shoulder. This is the defensive part of the sword, the part on which one can absorb an incoming cut.
• The middle of the sword is simply that – the mid third of blade between the forte and foible. Ineffective for an attack and too weak for strong defense, it should rarely show signs of wear except when used by an inexperienced fighter.
• Foible – The furthest third of the blade, and generally the weakest. The blade usually becomes much thinner the closer it gets to the tip so as to reduce weight and therefore fatigue. It is also the striking portion of the sword edge, the impact point for a cut. With very thin blades, foibles are inherently weak. When striking another sword in an attempted cut, the forward momentum causes the foible to bend around the blocking blade, so naturally this is the most common fracture point for lighter blades.
• Edge – Simple, right? The part that you cut with, also called the leading edge or true edge. On two-edged straight blades, either side can be the cutting edge. On single edged swords, sabres for instance, the opposite of the leading edge is called the back edge, and is always unsharpened.
• False edge – on single edged sabre blades, the last few inches of the back edge has been filed down to a sharp edge, not with the idea of attempting a backhand cut but in order to reduce resistance in the event of a thrust. Part of but not the same as the back edge.
• Spine – The part of the length of the blade that has the greatest strength. On single edged blades, the back edge is thickened to become the spine, while on narrow double-edged blades the center has been similarly designed. On heavy broadswords that have a groove (fuller) down the center, the two ridges on either side of the groove could be considered to form a double spine.
• Fuller – How do you make a blade that is both as light as possible but still retain its strength? One way is to build in one or more groves into the length of the blade. Called fullers, the dome shape that they create makes the blade much stiffer than it would be without having the metal removed. Sometimes gruesomely referred to as a “blood groove”, there is a myth that they are added to the blade to keep the sword from getting stuck in the victim, or to make the wound impossible to close. Not true.
• Tip – the point of the blade. If the sword is meant as a practice weapon, the tip of a very thin blade will have a thickened button welded on as a safety aid. In modern sport fencing, this steel button is covered with a rubber button for additional safety. The rubber button is always removed for stage combat, for it gives the actors a false sense of safety. [I have noticed that actors trained with full mask and rubber tipped swords tend to develop poor and unsafe technique, putting their partners in danger.]
Checking a Blade for Fight-Worthiness.
Only two materials are appropriate for use in order to construct fight-worthy blades – high carbon tempered steel or the more costly but significantly lighter tempered (“aircraft”) aluminum. Which is better? Fighting with a light aluminum blade makes life much easier for the actor, but great care must be made so that these costly pieces are only matched against other aluminum swords. Tempered aluminum is relatively soft, and can be easily gouged by even a costume grade cheap steel-bladed sword, rendering it useless after only a few rehearsals. But a serviceable steel broadsword can be used to fight nearly any weapon made of any material. As a choreographer, I prefer using steel.
Just because a sword blade is “carbon steel” doesn’t necessarily mean that you can fight with it, so take some time to carefully examine any sword with which you are not familiar before giving it to your actors, remembering that “fight-worthy” refers both on how a sword is built and how you intend on using it.
To evaluate an unfamiliar sword, first take a look at the flat. Is there anything written on the blade? Most will have a manufacturer’s logo stamped on the blade proper, usually near the shoulder. That’s normal but not required. What is troublesome is if the blade has ornate engraving or has been acid etched – almost always a sign that the blade is non-tempered. Another red flag is if the blade has been marked with “India”, “Spain”, “Toledo”, or “Mexico”. These blades are probably just tourist wall hangings and cannot take any kind of stress. On the other hand, many blades from Pakistan, although not sold as fight-worthy, stand up to stage combat better than many French combat blades.
Now tap the blade and hear the sound. Does it ring like a bell? Then you can be sure of …. nothing. A blade that rings is no more fight worthy than a blade that clunks. People get very pleased when they hear a ringing blade, so here at Weapons of Choice we try to get every weapon to ring before it leaves the shop, but that is only to please the director.
Permit a tiny physics review:
Ringing is the aural manifestation of unrelieved stress. When anything is struck, a pressure wave travels through the material. That wave has to go somewhere, and normally it dissipates into a substance, for example wood or skin, that absorbs the vibration. The pressure wave is transformed into a very small amount of heat.
When no release is possible, the vibration continues to circulate within the metal, often at a vibration rate that our ears can translate as that wonderful ringing sound. This is what happens in a tuning fork, a brass bell, and a sword blade. But that vibration – that running pressure wave – is always looking for somewhere to go. The vibration doesn’t last forever; because after a while the vibrating steel molecules cause enough internal friction so that the vibration slowly dissipates into heat energy. In a perfect world, that dissipation would happen evenly throughout the blade.
But steel is not perfect. There are microscopic defects that all metals have. Cheap steel is filled with them, but even the best steel blades will have tiny flaws in its structure. Those flaws are so small that they have no effect on the vibration rate, therefore the sound of the ringing. But the vibration does turn those flaws into micro fractures, which with time can become break points for your sword.
It is interesting to point out that the swords used for film work do not ring at all. The film swords are usually made to be sturdy and extremely light, with no thought given to “ringing steel”. The wonderful sounds that you hear in a movie sword fight are all added in post production. As that option is not available for stage, directors insist that all swords ring like bells.
Any metal can ring so long as the vibration within the blade proper can be somehow isolated from the handle, which would normally be able to absorb the vibration. So what can you tell from the ring? Nothing in terms of fight worthiness, but there is one benefit during rehearsal. Once you become accustomed to the way a particular sword sounds, a subtle change in that ring could mean that the sword is beginning to loosen and needs to be re-tightened. You may get a sudden drop in tone, or perhaps a secondary rattle or low rumble as some part of the guard starts to shake. But that is it. Some really cheap worthless swords ring wonderfully, and some very high quality swords simply clunk when struck. In order to check for fight worthiness, you need to examine the blade more closely.
“Temper, temper … “
Does it bend? Even the heavier broadswords will show some spring in them, and you need to see if the sword will spring back to its original shape. Some of the thinner sport fencing blades will allow for a little change in the bend. But for the most part if you can take a sword, bend it over your knee and it stays bent, then keep it as a costume piece but don’t fight with it.
Assuming you have springy steel, now check the tang. You can only do this by removing the blade from the hilt [see the beginning of the chapter]. If you have a very wide blade, but a very narrow tang, the blade might crack at the shoulder. There is no hard and fast rule here, but a two-inch wide blade with a tang only 1/4 inch at the shoulder is not something I would trust in a fight scene. I feel more comfortable when the tang is at least one third the width of the shoulder on a light blade, and at least one half the width of the shoulder on a heavy blade, but that is just the minimum. Wider is always better.
Incidentally, a tang that stays bent (not springy) is not bad, for most fight grade blades are differentially tempered so as to leave the end of the tang soft even if the blade proper is stiff. That makes it easier to thread the tang and bend it to fit the handle. Also, many fencing blades have a tang that is not in a straight line with the blade but is actually at a slight angle to it. That’s done on purpose, to allow a fencer to point the tip of the sword at the opponent without having to overly bend the wrist.
Now check the edge. Most blades for stage combat will have a beveled, though not sharp, edge, and if the angle is too acute the blade might gouge into other swords. Even if fight worthy, you may want to grind down the edge until there is more “meat” on the contact surface. This is one of the reasons that most Ren-Faire swords are not practical for stage combat. Most are strong and correctly tempered, but the edge is so thin that they deeply gouge, often to a depth of more than 1/2 inch, after just a few strikes from another sword.
The edges of any blade are not impervious to strike damage. Burrs should be removed and gouges reduced, as not only are they potential break points on a blade, but the burrs are sharp enough to slice through skin and costumes. When the combat is aggressive, it is quite common for the edge to nick and develop burrs, especially on new blades. But if the edges deeply gouge with nearly every strike, the steel is probably too soft for use in stage combat.
There are some people who are so concerned about hurting the temper of the blade that they will only remove the burrs by grabbing a good hand file and working away at them, but if the metal is hard they have to be at it for hours. Just as good is using a grinding wheel with a medium grit stone. You can avoid overheating the blade by making several light passes on the edge until you have removed the amount of the nick that bothers you. Take several breaks to allow the steel to cool down between a few passes. Flip the blade several times so you’re not always grinding from one side, and keep the blade at a little bit less than 90 degrees to the face of the stone. Don’t go directly at 90 degrees or the wheel might catch the blade and pull it out of your hand. When you are done with the edge, then round the tip, and here you don’t have to worry about heat buildup.
The edge will now be a bit ragged to the touch, so use either a wire brush attachment on your grinding wheel, or just use a bit of fine grade steel wool or better yet some emery cloth (most hardware stores will carry it, usually near the copper pipes) and rub it up and down the edge until the steel is smooth to the touch. Although any nick on a blade (called a stress riser) is a natural susceptible break point, you have to balance how much steel you take off of an edge in order to smooth it down. You may end up reducing the life span of the blade by too much concern rather than from neglect. Everything is a trade-off.
[By the way, the nicks and burrs should all be along the foible and forte of the blade. If the nicks are congregated primarily on the center of the blade, your actors are fighting with extremely poor technique. Either hire a fight instructor or get rid of the one you now have. Your fighters need some competent instruction immediately.]
Assuming that the blade has passed all of those inspection points, you still can’t immediately assume that it is safe to stick into your fight. Stage combat is actually much harder on blades than a real battle would be, for theatrical fights are exaggerations and have all of the abuse taken on the sword instead of on a human. Also, different fights require different moves, so a “fight-worthy” fencing sword will disintegrate in a swashbuckling rapier fight. Your sword has to be able to handle the strongest move within your fight.
Many people will pick up a sword and try to determine fight-worthiness by determining three attributes: finding the center of balance, determining the center of percussion, and listening to the ringing of the blade. All of which are completely inconsequential and tell you nothing about fight worthiness.
Current Common Blade Varieties Used for Stage Combat
The first three blades come in both practice and competition forms. You’ll want the practice variety always for stage use. Competition blades have a tiny groove in the length of both the visible blade and the tang to allow placement of an electrical wire. That’s because competition blades need to be wired for connection to the point scoring apparatus. This groove weakens the blade somewhat for stage use as well as increasing the price.
As these first blades are made for competition fencing, and are very thin strands of metal, steel buttons are welded onto the tips as a safety measure. They are not necessary for the other blades, and indeed of not much help in stage combat in any case.
Ö Foil – the lightest full length blade made, it starts off with a square cross-section of only 1/4 of an inch, and then tapers down to a springy and flexible flat band of steel, the blade proper being about 35 inches long. Used for competition in the Olympic sport of foil fencing where there is no cutting and the incoming thrusts are deflected, not blocked. Usually having a built-in slight “C” shaped bend overall so that in the event of a hit the blade will continue to bend rather than try and force its way into the opponent. It is not designed for nor can it tolerate any type of cutting motion. The foil blade and fencing style associated with it was developed originally as a practice tool for dueling students to increase reaction speed. Extremely “whippy”, it should never be used for stage combat. Even a pulled cut can bend right around a block and smack the defending actor right in the face.
Ö Olympic Sabre – also a flat band of steel, also 35 inches, it has a very slight narrow “V” cross-section giving it both a leading and a back edge if you study it closely, the bottom of the “V” being the leading, cutting edge. Although Olympic-style sabre fighting does use a cutting motion, it is all snap-cuts from the wrist with very little arm strength or body weight behind it. Just as with the foil, this blade is very whippy and not appropriate for stage combat.
Ö Epee – the lightest and most popular blade for use on stage. A prominent flattened “V” shaped cross-section and a deep groove running down its 35 inch length provides excellent stiffening while keeping it as light as possible. Unlike the above Olympic sabre, the bottom of the “V” is the spine, allowing each arm of the “V” to be a leading edge, in theory making the epee a double edged blade. When mounted onto the hilt, general practice is to have the spine pointing out when wearing the sword. In other words, when holding the sword with the palm facing up (supine) you should be looking down into the groove. The blade can certainly be mounted the other way, but it does change the feel of the sword.
Over the length of the blade, the epee forms a gentle “C” shape, curving slightly toward the spine, that is, away from wide part of the “V”. That curve is built in to the blade. With time, an “S” shape may develop, but this can weaken the steel during use, so the blade can and should be bent by hand back to its normal curve. It can survive that kind of re-bending hundreds of times, and that doesn’t weaken the blade appreciably. The epee can, with time, also develop a bend along the edge. This is cause for concern, for it means that the actor has been completing his cutting motions with far too much force. See the stage combat section for correct technique.
Using the epee blade for stage combat allows for all of the lightening fast moves of competitive fencing while still having just enough strength to handle most of the controlled cutting and blocking of stage combat. Epees are very flexible and springy, accepting bends of over 90 degrees. It is still a fragile blade, however, and in a big show with, let’s say, twenty fighters you can expect one or two blades to break in normal rehearsal and performance.
Ö [Demi-Epee] – Not normally purchased from fencing supply companies, but at 28 inches is just the right length for a historically accurate smallsword blade. At Weapons of Choice, we started providing these blades for not only the smallsword replicas but for any lighter sword in which the distance between the combatants can be a problem. In theatre-in-the-round or 100 seat houses, for example, having two actors standoff with full length blades sometimes means that one person ends up in the wings or on an audience member’s lap. This cut-down version of the epee also happens to take a lot of stress off what is normally the most brittle part of the blade, so the blade once so shortened seems to last forever.
Ö Double-Wide Epee – also known as the Musketeer blade. With twice the steel and a much deeper and dome-shaped groove, the idea is that it was supposed to be much stronger than the common epee. I’ve noticed that the foible seems to be even more brittle, and the failure rate to be twice that of its thinner cousin since the wide blade is still fitted with only a 1/4 inch tang. That extra weight puts a lot of stress on that little tang, and these blades often break off at the hilt. It is no longer widely manufactured, so on occasion is difficult to find, but some still pine for its [slightly] better visibility from the house. You can still find it in many props cabinets, and different European cutlers come out with one version or another every so often, usually at about three times the cost of a standard epee.
Ö Schlaeger – The lightest of cutting permissible blades. It starts out the same width as the epee, but it maintains that same width throughout the 34 inch blade length and has no groove, having a lens shaped cross section. Designed for the Mansuer style of aggressive dueling of the Heidelberg University, it allows for stout cuts and blocks. The tang is also at least twice as thick as that of the epee, increasing its survivability. Finesse wrist moves and exact point work are still possible, but the slight addition of weight down at the foible means that all moves will have to be performed more slowly compared to the epee. At the time of this writing, lens shaped schlaeger are no longer being produced. [There is a longer version of the same blade, but stay away from it. At 39 inches but the same width, it has a horrible tendency to wave and wobble during fighting.]
Ö Diamond Schlaeger – built the same as the standard schlaeger, but has a lozenge cross section. This shape reduces the amount of steel on the blade without sacrificing strength, so the sword is much more responsive in the hand [but still nowhere near as fast as the epee]. Some sword makers choose to weld a steel button on the tip, but for stage combat this is absolutely unnecessary.
Ö Single hand – Now we’re getting into the real broadsword weight blades. This one is meant for use in a singlehand sword, but we’ve sometimes put them on two-handed handles for fighters who may not have time to build-up the shoulder strength necessary for injury free two-handed broadsword fights. About 33 inches long.
Ö Hand and a Half – sometimes called the bastard sword, at 35 inches it is the most common blade used for two-handed fights. Although only two inches longer than the above single-hand, because of extra width it is 50% heavier.
Ö Double hand – this is a lot of blade, and there are very few who can both control the sword and not pull some tendons. Thirtyeight inches long and almost twice the weight of the hand-and-a-half.
Ö Zweihander – This is really fun to see on-stage, but either leave it for the weight-lifters in the cast or for use in a comic fight. The exposed blade is 45 inches long, and although actually lighter than the two-hand, the extra length makes it very difficult to control.
Ö Shortsword – Most swords for iron and bronze aged cultures were built with this kind of blade, as longer blades were simply not practical when using those weaker metals. In steel it is very light and responsive. Made by a variety of companies, most are about an inch wide and 18 to 24 inches long
Ö [Leaf] – Trying to match the look of the distinctive shortsword variation in a fight worthy blade is difficult, but we build them and keep them as light as the standard shortsword, but between 2 to 3 inches wide. The only problem is that in making it light, it is also brittle, so has a tendency to crack more often than standard blades.
Ö Sabre – An excellent and nearly indestructible recreation of the cavalry sabre, also used in oriental versions of two-handed swords. As a cavalry sabre it has a drawback in that the weight is very forward. It is very similar to the single-hand broadsword blade, even having the same 33 inch length, but on a military sabre hilt it lacks the necessary counterbalance to allow for easy control. With a short tang and no true pommel, it means that the sword is easy to swing but very difficult to stop. When built into a two handed weapon, the longer length of the handle and being able to balance the weight by use of a heavy pommel, the blade makes for a fine weapon. It is unfortunate that as of this writing they are disappearing from the market.
Ö Cutlass – The cutlass is really merely a shortened sabre blade, and as with all shortened blades it makes a very user friendly sword. Balances well in the hand with almost any hilt.
Ö Scimitar – Historic scimitars were simply what we would identify as standard sabre blades, but Western imagination gave it a much wider cutting head than it really ever had. Because of audience expectations, these fantasy blades are used for many “Middle Eastern” swords. Luckily, several Chinese firms make a durable and light blade usable for stage combat. But stay away from the ultra light wushu style weapons. Any blade that wobbles when you shake it is inappropriate for stage.
Ö Machete – Very thin steel, but of great strength (which shouldn’t come as a surprise considering what the tool is supposed to do in the field). The biggest concerns come in the wobbliness of the blade and that the edge tends to burr very quickly. Stage combat is possible with machetes so long as the moves are modified to deal with the realities of the weapon, and of course you have to grind down the tip and edge.
The Complete Weapon
Assuming that the sword is correctly assembled and suitable for stage combat, there remains the final attribute of the weapon – its “feel”, the way it handles. And here is where the makers and purchasers of swords will start to throw out the terms center of percussion, sweet spot, center of balance, and blade harmonics. Let’s start with the easy stuff.
The center of balance (CoB) of a sword is pretty self-explanatory, and easy to find. Simply balance a sword on your finger; there it is. Where is the optimum center of balance? That is a personal preference. The further the CoB (also called the center of mass) is from your hand, the more momentum, therefore power, can be delivered to a cut. But the drawback is that it becomes harder to stop the blade once it is in motion. The closer the CoB is to your own palm, the lighter the sword feels, but then you lose the benefit of gravity to aid in control of the tip. For stage combat, a balance point of between one to six inches beyond the hilt seems to be the average.
The center of percussion (CoP) is a little more complicated, especially since the term is used differently by different people. First, pure physics. Assuming that an item is suspended in air somehow, striking it at the CoB will cause the item to move away without spinning. But if it is struck off of that center, the item will also move away but in addition will spin around the CoB. Now suppose the item is suspended or held at some spot that isn’t the CoB. If you strike the object at the CoB, the object is going to try to pivot around the hold point. Strike it somewhere else and there are two pivot points to calculate. Somewhere in between the hold point and the CoB is the center of percussion, and striking the item right here will cause the two pivoting forces to cancel out. The object won’t try to spin; it will simply move straight back (if it weren’t held down).
So the CoP is determined by a combination of the center of balance and where you happen to hold the weapon or tool. This center of percussion is useful to know for sword play, because it is the spot that you want to use to block an incoming attack. If the block is made too close to the hand, the blade will try to pivot forward. It the block is made too far away, the blade will be pushed back.
Then there is the other center of percussion, the term as it is used by sword people. They like the term percussion to mean where one should strike with a sword to do the most amount of damage. What they term the center of percussion is commonly referred to as the sweet spot. Striking or cutting something at the sweet spot feels the most comfortable, but the reason for this has nothing to do with the actual CoP. I hate improper use of perfectly good terminology, so even though other sword people call this spot on the blade the center of percussion it really isn’t, I’m just going to call it the sweet spot.
Determining the location of the sweet spot for any given sword is both objective and subjective, because more important than the amount of force that one can generate is the way a sword feels when it makes contact with the item to be struck. This is relatively easy to do with something like a baseball bat, for the CoB is way down at the end of bat, so the CoP and the sweet spot are going to be down there too. There are a lot of very good physics papers which eloquently explain the phenomenon for baseball bats and tennis racquets. But a sword is different. The CoB is very close to your hand, but you have to strike with the far end. This conundrum has let some to work out a theory based on blade harmonics.
The idea there is that everything vibrates when it is struck, and that certain “vibration nodes” naturally occur along the object. These nodes differ for each weapon, but in theory the vibration is less noticeable at those spots. If one holds the sword at one node, striking the sword at the other node will cause the least amount of vibration to be felt in the hand. This is a wonderfully constructed and utterly bogus hypothesis. I won’t go through the physics, but the bottom line is that these nodes have not been established for swords, and that the vibration that does occur in a well constructed sword cannot be felt by the holder. The reason a sword or bat or racquet doesn’t feel right when you miss the sweet spot is simple – the handle wants to pop out of your hand. You can feel this by gently pushing on the blade – no striking, no vibration, no harmonics. Instead, simple leverage.
Think of an axe as compared to a machete. An axe has a center of percussion very near the center of balance, so it puts the sweet spot right at the axe head. If you’ve ever chopped wood and missed the strike, hitting the handle instead, you’ve felt that horrible pull of the handle as it tries to pivot around the axe head. On a machete, if you miss and make contact with the middle of the blade, it doesn’t sting the same way – it’s just an ineffective cut. None of this has anything to do with harmonics.
So we’re back to the sweet spot and the CoP. Again, those two are nearly the same for a baseball bat or an axe, but at opposite ends on a sword or machete. So what’s happening with a sword? It has nothing to do with the CoP, and everything to do with the swing arc. This is a term common in golf, and refers to the path that the furthest end of whatever we swing takes. That furthest end is moving faster than the close end, and therefore has much more power. This can be measured in pounds per square inch, and it is well known that when you choke up on a bat you put less power to the ball because you have shortened your swing arc. The same thing happens when you hit the ball at the true center of percussion. You’ve neutralized the pivoting, but you fail to take advantage of the full power out of your swing arc.
“Wait a minute. Doesn’t that mean that the most powerful part of the cut would be with the very tip of the sword?” Well, you’re right, it would be. The only reason that it isn’t practical is that it’s really hard to keep the blade straight the closer the strike is to the tip. Whatever is being struck forms a new pivot point, but an increasingly ineffective one the further you get to the tip of the weapon. The blade starts to bend out of the way of the impact, scraping by the target rather than digging into it. That’s fine for a passing slice, but it’s really hard to get good contact for a clean cut. You have the power there, but it isn’t being transmitted efficiently to the item being struck. Curved blades accentuate that problem, so contact with the last part of the blade, the foible, becomes ineffective as a strong cut. No, the best compromise between maximum power and maximum contact is that spot between the foible and the middle of the blade.
So, to summarize: The best spot to absorb a blow is at the forte near the hilt. The best spot with which to cut is at the juncture of mid-blade and foible.
Converting a Costume Sword to Fight-Worthiness
You might have a collection of costume swords in your props cabinet that you’d like to convert to fight quality by replacing the blade. Sometimes this is simplicity itself, especially if you are going to pop in a very light blade such as the epee. But there are a few things to take into consideration before you start.
It is almost a certainty that you will need not only a new blade but also a new pommel. The old pommel is probably made of brass, so will have to be replaced. Why? Because under the strain of swordplay, the pommel will loosen quickly, so naturally the pommel will have to be squeezed down harder and more often. Brass is soft, and the threads will strip very quickly. If you really want to keep the old pommel, there is one way to keep it so long as the new blade has a very long tang. Drill the hole all the way through and through, so that the blade tang can stick out of the top. Then tighten an appropriate steel cap nut on top, cut off the excess tang, and you are ready to go.
If the old pommel happens to be made of steel, you’re still not off the hook. It has almost certainly been threaded 1/4 20 [English], while most fight-worthy blades are threaded 6mm [metric]. 6mm is slightly smaller than 1/4 20, so you can’t just retap the same hole. You would end up with less than a third of usable contact between the threads, and the pommel would strip out in no time. If you really want to keep the old pommel, drill a deeper hole and tap the entirety at 6mm. This of course assumes that the tang of the new blade is long enough to allow for this.
Some swords have no pommels at all, or a hollow bulge called a false pommel. This is where the “center of balance” comes into play. Military sabres, especially, are designed to be swung without inhibition, so the center of balance is usually way down towards the middle of the blade. For a go-for-broke swing a weighted counterbalance is counterproductive. But stage combat sword work requires that you have control over your sword at all times. If you are going to put in an epee blade, you don’t need a counter weight, but anything heavier and you’ll need to get a weighted pommel on there somehow and bring that center of balance much closer to you hand. Does a big round ball on top of your sabre destroy the sleek look? Sorry, but you can’t fight without it.
Moving down the sword, the handle and grip can cause their own difficulties. To properly seat the pommel, the handle should have a flat, solid top. Many grips on costume swords, again mainly sabres, have asymmetrical tapered shapes. If there is enough wood, you might be able to simply give the top a fresh cut. If not, you’ll need a new handle. The asymmetrical handles will slowly collapse under the pressure of a tightened pommel, and even the tang can begin to bend inside the handle and crack.
You might also find that the old handle isn’t wide enough to support the tang of the new blade. Even though it may look plenty big from the outside, the hollow inside may need to be drilled out in order to accommodate your new blade. This can cause its own set of problems, especially if the wood is already weak.
Wire wrapped grips, especially common on sabres but also seen on many other swords, have to be handled with great care if you plan on using them with different blades. The wire ends are anchored to the inside of the grip, so drilling through the center of the handle shears the wire ends. After that, the whole wrapping quickly unravels.
A seemingly stout guard may not be suitable for a fight worthy blade. The width of the guard opening may be too thin and narrow for the new blade, but carving out the slot may weaken the metal. Also, even assuming that everything comes together, you might find that in tightening the pommel the blade will punch right through the metal of the guard. This is common on aluminum and brass guards, but can also happen on thin steel plate. To forestall this, place a good sized washer on the tang shoulder. This will not only spread out the pressure and protect your guard, but has the added benefit of isolating the blade from the hilt, creating that nice ringing sword that you wanted.
Finally, all of the parts may be good, but the assembly can leave the sword in poor condition. Here are some photos of a sword that was returned to us from a fight show. All of the parts are correct, but when someone reassembled the weapon they made two changes that diminished the sword’s suitability for stage combat. Can you spot the errors?
Ok, the first one I have to give to you, because you can’t see the blade width easily here. The blade edge on a sword must always be in line with the knuckles of your hand, therefore in line with the knucklebow. Take a look at the blade on the last two pictures. This person mounted the blade 90 degrees off, which would force the actor to cut using the flat of the blade instead of the edge. That’s like hitting a nail using the side of a hammer instead of the hammer head.
The second error is easier to spot. Notice the guard. It is asymmetrical, not uniformly round. A lot of people, including that props person, assume that the longer part of any guard should be aligned with the knucklebow. It looks prettier and is easier to wear since the sword can then rest closer to the hip. But alas, it is not so. The longest part of the guard must be placed so that it runs crosswise to the knucklebow, thereby protecting the front and back of the hand. After all, the knuckles are already protected by … the knucklebow.
Dagger Blades
Daggers in many ways are small swords, with many of the same components. Dagger blades differ from knife blades as they are double edged and symmetrical, meant primarily for stabbing another human. Some stage combat blade choices are listed here. Note that the blade lengths listed again refer only to the exposed portion of the blade, not the overall size of the complete weapon.
• Poniard – the lightest of fight worthy dagger blades, it is usually made from a cut-down epee blade. A mere 5/16 of an inch in width, it is commonly cut to between 12 to 15 inches in length. Designed for the quick fencing style of modern stage combat swordplay, it is just flexible and light enough to be the best match for the epee or schlaeger bladed sword.
• Dirk – At from 1/2 to a full inch in width, it is more stout than the poniard, and makes a legitimate visible threat in a larger house. The length by definition stays at between 10 to 15 inches.
• Wide Dagger – Also called the pie or wedge blade, it is the most common look for the fighting dagger. Usually one foot long, starting at about two inches wide and tapering in straight lines down to the point. Smaller lengths are available, but anything less than ten inches makes it very difficult for the actor to parry incoming attacks.
• Main Gauche – Literally “left hand”. While the wide dagger blade above was also an all-purpose knife, the main gauche was developed purely for the rapier and dagger fights of the Elizabethan period. Since the sword blade at the time was nearly 40 inches long, the dagger had to be made long as well, and the current main gauche blade is a tapered wedge of 18 inches. Some of the modern replica blades have two holes drilled at the forte near the shoulder. These serve no purpose; they are merely stylistic flourishes made to give the impression of the “sword breaker” notches that were found on some historic main gauches.