
These actions are the ones in which we need the audience to believe that hard physical contact has been made, with a recognizable moment of impact. That moment must always be accompanied by sound – sometimes a percussive sound, but always an exhalation of breath from both participants. Whether vocalized or not, the sound of breath is necessary for the illusion to be effective. There is no exception to that rule: every strike must have a sound.
No matter what the strike, the aggressor need not do the simulation quickly. It is the victim that must sell the violent impact in the reaction. Be sure that the victim understands to not begin the reaction until he can hear the impact sound – the “knap”. Sound travels more slowly than light, if the victim moves at the same instant of the strike, the audience is going to see the victim react before they hear the sound and it will get a laugh. Remember: aggressive move, then sound, then reaction.
foot stomp
I used to be a stickler about having the foot stomp performed by the aggressor stomping the ground directly downstage of the victim’s foot. But this can also work with the stomp directly upstage; in fact it often is even more realistic. It really depends on the actors. Have the actors practice both ways and you decide which one they do more effectively. Either way, the key to make this look realistic is to bounce the foot off of the ground immediately after the stomp. If the stomping foot is on the ground for even a millisecond, the audience will see that the aggressor didn’t actually hit the foot.
Go back and practice the trip a few times and you’ll see that the two illusions are mechanically similar, just with a different set of pictures and reactions. From one thing learn ten thousand.
face punch
These come in two broad varieties, either the cross or the jab. The cross starts from as close to the body of the aggressor as possible, travels to the impact point and beyond. It gets its name because the natural trajectory of the fist will cross from one side of the body to the other. (If the punch doesn’t cross to the other side but merely moves through the victim but on the same side that it started, it is called a straight punch). As the body weight is usually moving along with the punch, the cross usually has a lot of force behind it. The jab, on the other hand, usually causes less damage. It travels just from the shoulder straight to the target and then back again without committing the body. Therefore the jab is much faster that a cross, but also does less damage. In either case, this fist must form a straight line with the forearm: don’t let the actors curl in at the wrist unless you are trying to show that the character has no experience in fighting.
That’s the reality. Now let’s look at the illusions.
Directors usually like to have actors facing each other in quarter right and quarter left stances. However, for this first face punch we are going to have the actors placed so that the aggressor is full-back and the victim is full-front and directly upstage of the aggressor. This means that just before the punch, the aggressor’s face and body front will not be seen by the audience, and most of the victim will be blocked from view as well.
Right Cross: Side View
Careful: Actors feel that they already know how to do a fake punch, so the most difficult aspect of this is in having them perform the illusion rather than the reality of a real punch.
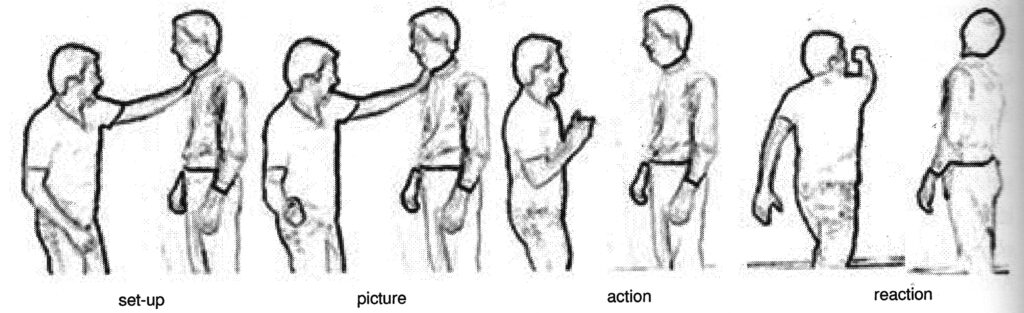
We need not only the verbal cue for the violent action, but also a physical one, perhaps noticed by the audience but not necessarily part of the violent act itself. For this punch we are going to have the aggressor put his left [non-punching] hand on the victim’s shoulder [the set-up]. The reaching arm should be almost fully straight, creating as much distance as possible between the two actors. This can be justified as, let’s say, preventing the victim from turning away or grabbing at the victim’s lapel, whatever, so long as it flows from the character choices and the scene. Once this touch occurs, the actors are not allowed to move their feet. Eye-contact is established between the actors – not the characters. If the victim dislikes anything about the body placements, or if eye-contact is not established, he or she merely steps back away from the aggressor [victim stays in control].
Right Cross: Audience View
set-up picture action reaction
Keeping the hips and shoulders square to the victim, the aggressor places his right fist out to his right side, showing the audience that a punch is about to occur [the picture]. The aggressor must not move his feet nor twist away from the victim; he merely presents a two-dimensional view of the preparation for a punch to the face. The picture does not have to take more than an instant, but it does have to be clear.
Now the aggressor gently brings both hands together, making a clapping sound so as to give the sound of fist striking face [the action]. Don’t punch the right fist into the left hand: that merely hurts the hand and makes a poor sound. Once the fist disappears from the audience’s view, simply create an openhanded clap, and then make sure to create the fist again as soon as you hear the sound. This is called a slip hand knap for only one hand is moving, the other merely being a static target, although it did have to move to get into position.
The fist will never approach the victim’s face in this simulation. Make sure that the aggressor understands that the right fist doesn’t actually loop around toward the victim’s face, but rather that both hands make a beeline directly to a spot three inches away from the aggressor’s chest. Clapping the hands by the aggressor takes place in a prayer position, never near the victim’s face. The audience has no depth perception, so there is no reason to move the fist towards the victim, but instead it travels across the front of the victim well below the level of his chin [aim off-line]. We perform a two-dimensional straight line reality, and allow the audience to imagine a three dimensional looping fiction. The feet of the aggressor stay planted on the ground, and the torso doesn’t lean into the punch, but merely pivots like the agitator in a washing machine.
The knap, however performed, provides the percussive sound of the impact, but it is not the only sound that the audience needs to hear. Far more important is the natural forced exhalation that comes from both participants in a violent action. These exhalations may or may not be vocalized, but in one degree or another must accompany every move in the fight. That’s why I had you inhale during the set-up. To ignore the exhalations in a fight is to rob the audience of their most critical cues to believing your simulation.
Only after the sound has been heard should the actors respond to the punch [the reaction]. Sound travels, so in a large house the victim must not react until he consciously hears the clapping sound, or else the back third of the audience will see the physical response before the sound of the punch has reached them. Also, actors tend to jump the gun when it comes to reacting, so making them wait until they hear the sound helps clean-up the action. The victim will move the face and right shoulder back and to his right, following the impetus of the imaginary traveling fist. In a larger reaction, the body might travel one or more steps, after the head reaction, but again back and to the right, increasing the distance between the actors. This reaction must match exactly the amount of impact which has been transferred by the punch from the aggressor to the victim, so all of the laws of physics must be obeyed [interactive flow of energy] The aggressor will finish his reaction not by sending the fist over the victim’s shoulder, but simply continuing the straight line started during the action, in other words, moving harmlessly in a safe line parallel and between the two participants.
The reaction is largely overlooked or given short shrift by the actors, but it is the only part that can impart realism to the simulation. The set-up, picture and action can be learned in a matter of minutes, but the reaction can take every bit of rehearsal time that can be spared. For the aggressor on this simulation, he should know that in all likelihood his character is experiencing an extraordinary adrenaline rush. The heart is pounding, the breath rate is increased, the muscles have tensed. The increased bloodflow includes that to the eyes, so much in some cases that the belligerent literally “sees red”. Pain may not be noticed in such circumstances, but quite a bit of damage can be caused to the punching hand, especially a number of fractures in the finger bones and knuckles, often a sprained or even broken wrist. This may not matter to the character immediately, but at some point the actor should incorporate the pain and stiffness when we see the character in other scenes.
The victim has just as much work to do. The simulation must include a realistic depiction of the transmission on energy that travels in a straight line through the victim, for as it travels it will affect each body part in turn. Let’s say that one of the moves is a face punch. If so, the victim must carefully decide exactly where on the face the fist has landed. If on the left side of the jaw, for instance, the lower jaw will be shunted violently to the right, the force of which will spin the head also to the right, but with the top of the head slightly trailing the jaw. The ligaments of the left side of the neck will begin to pull, stretch and tear, but also finally to draw the left shoulder around to the front. At this point the momentum will cause the top of the head to tilt suddenly to the right. Combined with the left shoulder turn, it will move the victim’s center of balance off of the left foot and back over the heel of the right foot, causing the body to move to the right and back. And that is merely one possibility.
Physiological changes for the victim include perhaps watery eyes and runny nose at least, perhaps slight shock as well. The extent of damage can include a broken lip, broken teeth, dislocated or broken jaw, certainly some tendon and ligament damage to the left side of the neck.
How much damage has been inflicted and how far the body will travel depends on how much force was behind the punch. Both actors must work together on every rehearsal to pay close attention to this, for not only must the victim modify the reaction so that it matches the apparent force delivered, the aggressor must make adjustments in body placement so that the path the victim takes after the punch makes sense.
Things NOT to do: over-rotate the fly-away the morphing punch/slap
There are some things to make sure that the actors NOT do when performing the aggressor role. These are bad little habits that can ruin the illusion. First, most actors will want to rotate their bodies for the picture portion, instead of keeping their shoulders square to their partner. By over-rotating and pulling the punching hand behind them instead of off to the side, it can expose the handclap moment to the audience’s view.
Second, actors tend to let both hands fly off in the direction of the punch during the reaction. Unless they force the knap hand to go down and low, the audience can easily figure out how the punch was faked.
Lastly, some actors will get the picture right with a closed fist, do the action correctly with an open handed clap, but then forget to close the hand into a fist again for the reaction.
jab
I love the jab, for it looks so real to the audience, even when they are right on top of the action. But it can only be performed in a proscenium stage, because it depends on a very narrow visual field. A jab is a straight quick punch, usually to the head, delivered from the leading hand We are going to assume a jab coming from the aggressor’s non-dominant hand, and that both actors have assumed a boxing stance. For most people, that means left foot forward and left hand forward. The jab is a set-up punch, causing pain but probably not enough to stop an opponent. It is usually used with the left hand to wear down an opponent’s defenses before a knock-out punch with the right hand.
Set up: actors stand facing each other, arms bent. Left fists are extended slightly from the body and held at shoulder or face height. The right fists are held close to the body at solar-plexus level. Both actors are leading with the left foot, and the shoulders and hips are turned sharply to the right to give the thinnest target to the opponent. In this combat stance the actor stage right will be half profile left, and the actor on stage left will be in three-quarter right. As opposed to many of the other simulations, that are performed just out of contact distance, the actors here must be in-distance, close enough for the wrist to reach the other’s shoulder.
Picture: In this case, there is no other picture needed or desired, for the movement must come as a surprise to the audience.
Action: There are two possible actions here depending on the position of the aggressor.
If he is standing stage left that means that the front of his body, therefore his right hand, is not visible to the audience. The left hand shoots out to a spot directly upstage of the victim’s upstage ear (disappearing for a split second behind the victim’s head) and immediately snaps back. At the same time, the right hand opens and makes a nice popping knap against the chest.
If the aggressor is stage right, than of course that right hand is visible, but the victim’s is hidden. In that case, it is the victim who needs to make the knap. In other words, the hand the audience can’t see at any particular moment is the one you use to slap. Either way, be sure not to twitch at the elbow when slapping the chest, or the audience will know how you made the sound.
Reaction: The victim’s head snaps up and down once in a slight whiplash reaction. A lot of actors want to follow the direction of the aggressor’s hand and turn the face slightly up-stage, but the simulation here is of being hit flush on the nose, so the face must not turn sideways at all or the illusion is ruined. The aggressor needs no reaction, as the jab causes minimal damage to the tight fist.
By the way, the same basic mechanics can be used to simulate a punch using the trailing hand. In that case it is called a straight punch, not a jab, and we do have to make one slight modification. Instead of having the actors stand with their shoulders square to each other, we have to off-set the actors, with one of them standing slightly more upstage than the other. That way the straight punch can travel upstage of the victim’s head without the aggressor having to twist the torso. Otherwise the simulation looks like a right cross, not a straight punch.
So remember: three hands are visible, so the one that isn’t does the sound. And no matter which hand you use, the punch always goes upstage of the victim’s head.
upper cut
Side view
A simple illusion. Full-back to the audience for the aggressor, full left arm safety distance touch to the victim’s shoulder, and then the left open palm dropping back to the solar plexus as the target for the knap. Keep the torso straight, but bend the knees so as to give strength to the coming punch. The right hand goes down as a fist to as low as comfortable to the right side, then drives up in a straight line to the target [left] hand. As in the right cross, open the fist so as to clap hands, then close into a fist again as it drives up to forehead level or higher, finishing the simulation. Naturally, if the actors are standing in reverse position, the victim can provide the knap. Either way, never let the aggressor’s fist move in a curve toward the victim’s face.
Victim full-back to the audience …. or ….. aggressor full-back to the audience
Remember that an upper cut delivers terrific damage, and boxers know that even with gloved hands if it connects it can be a one-punch knockout move. Save this move for the end f a fight, or at least for a point where the victim is going to remain severely disabled or disoriented. A broken jaw, severed tongue, double concussion (the brain slamming against first the front of the skull and then against the back), even a broken neck are all real possible consequences of this punch.
hook punch – face level
The upper cut just described travels from low to high, of course, perpendicular to the ground. If we shift the angle of this so that it travels in a tight semicircle parallel to the ground, we’ve created the look of a hook punch. The hook punch is used when then opponent is successfully covering his face with his hands, making the cross or jab difficult. The hook loops tightly around the opponents defenses, and does not follow through but must appear to “bounce off” the opponent’s head. As with the jab, the easiest way to provide the knap is to have the aggressor smack his own chest with his left hand. The victim’s reaction will be to tilt the head viciously to the right or left, the body following. Care must be taken not to have the victim twist at the neck, for that implies a different punch. Of course the trajectory of the actual movement will go to a safe spot between the two combatants. For this reason, this simulation can only work when the actors are stacked, never when in profile. But because the distance of the victim’s head and the aggressor’s moving fist are so close, this should be considered an advanced technique.
pile driver
Although this looks as powerful as the above upper cut, the damage is actually less, since the top of the head is a very hard object to strike. The simulation, on the other hand, is much the same except for the direction. If the victim has his back to the audience, with the hands hidden from view he can make the loudest clap possible without moving the elbows. If the aggressor has his back to the audience, then he will make the knap as he did for the right cross face punch. The aggressor’s arm starts high, and simply drives the hand in a straight line to the ground, of course going nowhere near the victim’s face. The victim matches the action with a clap, being careful not to move the elbows. If possible, have the victim get lower than a natural full upright stance, for we need to see the aggressor rise up on his toes and then “lower the boom”, the body dropping into the punch.
Pile Driver: Side View
set-up picture action reaction
The reaction for the victim is a little counter intuitive, so you’ll have to trust me on this. The path of the pile driver naturally has a slight angle to it, and contact is usually around the near eye socket. So instead of following the path of the fist, the face will twist not only down but also sharply to the side. Think of it as an angled billiard shot.
Pile Driver: Victim’s Back to the Audience
set-up picture action reaction
The reaction for the aggressor is pretty straight forward. Many of the bones of the hand will be broken. If it is necessary that the character not sustain that damage, consider simulating the punch using a hammer punch, that is to say a strike using the bottom of the fist, the little finger side.
slap, in distance and out
Ok, I’m going to get off of neutral ground here and say that for this simulation – DON’T WAIT FOR PROFESSIONAL INSTRUCTION. Oh, you should still get an instructor to show the correct technique and prevent injury if at all possible, but I know that the reality is that actors are actually slapping each other every day on stage and I what to put a stop to it. Today.
There are some stage combat “experts” who insist that an actual contact slap to the face is perfectly safe as long as it is modified slightly. I have seen videos sold by these same professionals showing actor/students facing each other and trading slaps back and forth to prove the safety. Those experts are wrong. The contact slap is inherently unsafe. The slap to the face sends more actors to hospital emergency rooms every year than all of the other techniques of stage combat combined. Did you get that? This includes knife fights, broadsword fights, swinging from ropes, gunshots … all of the other techniques of stage combat combined.
Actors are often taught that all one needs to do to safely slap someone in the face is to cup the hand slightly, keep the fingers and wrist very relaxed, and go for the fleshy part of the cheek. It is true that most of the time it causes no injury, which is why those “experts” assume that it is safe. But when this contact technique goes wrong, the results are devastating.
In a perfect world, the slapping hand will strike at exactly the same spot every single time, but that is simply unrealistic. When a hand is relaxed, the palm forms a slightly shallow cup shape. When that cup strikes the cheek, the air inside becomes pressurized and searches for release in the line of least resistance, which makes that satisfying popping sound as it slips by the fleshy skin of the cheek. However, if the hand drifts a mere inch closer to the victim, the ear is now inside the coverage of the hand. The pressurized air is still looking for a means of escape, and it’s found it – right down the ear canal. At the bottom of the canal is the tympanic membrane – the ear drum – which easily bursts. If the membrane doesn’t heal properly [all too common even with immediate medical attention] or if an infection develops [which is highly probable] the actor can expect temporary or permanent, partial or complete, hearing loss in the affected ear.
If this were the only bad thing that can happen to the actor, it would be reason enough to ban this practice, but there are other injuries which also occur – every year. If the hand is flexed a little, the face is hit with not a cushion of air but with the outer edge of the hand, or the hard ridge where the fingers meet the palm, or worse, the heel of the palm. In other words, bone strikes face. This can and does lead to dislocated jaws, broken cheek bones, broken hands, broken cartilage of the external ear, broken teeth, split lips – nasty stuff.
The damage need not occur only on the first contact of the slap itself. Many have escaped injury on the initial slap only to have the trailing fingers scrape across the near eye or break the nose. Some have been taught that, in order to avoid all of these potential dangers, the slap can be delivered lower, to the side of the neck. Very poor advice, as this can lead to a bruised trachea, and in one instance a slap collapsed the carotid artery and the victim died from lack of oxygen to the brain. Died.
No one should have to risk deafness, blindness, broken bones or death because of a play. But even if we could make the contact slap completely risk free, there is still another reason not to do it. It leads to bad acting for both the aggressor and the victim. The aggressor has to stop acting for a moment while she worries if the slap has really done any damage, which is the opposite of the feeling she is trying to convey to the audience. As for the victim, he usually ends up with a look of stoic resistance just before the slap – not exactly helpful in trying to sell the idea that the slap has come as a surprise. The timing can suffer, because most actors tend to get a bit “slap-shy” after being struck in the face a few times in rehearsal, and then start to react to the slap before the hand has started moving. Also, the pain received is real pain, therefore the reaction is the actor’s, not the character’s. It might be similar to the character’s, but at that moment the actor has removed himself from the world of the play and lives completely within himself as his body deals with the pain. All of the work of trying to create a world specific to the playwright’s intention is thrown out the window, and the audience has to wait for the actors to regroup and find the characters again. This isn’t acting; it’s the opposite of acting. It’s the equivalent of rubbing onion juice on your cheek in order to bring up tears.
Directors tell me that they would rather that the actors hit each other because it is very difficult to make the simulation look real. Yes, that’s true. It is hard work, harder than any other simulation you will ever ask your actors to do. But since it can save them from permanent injury, just suck it up and add the extra rehearsal time and work it ad nauseam until you can fake out five observers looking at the slap from five different vantage points.
I have more than once heard an actor tell his partner to “just go ahead and slap me – it’ll keep me in the moment and it will look better”. I’ve noticed that the offer is never made if he is supposed to be struck on the head with a baseball bat. Well, if they can make a simulation of being clubbed work to the audience’s satisfaction, they can do the same with a simulation of a slap. I obviously feel strongly about this, so strongly that I will not work for a director who insists on having the actors perform an actual contact face slap. You shouldn’t either.
Now, let’s get to the simulation. A real slap to the face, especially as written in most Western plays, comes as much of a surprise to the aggressor as it does to the victim, so in the simulation we need to remove any hint of premeditation. So there isn’t going to be much of a wind-up nor follow through. If anything, the body and even the rest of the arm will stay neutral and the slapping hand will look as though it had a life of its own from the wrist outward. Let’s try a difficult slap first, and that’s with the aggressor’s back to the audience.
Slap: Side View
“pre” set-up set-up picture action reaction
Set-up: As the victim crosses slightly upstage, the aggressor uses the fingers of the left hand to touch the shoulder, stopping the victim from continuing, by happenstance stopping directly upstage of the aggressor. This is a small movement that can happen several lines before the slap, for it merely establishes distance. We can call this the “pre” set-up. Once the left hand is no longer seen by the audience, it can move to its target position – right in front of and against the solar plexus, palm turned up at about 45 degrees.
Picture: On the cue for the slap, the right elbow stays tucked against the body as the right hand flies up almost to ear height. Don’t short change this step, because there is no body English that goes along with this simulation. You must give the audience a brief look at the back of the hand or they won’t register the slap that is to come. But the elbow must not move.
Action: The hand, and only the hand, moves quickly here from right ear to left ear. Along the way, as it disappears from view, it scoops down to the target hand, makes contact with a light slapping sound, and then continues to its final position. Think of slapping water out of a bowl being held by the left hand, and throwing the water over your left shoulder. Do not move either elbow, don’t move your body, and you don’t need to move the target hand either. This is a tiny little movement; not an action that has the force to drive someone through a wall, but just enough to turn the face slightly.
Reaction: The aggressor must show the audience the fingertips of the right hand over the left shoulder for just a brief second, and the left hand must simply appear down by the left side. We want the audience to think that it was there the whole time, that way they won’t think that it was part of the action. Again, eliminate all movement except for that of the slapping hand. The victim must wait until he hears the slap sound before moving the face.
Slap: Audience View
“pre” set-up set-up picture action reaction
No matter what the relationship was between the two characters, once a slap has occurred it means that the world of these people has changed forever. One person has decided that words alone cannot express emotion, and that violence – the specific intent to cause physical pain – was the only remedy. There is no ignoring the transgression. The characters may make up afterwards, but the damage to the relationship will be there forever. Both characters know it, the audience knows it, and that is why the damage is far greater than the act. The audience now needs to know what will happen next – where will the relationship go? – and so they will look at the victim’s eyes for help. That is where your focus should be as well. The slap is over in a second; the emotional scar may last a lifetime.
I said that this simulation is the most difficult, so if you master it, everything else is a piece of cake. An easier version is to reverse positions, having the victim step slightly downstage and then turn his back to the audience. Now he can clap his own hands together, or even just use one hand to slap his chest, although the chest slap is a deader sound, so I prefer that the victim simply clap his hands. This one must be a slip hand knap, with one hand held stationary as a target and the other traveling in a straight line from down by the hip to the target hand to the “struck” cheek as part of the reaction.. The aggressor can stand a little further back and his hand need not dip so low, although I still like the fingertips to scoop underneath chin level so that the victim knows he has nothing to fear. In any case, the slapping hand need never get any closer to the victim than halfway between the two actors.
As both actors feel more secure in the knowledge that they can’t hurt each other, the director can keep making adjustments to make sure that the audience is fooled by this illusion. As everyone masters these techniques, slowly turn out the relative placement of the actors. Instead of one being full back to the audience, try moving them so one is three quarters front and the other is one quarter front. The body placement will have to change slightly, and the path which the arm takes may need to change as well, but it is possible to open this simulation up quite a bit, especially if the actors are in motion slightly just before the set-up.
Slap: Audience view, Victim establishes set-up, Actors off-set
set-up picture action reaction
This kind of simulation can be a pain to work through, but it is definitely worth the effort. I have yet to find a circumstance in which there was no alternative to actual contact. To give you an idea, I once choreographed the fight scenes for a theatre-in-the-round production of Macbeth, and in this production for some reason a general slapped a soldier in the face. The actors were surrounded by the audience so there was no hand that could disappear from view, and we couldn’t provide the usual cheat of doing an off-stage noise. We finally worked it so that when the soldier finished his line the general stood for a moment in livid silence and then turned slightly away, as if the soldier was off the hook. Just as the soldier relaxed with a sigh of relief, the general suddenly turned back and savagely struck him. The soldier instantly raised his hand to the side of the face, and the general let his own hand hang in the air at face level. The audience heard the slap, and they were sure that they had seen the soldier’s face brutally struck, but the actor had merely been slapped on the shoulder. So long as the actors believed the illusion, the audience did as well, because they were given the right picture before and after the sound.
backhand slap
Set up: Both actors parallel to the proscenium. This one works rather well no matter which actor is upstage, so long as one is standing full front and the other is facing him full back. The distance between the two should be slightly more than the length of the aggressor’s arm. For our example we have the victim attempting a stab with a knife in the right hand, which the aggressor has blocked with his own left hand.
Picture: Although it’s called a slap, this kind of strike packs a heck of a wallop, so the stance has to be much wider and deeper than for that of a regular slap. The aggressor should make a slight step to the left as his open right hand reaches low and to the left, making it clearly visible to the audience. The victim raises his left hand to solar plexus level, about six inches away from the body, leaving it loose and parallel to the ground.
Action: The aggressor sweeps his right hand in a gentle arc from low left to high right, connecting with the victim’s contact hand to provide a shared knap, and then continues to a point above the right shoulder at face height.
Reaction: The backhand is one that can spin someone’s head around, so the victim should gauge the severity of the reaction according to how much apparent force the aggressor is pantomiming. The victim must make sure that the contact hand not fly up with the force of the slap, but instead drop down and away. If the contact hand goes anywhere but down, it destroys the illusion.
spanking
Just a brief word here, because I have seen this done so poorly. Many actors, wanting to do a series of spanking slaps, pause at the bottom of the spank. It just doesn’t look real. Instead, concentrate on bouncing the hand away from the target. If there is any pause or slow down, it should be when the hand is up, not down. And have someone provide sound out of view with a slapstick. The audience needs to hear this sound if they are to have any chance of believing what you are selling.
backhanded punch
Not to be confused with the backhand slap, this has more in common with the jab in that the strike is quick and has no body weight behind it. But because of the arc of the striking hand, it is much more dangerous. With the fist traveling directly toward the victim’s face, we’ve broken the rule about making sure that all energy is directly off-line. Attempt this simulation only under the guidance of a trained instructor.
Set up: both actors on the same plane and parallel to the proscenium, both full back, victim stage right, aggressor on the left, although this simulation can work in almost any angle. A pre-touch should establish a one arm length’s distance.
just the picture: downstage (audience) view sideways view upstage view
Picture: The aggressor’s left elbow rises up and points four inches downstage of the victim’s nose, as the right fist, slightly curled in, rests in front of his own right shoulder. The right arm gently crosses in front of the chest in a ready position, with the fingers of the open right hand near the let fist.
just the action: downstage (audience) view sideways view upstage view
Action: Making sure that the aggressor’s elbow doesn’t drift upstage, the upper arm remains immobile as the fist travels in a horizontal arch until almost fully extended and then immediately returns to the original position. The fist must go no further than that spot directly upstage of the victim’s upstage shoulder (it’s hard to see, but note the arrow on the illustration above. That’s as close as the fist ever gets to the victim’s head). The fist snaps out and back like a whip at the fullest point of the extension, and the act of pointing the elbow will keep the fist away from the victim. Be very careful not to hyperextend the elbow when performing this action.
By the way, the back of the hand is not the striking surface in a backhand punch. Just like any regular punch, contact would be made with the front of the fist, so we have to include that reality in this illusion. That means the wrist must curl out at the last part of the swing so the audience can believe that this was a punch, not a closed-fisted slap.
The knap for this is similar to that for the jab, in that the palm of the right hand quickly slaps the space between the right shoulder and pectoral muscle. This works even in full view of the audience so long as the left hand moves as one unit with the arm – no separate movement at the wrist, and certainly no flapping at the elbow. And this isn’t a big move – you should be able to get a decent knap with the arm traveling only an inch or two. The toughest part is to not bounce the slapping hand off the chest after making the sound (the extra movement will give away the illusion) The punching hand can’t “stick” in the air – it has to bounce right back to the ready position.
Reaction: Only the victim need react here, and it is a relatively small “whiplash” reaction with perhaps the subsequent realization that the nose has been bloodied. The simulation will not work if there is even a hint of reacting too soon, so it is absolutely critical to hold the reaction until you hear the knap.
stomach punch
(I know, I know, a hit to the belly misses the stomach entirely, but no one uses the phrase “small intestine punch” ; neither will I.)
Every cast seems to have some young idiot, usually a young male, who insists on showing everyone how to do a contact stomach punch by getting someone to punch him in the belly with full force, at which point he clenches his stomach muscles and takes the hit. In my youth, I was the young idiot. There is actually a way to do a relatively safe contact stomach punch, but it’s neither as easy nor as dangerous as the one our young actor would have us perform. A stage contact punch doesn’t require any stomach clenching on the part of the victim, and feels like a light tap, but only let an experienced fight person teach it.
We’re going to learn a non-contact technique. I love this one because once you get the hang of it, it can be performed at almost any angle.
From a safe distance … right foot crosses to right foot … then left foot to behind victim … then do the punch.
Set-up: The victim stands stage right, profile left, the aggressor stands stage left and profile right but slightly downstage of the victim. The right feet of both are almost touching. The aggressor takes a big step forward with the left foot, actually past the victim, and the hips have turned slightly closed. The aggressor should be able to see the victim’s back. When the actors are this close, the victim’s stomach is hidden from the audience’s view. At the same time, the aggressor’s left hand touches the victim’s right shoulder. At this point there is still no movement of the punching arm.
Picture: The aggressor slightly bends at the knees, closes his hand into a fist as the right arm arches back into the view of the audience.
Audience view Side view
Action: The punching arm quickly moves into the target, which is a spot downstage of the stomach, right into that clear gap between the two actors. Since the aggressor can’t see the target, I like to have him aim for his own right hip – easy to find and it keeps the victim safe. To make clear, I repeat: the target is not the victim’s stomach. Don’t let the hand stick in place. In order to sell the illusion of hitting the stomach, the fist must appear to bounce off of the target, so this is a quick out-and-back punch.
The percussive sound of contact is not necessary so long as both actors exhale with a slight vocalization. An actual punch doesn’t sound like much, so there is no reason to create a hidden clap.
No need to aim for the stomach. The fist is aimed between the two actors.
Reaction: The victim simply bends forward at the waist. But don’t lead with the head; that’s not natural. The bend happens as a wave, with the stomach contracting first, then rolling the shoulders in as the butt moves back slightly, and only at the very end will the head look down. The aggressor should do the opposite, that is to say stand up even more straight. (For some reason, sometimes the aggressor doing the punch wants to bend at the waist too. Strange.)
elbow to stomach from behind
Warning: this is a more dangerous illusion, in that we are aiming force directly at the victim. This should be taught under direct supervision of a trained instructor.
This is the typical escape from a one-arm choke hold from behind, and is a simple variation of the above stomach punch. From one thing learn ten thousand. (I obviously enjoy that phrase. I’ve borrowed it from The Book of Five Rings, and serves as a reminder that each technique can be modified to create countless variations and alternatives.). Since this technique is an elbow strike, the roles of aggressor and victim are reversed: the choker/aggressor suddenly becomes the victim, while the person being choked becomes the aggressor. For this example, we are assuming that the choke is being performed with the right arm.
Set-up: The victim and aggressor stand full front to the audience, the aggressor slightly to the left and in front of the victim. The right heel of the aggressor is almost touching the left toe of the victim. The victim has his right arm loosely round the aggressor’s neck, and the pressure of the arm is pressing lightly down and forward. The aggressor, pretending to try to remove the choking arm, is actually pushing the victim’s arm towards his own chest, so that if he relaxes his push, the choking arm would naturally drop away. The aggressor’s chin should be tucked into the chest so we can’t see that he is not really being choked. The head of the victim must be safely looking over the right shoulder of the aggressor.
Picture: The aggressor’s left arm stays on the victim’s choking arm, while the right straightens out forward.
Action: Be careful here, because an elbow to the solar plexus can do a lot more damage than a punch to the stomach. The elbow smoothly moves into the target, which is the aggressor’s own right hip, and must not be allowed to drift further back than his own hip level. The elbow doesn’t stick there, but bounces off rather quickly. Again, the only sound of contact needed is a vocalization from both actors.
Reaction: The victim simply bends forward at the waist, but this time the chin should lift up so that the audience can see the reaction. The aggressor simply holds position.
elbow to spine
For the YouTube video on this, just follow this link: https://www.youtube.com/watch?v=e9vWMexflpk
We’re getting into some dangerous territory here, but I include it because I see a lot of high school students play around with their own simulations. They see this stuff on professional wrestling on TV and then try to recreate it. Ironically, they know that what they see is fake, so they assume that the simulations can’t hurt anyone. Unfortunately, it can if done improperly, and an elbow strike more than others even if done lightly. So here are some guidelines on turning a very dangerous simulation into something tolerably safe:
Set up: Usually, this simulation comes directly after a regular stomach punch, so the set-up is already implied from the final reaction – the doubling over of the victim, with the aggressor’s left hand still touching the victim’s right shoulder. The aggressor is standing very close and squared-off to the victim.
Picture: Let the left hand slide from the shoulder to a spot to the right of the victim’s spine. You’re looking for a large muscle group a little above the floating ribs but below the scapula. Let the heel o the palm rest there as the fingers lift up. The right hand shoots straight up into the air and forms a fist.
Action: The aggressor merely bends from the knees, keeping the back straight, as the right arm bends. The contact is made obviously NOT with the elbow, but with the back of the upper arm, the triceps. To add further safety, contact is not made with the victim’s back at all, but with the back of the aggressor’s left hand, just below the wrist. So that the victim can time the reaction, the aggressor uses the slightly curled fingertips of the left hand to tap the victim’s back at the moment that “strike” has occurred.
Reaction: The aggressor straightens his legs and lifts his arm slightly, giving a “bounce-off” look to the simulation. The victim should arch the back and lift the head slightly, curving into the strike, and then of course dropping to the ground is expected. This action is a fight-ender.
bite
It surprises me that people think that a lot of work has to go into this. Start with a phony grab and then the body part to be “bitten” is merely brought up in front of the mouth so that the aggressor’s teeth are blocked from audience view. The bite needs almost no movement by the aggressor besides a little facial mugging. The victim just has to sell the pain reaction. No contact, no worries.
My favorite: biting someone’s finger (especially popular in Taming of the Shrew).. If you are the aggressor, use both hands to loosely grab the victim’s hand. Of the three hands involved, two should be pointing in the same direction, let’s say his right and your right. Let your hand slide underneath his, and some of your fingers slip up between some of his. Your left hand will act as a visual distraction. Then bite one of your own fingers as the victim lets out a bloodcurdling scream. There is no way that the audience is going to figure out how you did it (unless the victim is wearing colored nail polish and you are not).
face scratch
This s a simple pantomime that relies more on the victim’s reaction than on the simulation, but we still want to make sure that no one gets hurt. A real scratch to the face brings the fingers directly across and into the skin, so on stage we redirect that energy away from the victim’s face. Having the actors stagger their positions on stage helps to disrupt the audience’s focus. The right hand, say, curls in a half-fist and reaches up to the level of the victim’s left ear. A simple quick pull down and left but towards the aggressor’s left hip makes for a convincing scratch. So the energy of the “scratch” actually moves away from the victim, not across the victim’s face. As with most of these small moves, it’s the victim’s reaction that creates the believability to the action.
head butt
Too dangerous to use for most theatre companies. I tend to stick this one into The Three Musketeers as a comedic payoff, but it is a close-in simulation that can cause a lot of damage. Include it only if you have a very trusted choreographer working for you. There are two ways of doing this, depending on the placement of the actors, but I’m not going to go into specifics. It’s simple and quick, and if I’m there to guide the actor’s head with my hands, I teach it. But otherwise, stay away from it. This is not only extremely dangerous but also looks amateurish if done poorly and detracts from the show.
Kicks
Kicks are mere variations of punches and slaps, but the potential force behind them is much greater. Add to that the fact that most people have no idea how far their foot really can travel on a kick, and you’ll see how we’ve moved a step up on the danger ladder. To reduce that risk, we have to be even more attentive to relative body positioning at every point in the kicking simulations.
fan kick
In reality it’s a big looping slap to the face using a foot instead of a hand.
Fan kick viewed from the side (and would have been more impressive if I could have kept my back and legs straight, but the dancer that I was is a distant memory).
Set up: Victim stands full back, and the aggressor is upstage and full front, facing the victim. The distance between the two needs to be twice the distance of the aggressor’s arm. To make sure, initial contact can be made by, let’s say, one actor touching the other on the shoulder, and then taking a big step back with the non-kicking foot.
Picture: The aggressor keeps the non-kicking foot planted, and ten takes another step back with the kicking foot. But be sure and keep the body weight over the non-kicking foot.
Action: For a right-footed actor, an inside fan kick will travel right to left, and an outside fan kick from left to right. Either way the leg is kept straight as it swings in as big a circle as is comfortably possible, landing at the same spot that it started. Try it very gently a few times and you’ll realize that this requires great hip flexibility and strong thigh muscles. (Most actors won’t be able to perform this kick unless the victim is on hands and knees.) As the victim’s back is to the audience, he can provide the knap by simply clapping his hands.
Reaction: The aggressor’s reaction is static, ready for the next move. The victim is going to move the head and body in the direction of the kick (although in a broad comedy such as The Three Musketeers the reaction turns into a cartwheel!)
groin kick
DO NOT suggest to the actors that it is safe to do a contact groin kick so long as the victim wears an athletic cup. Athletic cups are meant to protect against incidental contact. On a full contact kick, the edges of the cup can rupture the lymph nodes on either side of the groin, leading to systemic toxic shock within an hour. People have died this way.
DO NOT suggest to the actors that it is safe to do a contact kick by simply aiming for the victim’s inside thigh. A slight miscalculation can lead to getting nailed in the groin anyway or, worse, the strike hitting low and breaking the leg. It only takes about 45 lbs. of pressure sideways to break the knee. So DO NOT have any movement going toward the victim.
There is horrible video on the web with an “expert” demonstrating a simulated knee to groin. It features the aggressor directly facing the victim, and the victim with his hands crossed in front of him, fingers interlaced and palms down. The aggressor then raises the knee and strikes the palms of the victim. Here are some of the problems with the technique as demonstrated:
1) The aggressor’s knee has to lift up far higher than groin level in order to strike the hands of the victim.
2) Striking the victim’s palms when his fingers are interlaced is a great way to break fingers or wrists.
3) The movement of the aggressor’s leg is going toward the victim. If the aggressor is standing just a little too close, the knee can hit the groin or stomach.
This video ostensibly was created in order to show a safe simulation, only to add more levels of potential injury.
Instead, let’s try a simulation where the energy of the aggressor is moving away from the victim:
Set up: have the victim stand full-back to the audience. Without turning the head towards the aggressor, cheat some eye contact before continuing. The aggressor stands in profile but slightly up-stage of the victim, and about one and a half arm’s distance away. The body of the aggressor must not face toward the victim, but rather at the empty space directly upstage of the victim. The toes of the downstage foot point at the victim’s left and right toes. At this point on, that downstage foot remains planted; it is the upstage foot, the foot furthest from the victim, which performs the action.
Picture: Much like the slap, the groin kick works best when it comes as a surprise to the audience. And yet there still has to be a tiny moment that the audience can identify as a precursor to the action we want them to believe. In this case, it is a very small bit of preparatory body movement in opposition. It can be as simple as a little lift of the foot off the ground, or a momentary shift of weight to the rear foot.
Action: The upstage knee rises and points towards the spot upstage of the victim, and then the foot swings out and back quickly, parallel to and upstage of the toes of the victim. Don’t allow the foot to arc towards the victim. The foot must immediately go back to its starting position. Any hang time at all on this and the audience will not believe the illusion.
Reaction: The victim performs the universally understood reaction – bending the knees, sticking the butt out and lifting the chin. Don’t collapse the head down nor bend over at the waist – that only confuses the illusion. The reaction is funnier if the vocalization of the victim can be high pitched, if the knees can touch (knock-kneed) and if there is a slow continuing collapse after the initial shock of the impact. The aggressor should not bend over at all (so many male actors want to in unconscious sympathy), but maintain a victorious posture.
The kick is more of a flick kick than one that is capable of doing any serious damage, so the aggressor’s action must be as quick as possible, especially coming away from the target. There is also a truism at work here in that if the aggressor’s foot actually rises to the height of the victim’s groin, the audience thinks that it has seen a kick to the stomach, because the viewer’s mind always adds a little more movement to what he actually sees. So stop the foot a little lower than groin level. Be sure to include the look of the foot bouncing back from the groin, like a ball bouncing off a wall, to give the illusion of contact. In order to sell this, it might be necessary for the foot to swing up for the kick a little slower than it will move on the bounce back.
If you want to simulate a groin kick with the knee rather than the foot, the basics will be the same, but look ahead to the knee to stomach explanation.
front kick to stomach – victim standing
There are two ways of simulating a front kick, but I’m only going to tell you how to do one kind – the safer one. This one is really the same as the groin kick, with some obvious exceptions. So look at the groin kick pictures on the previous page. All we have to do is change some very minor points:
Set up: have the victim stand full-back to the audience. The aggressor stands in profile but slightly up-stage of the victim, and about one and a half arm’s distance away. The body of the aggressor must not face toward the victim, but rather at the empty space directly upstage of the victim. The toes of the downstage foot point at the victim’s left and right toes. At this point on, that downstage foot remains planted; it is the upstage foot, the foot furthest from the victim, which performs the action. Get eye contact.
Picture: For the picture, we can have the aggressor step back with the kicking foot, bending the knee of the supporting leg, as if gearing up the energy for the kick.
Action: The kick is going to be a bit different as well, with the foot allowed to drift just a little higher (but still lower than stomach level), and the entire kick rising up in a full arc from the ground up to the target level, swinging from the hip, as opposed to the quick flick of the groin kick. Always keep in mind that there is no reason to hook the kick toward the victim, for the audience has no depth perception. The victim can use a free hand to pat the stomach to produce the sound of impact, but the most important noise to make is a huge exhalation of breath.
Reaction: And of course the reaction of the victim is going to be very different than that of the groin kick, most especially in that the head can be allowed to look down. The body of the victim can move slightly downstage as with a stomach punch, but also can almost hop even as the victim doubles over, for the direction of the impact has come up from the ground.
front kick to stomach – victim on the floor
This is where the victim is already on the floor for some reason on all fours, and the aggressor simulates a full kick to the stomach. When this was taught to me, back in the day, I learned it as a full contact kick. I was expected to clench my stomach muscles and simply absorb the blow. This worked well almost every night. But there was one performance where it didn’t work well, where just before the kick I ran out of air and needed to take a quick breath. I tried to wave off my partner, but it all happened so fast that he didn’t have time to notice my change of expression, and his foot landed on my stomach just as it was relaxed enough to suck in a gulp of air. That little bit of air was immediately pushed out of my lungs, and the force of the kick lifted me up off the ground. I was left in a crumpled mass on stage with no way to continue the scene. My partner simply had to stand and wait for what seemed like an eternity until I could manage to say my next line and get the scene going again.
If you really must do this simulation, here is one way to do it which is marginally safer than what I was taught. Have the victim on all fours placed so that he is heading 45 degrees from either profile or straight. The aggressor moves in sideways but upstage of the victim, so that no matter which way the victim is pointed the aggressor is facing 1/4 out, with hips and shoulders square to the victim’s stomach. The non-kicking foot is planted about six inches away from the victim. That is your set-up.
For the picture, the kicking foot steps back and the front leg bends slightly at the knee, so as to aid in maintaining balance. The action is the part that can get actors in trouble, for the tendency is to swing in too close and accidentally make contact with the victim. That is precisely what we do not want. Instead, slowly bring the kicking foot to a spot parallel to the planted non-kicking foot, and at the moment of “impact” pull the foot away again as quickly as you can. To repeat: slow in, fast out. And no closer than your own planted foot.
The reaction is pretty obvious, and you might even be able to sneak a little self knap if you can hide one of the victim’s hands from the audience’s view. But don’t ever let the aggressor try to make the sound by jabbing his kicking foot into the floor. It just sounds horribly not like any kind of kick to the body.
front kick to head
Once again, we follow the mechanics of the above groin and stomach level kicks, but in this case we have to lower the victim since most actors won’t have the flexibility to kick at higher than waist level without pulling a hamstring. For our purposes we’re going to try the easiest form of the kick to the head – one performed with the victim’s head only a couple feet off of the round.
side view
audience view
Set up: The victim is already on the ground for some reason, on his hands and knees and full back. The head must be held back some, so that the hands are further upstage than the head is. The aggressor, standing stage left, profile right , lines up his left foot so the toes point in a straight line to the victim’s finger tips. Once the aggressor is in position, then the victim can rock back slightly so as to shift weight off of the hands, freeing them to provide the knap for this simulation. The hand nearest the aggressor should be directly beneath the other, ready to clap. Care must be taken during this shift that all of the movement be hidden from the audiences view. The victim then establishes eye contact only when ready. Be patient. Don’t rush into the picture unless every part of the set-up is comfortably in place.
Picture: As with most kicks, we can have the aggressor step back with the kicking foot, bending the knee of the supporting leg, as if gearing up the energy for the kick.
Action: The aggressor’s foot swings in an arc parallel to the proscenium, following the path of where the victim’s fingertips were. As opposed to the other kicks, this one does not bounce back, but continues past the level of the head. Keep the heel of the standing foot securely planted for balance. The victim provides the sound of contact by driving the bottom hand into the top (target) hand, and then continues to the face. Careful not to let the elbow “flap”, for the audience can see the tiny move and figure out how you made the sound. If the victim wishes to add a vocalization (and he should), keep the sound higher in pitch than that for a stomach punch.
This simulation is most often taught with a different kind of knap – a “cage knap”. It’s a shared knap requiring both actors to make the sound. The victim cups his hands, one overlapping the other a bit. With the palms facing the floor, it creates a dome shape. The aggressor then kicks the open “cage” with the top part of his foot. I’ve been leery of this ever since I saw the victim’s hands kicked right into his own face, breaking his nose.
Reaction: The aggressor should not quickly return the foot to the ground, as she would for the other front kicks. On this one, we like to see a little hang time before the foot naturally drifts down. The victim will arch his back and let the head snap up and very slightly away from the aggressor.
roundhouse
This kind of kick is not a street fighter’s act, but comes from eastern martial arts. The rear heel and knee lift up to waist height, and then are swung around in a big looping motion parallel to the ground until it strikes the opponent’s waist, ribs, knee or face. The strike itself is something similar to that of a snap-kick. The danger level on this kick is so high, and the kick itself so rare, that there is to need to include it in a show without having an expert on site, so I’m not going to include a description of how to do it here.
rear kick
This would be a simulation of kicking someone who is standing behind you, and is actually very similar to the front kick in execution. But it is a difficult kick for most actors to perform with consistent accuracy (they usually have difficulty maintaining their balance and keeping control of the direction of the kick), so I suggest leaving it out of your fight unless learned under the direct tutelage of an experienced instructor.
knee to stomach
Go back and re-read the section on the groin kick and the stomach punch. You should be able to see how many of those elements are modified to make this kick easy and effective. This is an excellent close-in simulation that can work in almost any direction.
Set-up: No matter where the victim is, the aggressor moves directly in-line and faces the victim’s right side. The victim is turned out, showing his right profile to the aggressor, either or both of whose hands may lightly land on the victim’s right shoulder. The aggressor’s left foot is placed behind the victim’s right heel, so that the aggressor is almost straddling the victim’s right leg. Establish eye-contact.
Picture: We don’t get to see any leg prep on this, so it all rests with the aggressor’s body English, who needs to bend the knees a bit and really sell that he is about to drive the knee into the stomach. If the actor believes it, we’ll believe it.
Action: The knee glides along the front of the victim’s right leg and stops when it is at stomach level. On this illusion, the leg will “stick” there for a moment, allowing the victim to double over around the attacking leg, closing off the distance between the leg and stomach. Full breath exhalation – no need for a knap.
Reaction: The victim has the wind completely knocked out of him, and probably has a broken rib or two, so this is a fight ender. Staying doubled over, with head down, is the most you can expect. The aggressor allows the kicking leg to drift down to the ground.
head to wall
This is usually performed as a compound series of separate actions: the aggressor grabs the victim by the hair, drags him over to a wall, and slams his head into it. Three distinct actions that combined look very scary but can actually be done very safely.
The hair pull has already been discussed, as has the concept of the aggressor making it appear that she is dragging the victim across the stage, when actually the victim is leading all of the action. The aggressor is merely pantomiming the pulling while moving ahead of the victim. As the ending location is going to be a wall, let the audience see the aggressor do the hair pull first and then make the decision to go to the wall. Here is where actors start to muddy this simulation.
Actors want to run into the wall nonstop. That cannot be done safely, so don’t let them try. Instead, they have to cross to the wall first and then do the head to the wall bit. First complete one, then do the other. Once they have finished the drag/cross, only then can they perform the following:
Set-up: Assuming for now hat the aggressor has been pulling on the victim’s hair with his right hand, it means that he will be to the left of the victim as he stops in front of the wall. The victim can stand square to the wall, but for additional balance and control, one foot might actually be pushed against it. The aggressor could turn to face the victim, who is facing the wall with legs bent and a bit bent at the waist (coming naturally from having been pulled by the hair). It will be difficult to make eye contact, so the aggressor has to be completely relaxed and apply no pressure whatsoever to the victim.
Picture: The victim keeps the knees bent, and arches back to the point where the head has fully raised up. Completely let go of the aggressor’s hand.
Action: The victim pivots the head quickly down to where it was at the set-up, and then immediately snaps it back up as though it has bounced off of the wall. As he does so, his own hands will slightly lead the way, and with one open palm smartly rap the wall for the impact sound. The hands must then drift down, away from head level. As the hands are leading the movement, and the smack to the wall is done at head level, there is no worry that the victim will hit the wall with his own head, for his hands will get in the way. Important note: don’t ever let an actor kick a wall in order to make the sound of impact. The audience can see that a mile away and it just looks horrible.
The aggressor’s hand does not follow the head as it arcs down, but moves in a straight line towards the wall and parallel to the floor. At the moment of impact, the hand can flair up a bit. The aggressor’s hand should not get too close to the wall or the audience will think that she had something to do with making the contact noise.
Reaction: The victim should keep the knees bent but the rest of the body should be fairly upright, with the hands continuing to drift down instead to going back to the head. We want the audience to forget that the hands were involved in any of this.
knee to head
Here’s a simulation that is even more dangerous than it looks. It shouldn’t be, and if done correctly is very safe indeed. But there is no way under heaven that this should be attempted unless under the direct supervision of a very competent stage combat instructor.
When I include this in a show, I first demonstrate it a few times to the actor, then have him do the motions several times without a partner, and then bring in the victim to have him try it in super-slow motion. Even with all that, believe it or not there have been many times that the actor will bring his knee up directly into the victim’s face. I was always standing right there to stop it, and they were working at extremely slow speed, so no one has ever been hurt, but you can see my trepidation at having actors try this without an expert standing by.
Unarmed Fighting Styles
Most real fights occur between people who have reached a point of rage in which they no longer are acting rationally, so any training they may have had goes out the window. I’ve seen this happen to otherwise skilled fighters who get caught up in either fear or anger. For these combatants, the moves tend to be circular, wild, uncontrolled both in execution and in balance, the tendency being to throw the combatant off-balance whether or not he actually makes contact. There is very little effective defense, and what little there is is simply the instinctive curling up of the body as both forearms come up to protect the face. Untrained fighters also tend to use the same one or two moves over and over again regardless of effectiveness. The person who falls down first invariably ends up as the loser.
Among trained fighters who are able to keep their wits about them, there is a greater variation of moves both offensive and defensive, with an attempt to bring into play combination moves designed to establish distinct lines of attack and take advantage of perceived weaknesses. However, what the audience will notice most of all is the “on-guard” position which trained fighters will drop into when a threat is identified. Invariably the dominant foot and hand step back, providing a slightly reduced target to the opponent. The elbows both tuck in slightly to be ready to protect the stomach and flanks. The dominant (right) hand goes to shoulder level and stays fairly close to the body, while the left fist rides higher, just under eye level, and extends further towards the opponent. This allows both hands to protect the face. The ribs are protected by the elbows.
We know from art on excavated pottery that boxing goes back at least to the ancient Greeks, and it seems that the stances and guard positions would be instantly recognizable at any gym today. There is, however, a very distinct boxing style that developed during the mid-nineteenth century and flourished though to the 1930’s. You have probably seen photographs of prize fighters with handlebar mustaches, with the fists tightly curled in and the head held stiffly back. The opponent would see the back of the fighter’s hands instead of the little finger side of the fist. This is the era of bareknuckle prize fighting, the Marquise of Queensbury rules, the birth of the “sweet science”. The seemingly unnatural stance is actually quite practical for the style of fighting performed. No grabbing or kicking was allowed, winner was declared by knockout only, and up through the turn of the century a round was counted not by the clock but with each instance that someone was knocked down. This was brutal exhibition fighting, and with no timed rounds or points given, the only strategy was to survive the punishment and inflict as much damage as possible.
In this style of fisticuffs, some moves needed to be modified. Punches that land with the flat face of the fist can deliver great force, but the delicate bones of the fingers can easily break, so constant jabs with the left can quickly ruin the hand. A better jab for bareknuckle fighting is to turn the fists in so that the back of the hand faces the opponent, the knuckles all pointing toward the opponent’s face and the hand held directly above the elbow. From this position the fist can be quickly snapped out and down onto the bridge of the nose of the opponent. The knuckles might fracture but the hand was still capable of attacking. Either hand could jab, and to hide the attack the hands could roll in a vertical circle, providing an ever shifting presentation of fists. Alternately, the lower fist could quickly rise up, thrusting in for an upper cut to the chin or to the stomach. A fist could always attempt a quick looping roundhouse to break the cartilage of the ear, a hook punch to the ribs, and if the opportunity finally arose, go for the straight right cross for a knock-out punch to the chin or nose. My point here is that just because something looks funny to our modern eyes doesn’t mean that it wasn’t extremely effective.
The defense matched the offense. The forearms could slightly extend to either side to deflect the attacks to the face, but it was more important to keep the head leaning back and away from the extension of the attacking fists. The stomach and ribs were protected by the elbows. Because the punches had to cause damage in order to win the fight, dancing around in the modern boxing style was unknown and the feet were more firmly planted on the floor, always providing a solid foundation for the knock-out punch. Throw a punch while you’re on your toes and you’ve dissipated all of its power.
As you know, boxers no longer fight that way. Why? Modern boxing is a much more controlled sport than it was a hundred years ago, and in order to try to reduce the damage to the fighters three changes in the sport changed every technique: 1] Winner by knockout was replaced with a point system. 2] rest periods only after knock-downs were replaced by timed rounds 3] and bareknuckle was replaced by padded gloves. Since modern boxers no longer need to knockout the opponent but rather can win by points scored, the number of jabs as opposed to solid punches has gone up dramatically. The moves are lighter and faster, with more emphasis in landing a greater number of points and a greater willingness to stay close in, since receiving the jab from a padded glove, though painful, usually cannot end the fight. Now the head can drop in closer to the hands, the center of balance shifts higher up into the torso instead of the hips, the weight shifts from the heels to the ball of the foot, and the fist strikes with the metatarsals rather than from the knuckles.
All of this means that the look of a stage fight will be very different if set in 1895 compared to 1995, but what never changes is the way that a stage combat technique is performed. A jab is a jab, a stomach punch is a stomach punch. The set-up and the picture might change due to the period specifics and the character choices, but the careful calculation of the action must conform to the safety needs of each simulation.
Putting together the moves.
No reason to go into choreography here (I’ll get to some basics at the very end of the chapter), but there is a certain natural progression in the types of moves that might be developed in a fight that shouldn’t be ignored. Mainly it comes down to damage sustained and adrenaline produced. A fight progresses only so long as the combatants can continue to sustain damage. When someone connects with a strong punch, it’s usually a fight ender. A connected punch to the stomach at best will knock the wind out of you, at worst will cause broken ribs and a ruptured spleen. A punch to the face will leave you at best with a runny nose and inflamed eyes, at worst with broken bones, a concussion, shattered eye, even death. To extend a fight into a barroom brawl where every punch continues to connect but doesn’t break a bone insults the audience. They will go along with a longer fight so long as the consequence of each action is not forgotten. Which in turn means that many strikes and kicks are going to have to miss or be effectively evaded or blocked on a longer fist fight.
As the movements are memorized, the actors must also add the character’s intention and reaction to each of the moves. Any fight scene is also an acting scene, so just as one can only say the lines as fast as the audience can understand them, the fight moves can be only as fast as the audience can follow the story that goes along with the moves. And just as we also nuance the delivery of our lines so as to add layers of interest in our characters, so must we go far beyond the mere performance of the fight in technical terms. So forget the idea of too fast or too slow. Think instead in terms of clarity, believability of intent, and emotional connection.
There are many instances in which your show will be better off by hiring someone as fight instructor rather than as choreographer. I mentioned before that the fights should be rehearsed as early as possible, but for many shows we have to amend that slightly to make sure that they are rehearsing the right thing.
For many modern shows, I don’t like to stick my nose in too early. I’ve found that as soon as I mention anything to the actors in terms of specific moves, even if only as a suggestion, they immediately latch onto it as though it were scripture. If on the other hand, the actors work their way into the scene and find out where their own impulses take them, the “fights” become more organically tied to the story that they are presenting.
I usually like to step in after the director and actors feel good about the nature of the emotional responses that are drawn out in their playing of the scene. That way I can take their impulses (“now I want to throw him to the ground”), and show them how to do it safely. But if I tell them that someone should be tossed to the ground before they themselves come up with that idea, that moment becomes a technical one for the actors instead of part of their creation. So for at least the first blocking, I prefer to let the actors rush to each other and even gently lay hands on each other, and then grunt or squeal or yell what they want to do. If nothing comes up on the first rehearsal, then maybe they’ll need more time to understand their characters. But I don’t like to have them or the director feel that we need to rush to get the fight blocking down too early. Better to have a brief fight and fully realized characters than a longer fight that is only an interruption of an exciting story.