
Stance
Although balance is absolutely essential in swordplay, it is perhaps even more important here in unarmed fighting, though a little less obvious to the audience. Foot placement should appear normal, but at all times provide a solid base from which to move. That means that both heels should stay planted whenever possible, and the weight of the body should rest comfortably on the hips, not leaning forward. Knees need to be slightly bent and relaxed to further aid in maintaining balance. As you can guess, since in unarmed stage combat the actors are so close together, one actor losing his balance means that two actors fall down. So keep the balance off of the toes and back down on the heels. It might be a common reaction for the aggressor to throw his body weight forward along with the momentum of a punch, but if we include that in the simulation, it must be under complete control.
And, although it sounds impossible at first, both actors have to be as physically relaxed as possible. Tension leads to injury.
The Basic Impulses
All of stage combat is a pantomime, of course, but some simple illusions are not overtly violent yet still fall within the parameters of controlled movement. Mastering these techniques will make the impact simulations even more realistic. We’ll start with the basic moves, which is not to say the easiest. Indeed, these pantomimed impulse moves are more difficult to do because of their subtlety.
Grab
I start all actors out with the grab, for it is the simplest of stage combat actions, and one that need not have a violent intent at all. Stated another way, it reminds us that stage combat is about actions, not anger. Actors learn something instantly practical and it begins to prep them in the concept of stage combat being a shared art form.
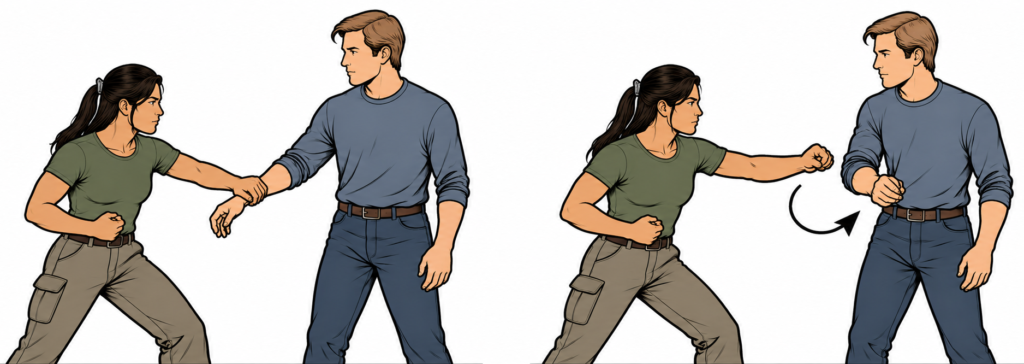
Any character might want to stop another simply out of excitement (“You’ve got to see this – it’s the most incredible thing!”) – and the hand grabs the friend’s wrist. Even in such a friendly situation, we have to obey the cardinal on-stage rule: the victim must stay in control. You may ask, where’s the victim? Well, we’re concerned with this single action, and at that moment of contact the friendly aggressor is restricting the movement of her partner, therefore the partner becomes the victim. No matter how friendly the motivation, the act of grabbing establishes the roles for an instant.
“All of that is a fascinating philosophical discussion, but why are we wasting time on something so simple as grabbing?” Because doing so too brusquely can hurt the victim’s shoulder, bruise the forearm, or even cause one or both actors to fall. Also, if the victim resists, the aggressor has no way of knowing if the character is trying to get away or if the actor really does need to get away.
In this as in any other static illusion, always find a way to give the victim an escape route. In this case, the aggressor first steps into position, and then reaches out and makes contact with the victim’s arm using only an open hand. The thumb is pressed against the index finger creating a bear-paw look – not a primate opposable thumb grip. The force of this connection is provided by the victim – as long as the victim chooses to press his arm into the aggressor’s “bear-hand”, the illusion is maintained.
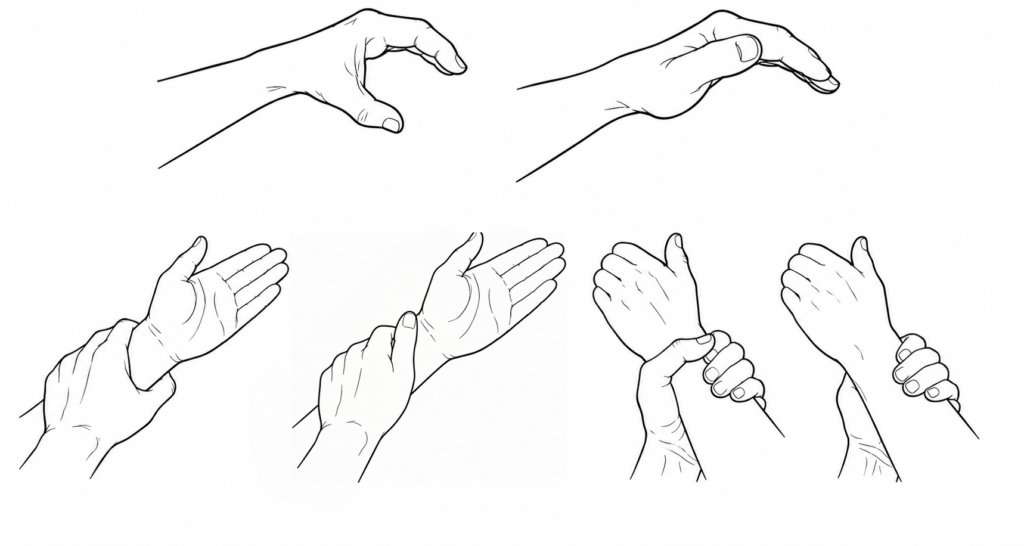
If for any reason the victim has to get out of the way, he simply releases his arm from contact and steps back. Easy. That’s all there is to it! Our primate grasp with the opposable thumb makes a great clamp, but you don’t need that on-stage. Simply have the aggressor keep the thumb and fingers pressed together in the bear paw position and grab the victim with the cupped fingers. No more bruised arms or wrists, and the victim can always slip out of the grasp if absolutely necessary. Just roll the arm towards the fingers for an automatic release.
“But the audience will see that I’m not really grabbing him.” No they won’t, not if the rest of what you’re doing is interesting. Anyway, if the audience is looking at your thumb position during the middle of a scene, it means that you lost their attention a long time ago.
Push
For the YouTube video on the push, follow this link:
So simple, and yet so much can go into it.
Actors at first put too much energy into being pushed, but people don’t fly away from each other at the merest touch. Neither should one actor have to fling the other across the room. After all it’s still a pantomime. Certain physical rules have to be followed in the order in which they occur naturally. Try pushing a wall, and then try pushing a pair of pants hung in your closet. Without conscious thought, your body will go through the same biomechanics both times, the only difference being in the response to the amount of resistance anticipated or encountered.
First the fingertips touch and assess the weight and composition of the object. Then the legs, torso and shoulder readjust in order to make a better bracing angle against the floor, and as the elbows bend and the body leans forward. Then the arms straighten as the object is moved away. If the object is heavy, the legs will also bend and then straighten, providing even more power. All of this happens in direct proportion to the resistance encountered, and it happens in a split second without conscious design.
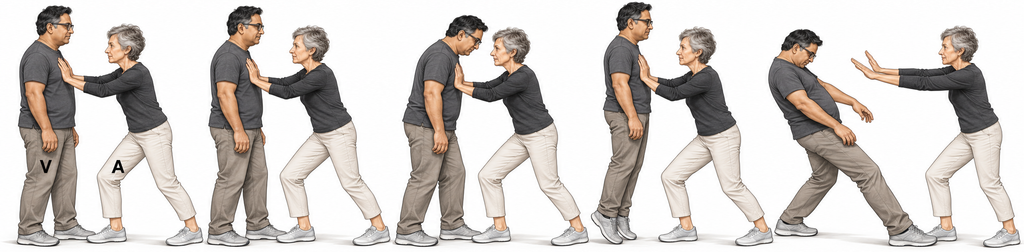
We perform exactly the same movements in a staged push, with slight changes. In the illustration above, our aggressor, Helen, very gently lays her palms against the upper portion of Arjun’s chest. As her fingertips touch him, Arjun gently and almost imperceptibly leans into her. Helen allows her hands and arms to remain soft, bending her elbows as the two come closer together. This nearly invisible pre-movement, in opposition to the action to come, is what gives such impulse simulations their believability.
Helen must now wait for Arjun to initiate the apparent push, because the timing belongs to the victim. Arjun rises slightly onto the balls of his feet as Helen sinks, and then takes a large, controlled step backward. His chest moves first, while his relaxed arms and head momentarily lag behind: his arms remain slightly forward and his chin drops toward his chest. Helen follows his movement by extending her arms, completing the illusion that she has propelled him backward, although she is exerting almost no force.
Make sure to establish an exact correspondence between the amount of body English in the “push” and the distance the victim travels. A small apparent effort should not send someone flying across the room.
The aggressor should take care not to push against the victim’s shoulders. Repeated force applied directly to a joint can cause injury. It is better to place the hands against the upper portion of the chest muscles, away from the shoulder joints—and, even there, to apply virtually no actual force.
Pull
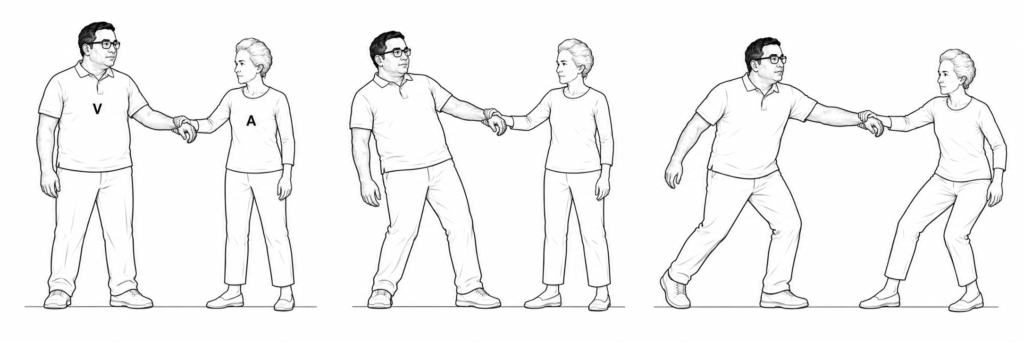
Much like the push, but in the opposite direction. As mentioned before, the aggressor does not use the thumb to grasp the victim, but makes contact with a loose “bear paw.” The victim then makes a very slight movement in opposition, creating the picture of resistance and cueing the aggressor that the action is ready to proceed.
The apparent pull begins with the aggressor making a small pulse toward the victim, as though gathering the force necessary to pull him forward. The aggressor then performs the physical action of pulling, but the true movement begins only when the victim decides to go forward. The apparent impulse must travel sequentially through the aggressor’s body, into the joined hands, and then through the victim’s arm, shoulder and torso before the victim’s feet begin to move.
The reactions of both participants create the interactive flow of energy that sells the illusion to the audience. The aggressor must appear to lead the action, although the victim is never truly pulled at all.
Trip
It’s the simple things that can do the most damage. I saw one actor nail another in the shin trying to do a trip. If you’ve ever taken a hit on the shin, you know that the pain is temporary but excruciating. It naturally stopped the scene.
For this bit, all the actors have to do is remember that the audience has no depth perception, and that less is more. We’ll assume here that the aggressor is stationary and that the victim is in motion. The set-up in this case happens before the victim starts to close in, a quick glance for eye contact and to ensure that the aggressor is just upstage relative to the victim. The picture is the victim moving across the stage up to the point where he is directly downstage of the aggressor, and the aggressor sharply stabbing the ground with the ball of the foot. This is a very small movement, and it lands upstage of the victim’s planted lead foot. The action is completely non-contact on the aggressor’s part, while the victim taps the top of his trailing foot against the heel of the planted lead foot, giving the slight “stutter step” look, as well as just a little bit of impact sound. That’s right, this is a self trip, and although in direct view of the audience it is invisible to them because of their limited perception of objects in motion. The physical reaction is passive on the aggressor’s part. Normally he just looks on and gloats, but if the character’s intent needs to be more violent, a pantomimed push on the victim’s shoulder can be added. But the push must be pantomimed. The hand may make the lightest contact necessary to complete the picture, but it must exert no force; even a slight real shove could knock the victim off balance.
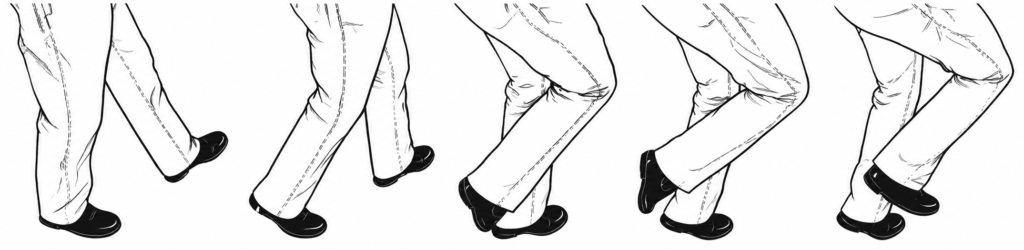
In order to sell this illusion even in tight quarters, the reaction from the victim should lead the audience to look up instead of down at the feet. A slight “whiplash” reaction of the head and letting the arms fly up will help in the distraction.
Pull hair/ear/nose
An elegant simulation that I love teaching, and one in which the victim does almost all of the work. The initial danger point is actually as the aggressor moves in to make the grab, so just make sure that the hand doesn’t move in towards the eyes, but rather goes up along the side of the head and then to the hair. In a real hair grab, the fingers dig into the hair and then the wrist slightly twists. It is the twisting motion that actually causes the pain, not the lifting. For stage, the aggressor’s fingers curl in, making a half fist, which then gently lands on the head of the victim without grabbing any hair at all. At this point, the aggressor is just along for the ride, while the victim acts the pain.
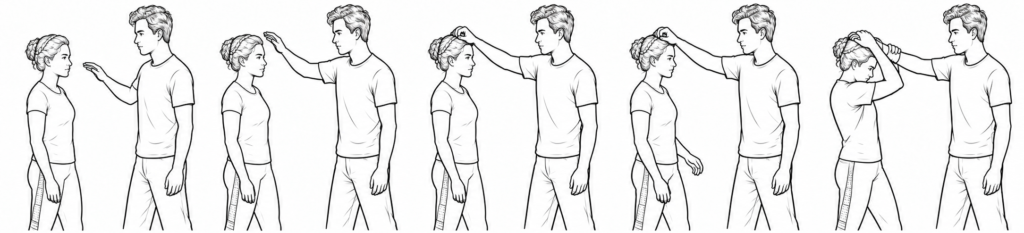
Keep in mind throughout this illusion that in real hair pulling, there is very little pain from simply pulling the hair straight up. It is the slight twist of the wrist that causes the hundred little pinpoints of pain that shoot through the scalp. That is what the victim needs to sell if the illusion is going to work.
If the action is going to move from here, we need the victim’s hands to fly up to the hair, as though to pull away the offending hand. What actually happens is twofold. One hand will land on top of the aggressor’s, thus ensuring that the hand will stay in contact with the head and not ruin the illusion. The other hand if at all possible will cover the aggressor’s wrist and act as a brace – for the aggressor’s safety. During the rehearsal, a very carefully choreographed stepping pattern will be worked out, with only the victim actually setting the movement and the aggressor trying to make it look as though he is the one initiating the movement. The aggressor’s wrist is in danger if the victim does any sudden movement, so not one muscle twitch must be left to improvisation on a moving hair pull.
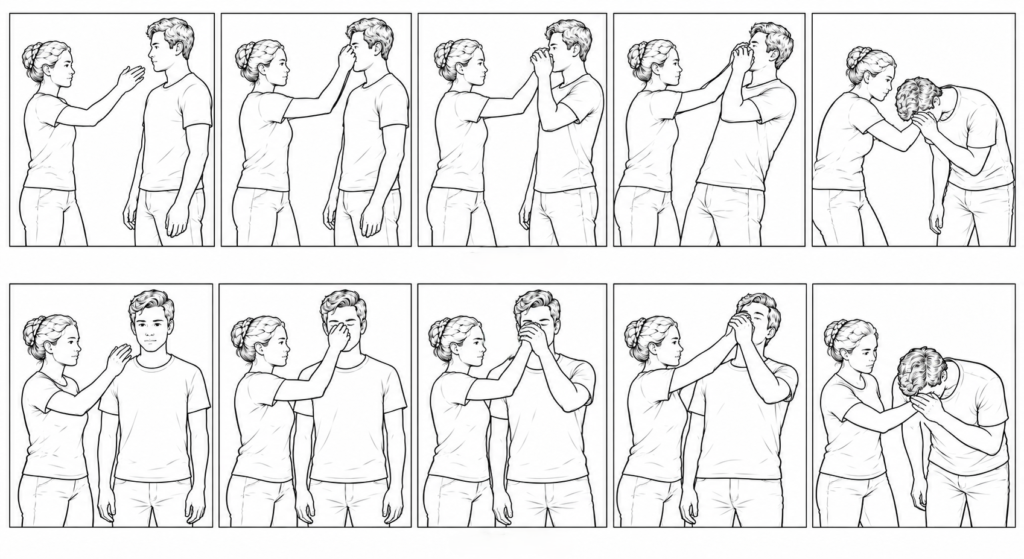
If pulling the nose or ear is what you need, the set-up and actions are the same, just a different target. As always the danger is in moving the fingers in the direction of the eyes, so have the hand come in sideways in front of the face and then allow the victim to gently lean into the hand.
In pulling someone by the nose or by the ear, think push, not pull. Have the victim push her head into the aggressor’s hand, and he gently pushes back to maintain contact. Both will walk together to the choreographed location, with the victim providing more force than the aggressor.
Hair pull across the floor
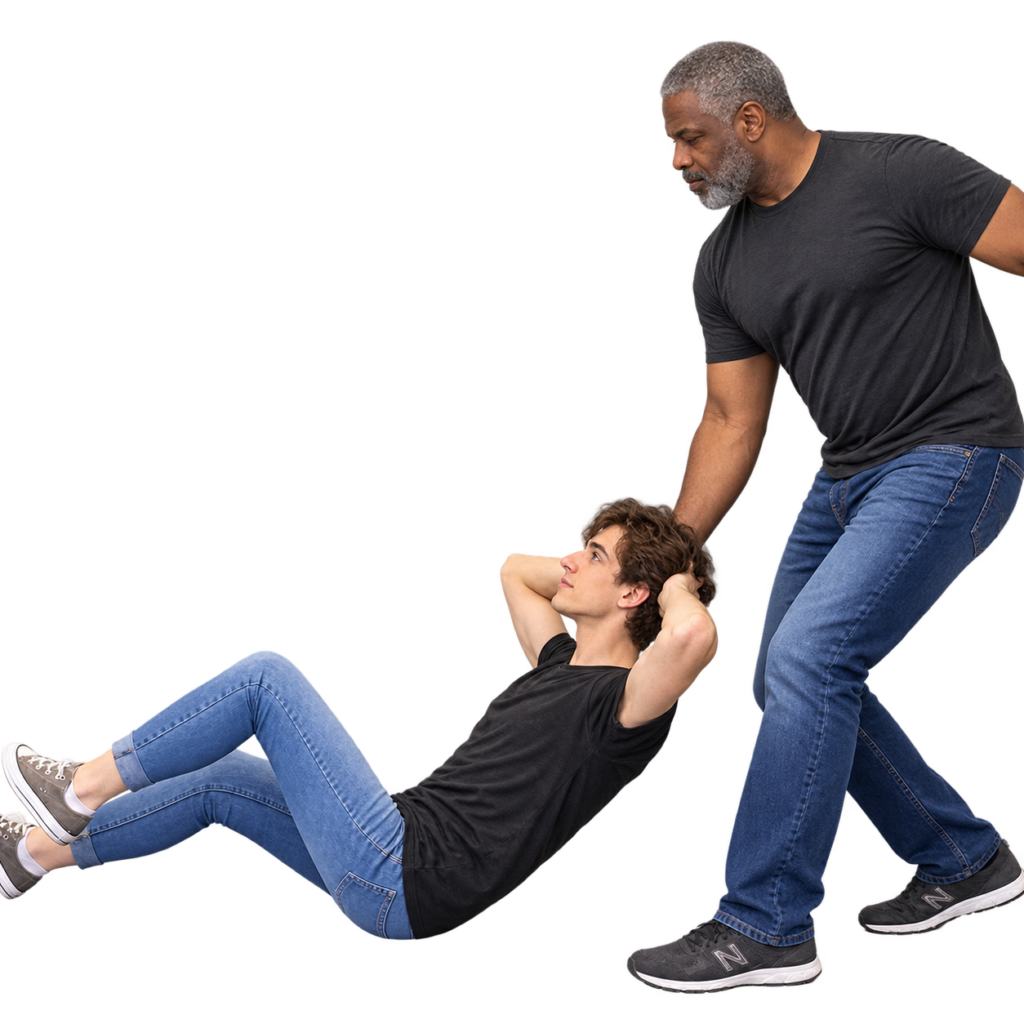
The hair pull across the floor is an illusion of considerable violence and should never depend upon an actual pull on the hair, scalp, or neck. The audience must believe that the aggressor has seized the victim by the hair and is dragging the victim bodily across the floor. In reality, the point of apparent contact and the force that produces the movement are two different things.
Action: The aggressor places the hand into the victim’s hair rather than closing the fingers around a handful of it. The hand should disappear sufficiently into the hair that the audience cannot see precisely what is happening. There must be no sustained tension on the scalp. The aggressor takes a broad, well-balanced stance, with the knees flexed and the back supported by the legs and core rather than by bending and pulling from the waist.
The victim establishes the actual working connection by gripping the aggressor’s wrist or forearm. A trapeze-type grasp works well because it allows the victim to support the upper body through the arms while the aggressor supplies the horizontal force of the drag. The aggressor’s hand is then hidden within the hair and need not grip it at all. The audience sees the apparent point of control at the hair, while the real load-bearing connection is between the victim’s hands and the aggressor’s forearm.
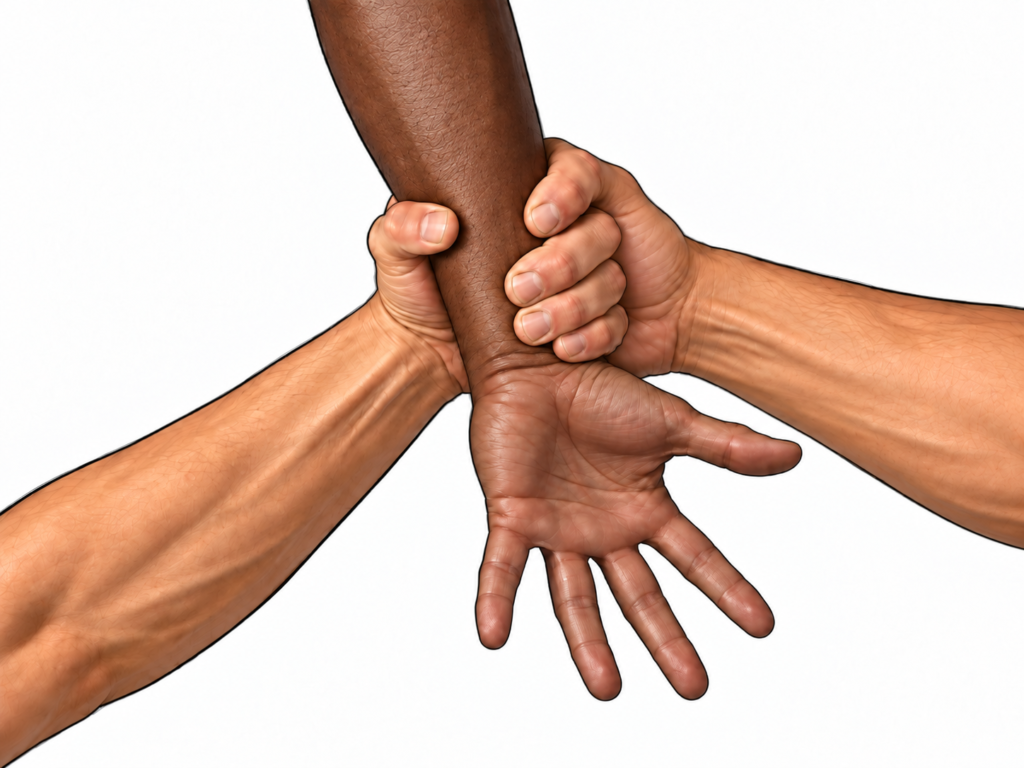
For a stronger variation, the victim grips the aggressor’s forearm with one hand and reinforces that grip with the other. The open or relaxed aggressor’s hand remains buried in the hair, preserving the illusion without placing the victim’s weight on the scalp or neck.
Once the position is established, the aggressor begins the drag by moving backward from the legs. This is an actual pull across the floor, not merely an illusion of one. The movement must therefore be smooth and continuous. Do not jerk the arm backward, snap the elbow straight, or attempt to accelerate suddenly. The aggressor controls the direction and speed of travel and must remain aware of obstacles, changes in floor surface, scenery, and the victim’s ability to maintain the required body position. But make sure that the aggressor is taking care of his back! Try to avoid twisting motions in the torso or excessive shoulder strain. If it feels too difficult – STOP!
Reaction: The victim does not simply go limp and allow the head to be pulled along behind the body. The victim contracts the abdominal and back muscles and lifts the shoulders and upper torso from the floor, maintaining something rather like a sustained partial sit-up. This keeps the apparent line of force running toward the hair while preventing that force from actually being transmitted through the head and neck.
The legs remain active as well. Depending upon the choreography, the knees may stay bent and the heels may skim or slide across the floor. The legs, hips, abdominal muscles, back, shoulders, and arms all contribute to maintaining the position. This is a physically demanding technique for both performers.
The victim cannot control the travel itself. Once the drag begins, the aggressor is genuinely supplying the horizontal force that moves the victim across the floor. What the victim controls is the contact: the protective relationship between the head, neck, arms, and the aggressor’s apparent hair grip.
Both actors must agree upon the distance, speed, route, and stopping point before attempting the movement. Rehearse first over a very short distance and at reduced speed. Increase the travel only after both performers can maintain the position without strain to the scalp, neck, shoulders, or lower back.
The effect succeeds because the audience sees the victim’s body following the aggressor’s hand and naturally concludes that the hair is being used as the handle. It is not. The hair provides the illusion of control; the actors’ bodies provide the actual mechanics.
Smothering
Smothering Desdemona with a pillow while she lies in bed is the obvious example, but also included here is any moment in which one character covers another’s mouth, if only to shut them up. We always want the victim to be able to breathe, and we don’t want to damage the nose either, so the basic principle is to take away any pressure directed toward the face.
For an open-hand smother, the aggressor slides the palm upward, parallel to the face, rather than swinging inward in a slapping motion. Let the hand hover just away from the face, with the nose kept clear, and let the victim close the gap by pressing forward into the open palm. The aggressor keeps the hand slightly cupped, so that contact is limited principally to the fingertips and heel of the palm, leaving breathing space beneath it. The victim may also place a hand on the aggressor’s wrist as a safety check and to help control the distance. The key is that contact is maintained by the victim pressing into the aggressor’s hand. If the victim stops pressing forward, the contact disappears.
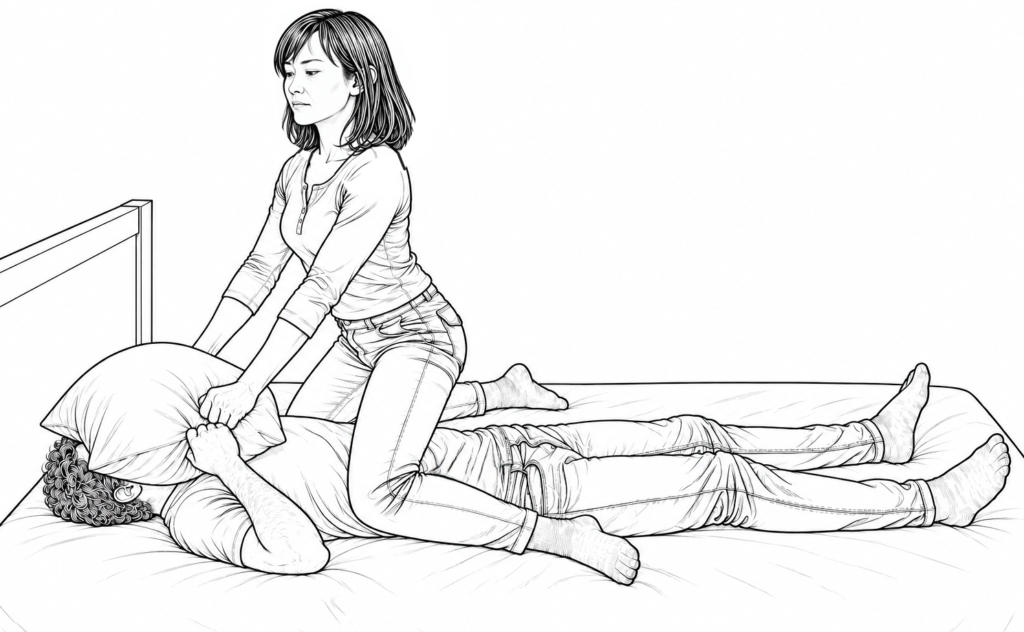
The pillow smother is dicier, but it can be just as safe. We cannot use the same sideward slide, because the audience needs to see the pillow come down directly onto the victim’s face. It should descend with apparent force, but without being driven through the face, and all downward pressure should be released as soon as contact is made.
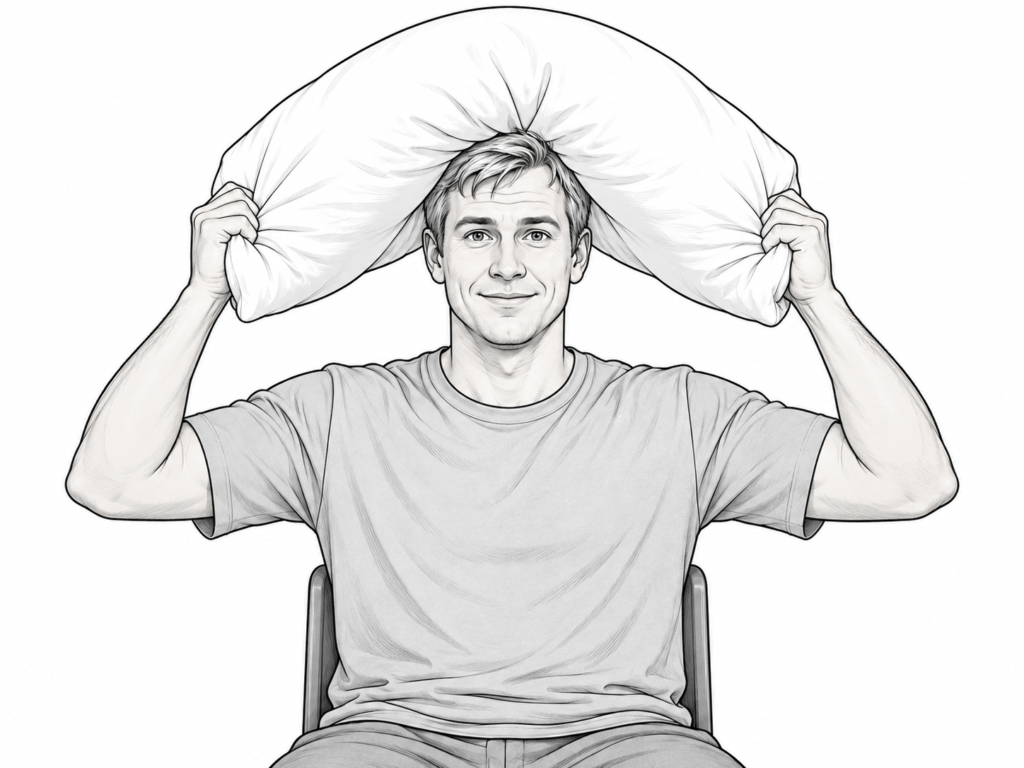
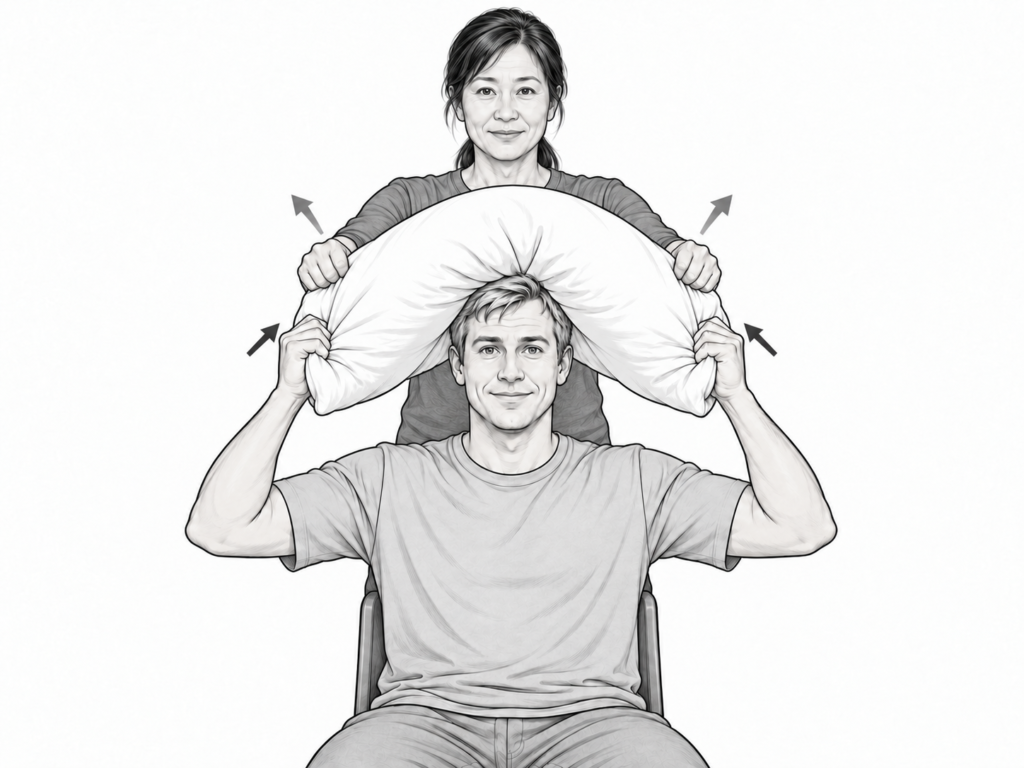
We begin here by letting the victim hold the pillow over his own face and arrange it comfortably. The pillow should remain slightly tented rather than being compressed flat against the nose and mouth. Once the victim is satisfied with the breathing space, the aggressor can join the exercise. He gently pulls the pillow toward his own face while she applies a light, steady pull in the opposite direction. They can now experiment with the apparent struggle while the victim remains in control.
When both actors are comfortable with this exchange of force, the victim lies down and the pillow is moved into the smothering position over the face. The mechanics remain exactly the same. The victim may pull directly on the pillow, or may grasp the aggressor’s hands, wrists or forearms, drawing the pillow inward while the aggressor gently pulls it away. Although each character appears to be struggling in one direction, the actors are exerting force in the opposite direction.
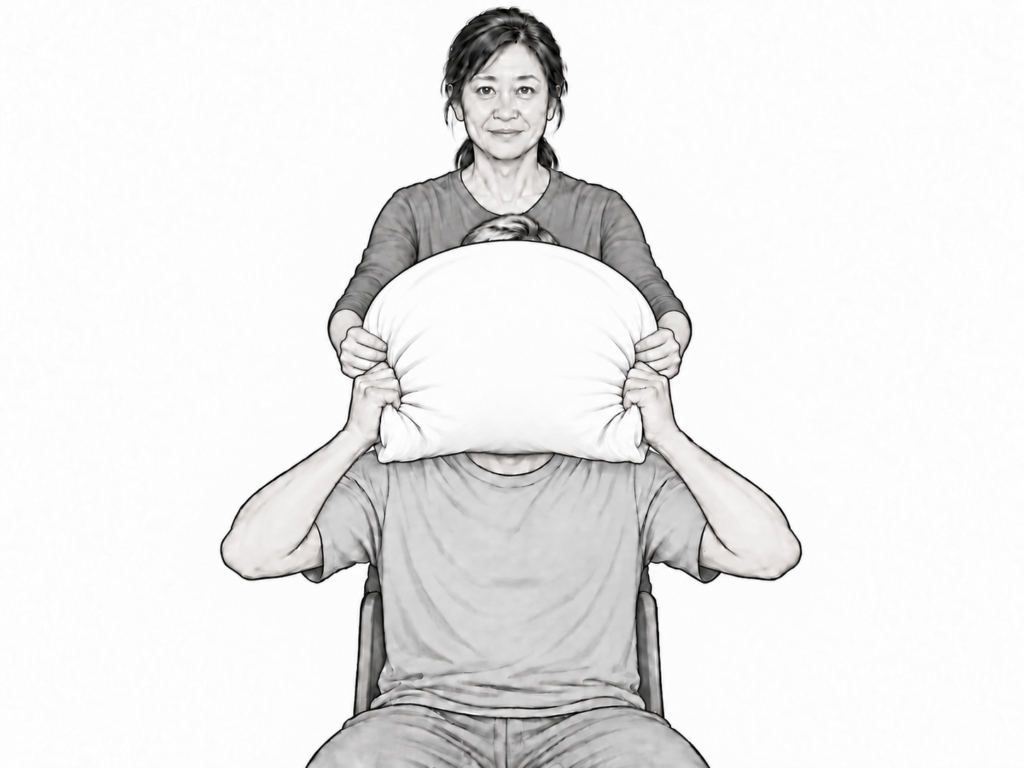
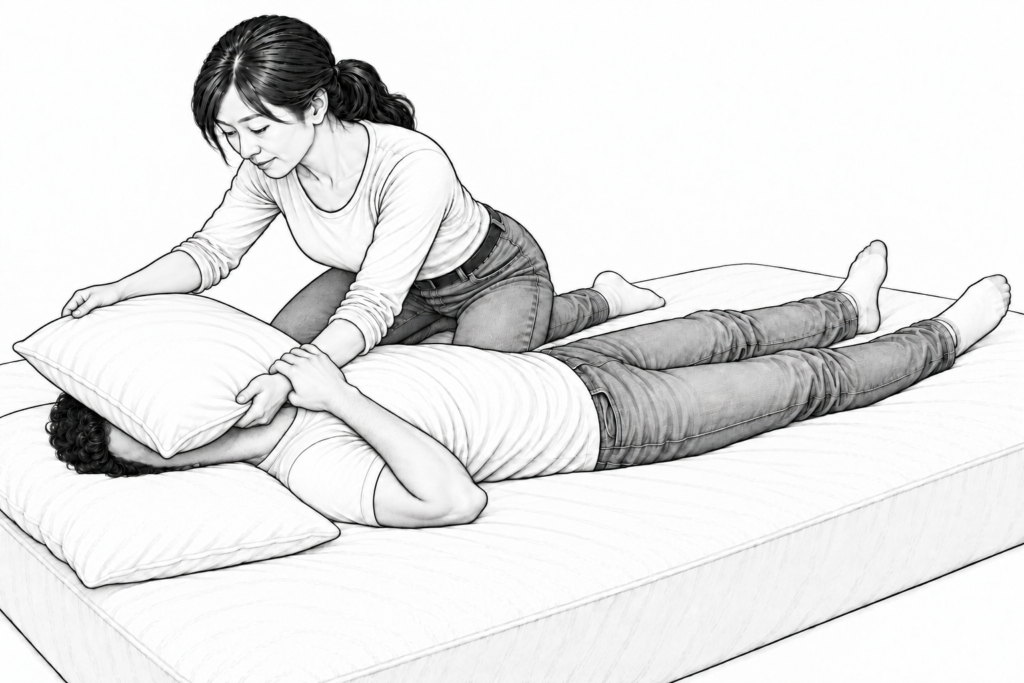
The aggressor may kneel beside or straddle the victim, depending upon the needs of the scene. Either position is acceptable as long as no weight is placed upon the victim and the aggressor remains balanced independently. The aggressor’s force should always travel upward and slightly away from the victim, never downward into the face.
This opposition of forces creates an automatic release. If Daniel releases whatever hold is creating the inward pull, Aiko’s counter-pressure causes the pillow to pop immediately away from his face. The aggressor may look murderous, but physically she is acting as little more than a pillow delivery service—with a built-in retrieval system.
Choke – hands on neck
The obvious danger here is that the victim might actually be choked. The aggressor’s forward momentum might also drive her hands into his throat. This is one illusion in which we cannot use the “bear paw”: the audience must see the aggressor’s thumbs if they are to believe the choke. We also need to see muscular activity in the aggressor, so we redirect her physical energy downward into the victim’s shoulders rather than inward toward his neck.
For the set-up, the aggressor plants her feet and extends her open hands toward the victim’s throat. The partners should position themselves so that their heads are not directly in line with each other. To create the picture, the aggressor rests her palms on the victim’s trapezius muscles—the muscles running from the shoulders toward the neck—and lets her thumbs find his collarbones. These bones are easy to feel, even through a heavy costume. Her thumbs are then placed at or just below the collarbones, safely away from the throat.
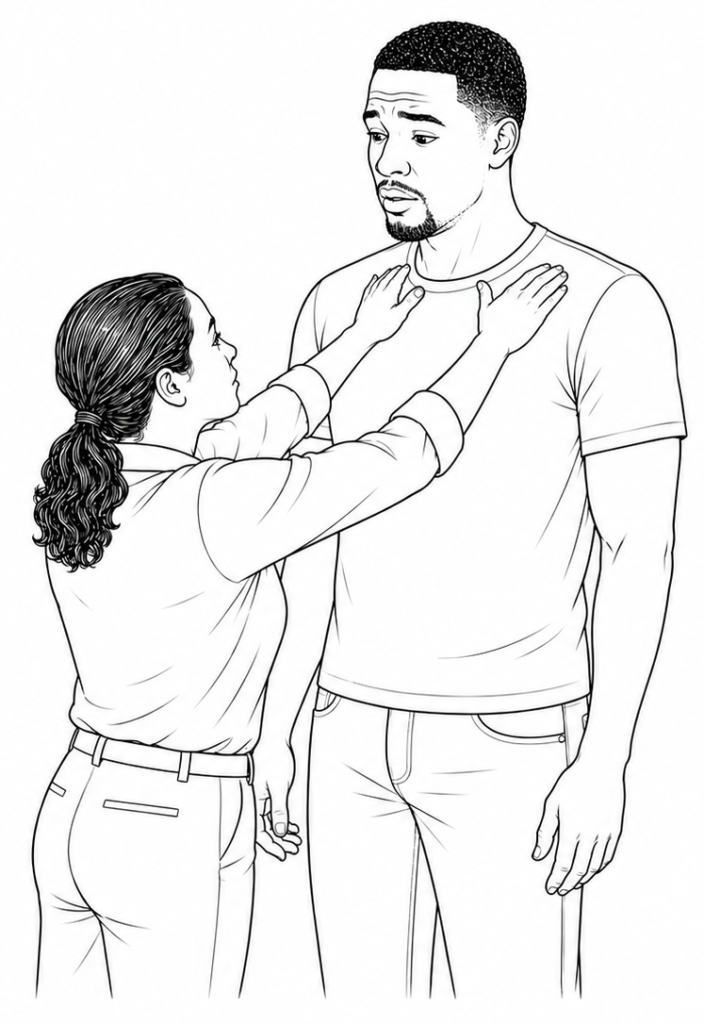
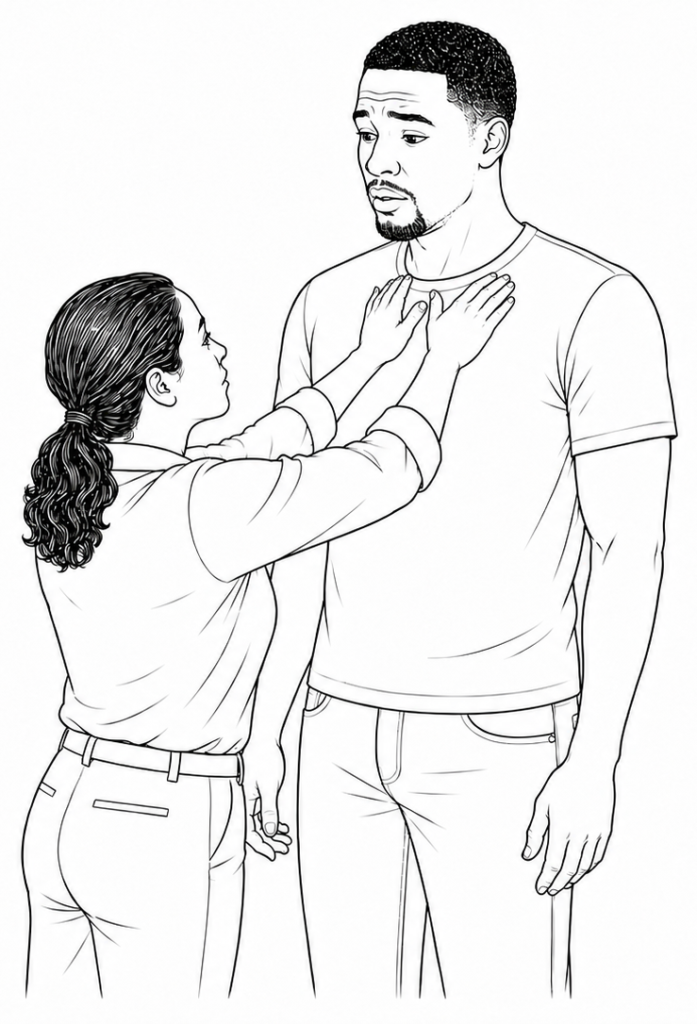
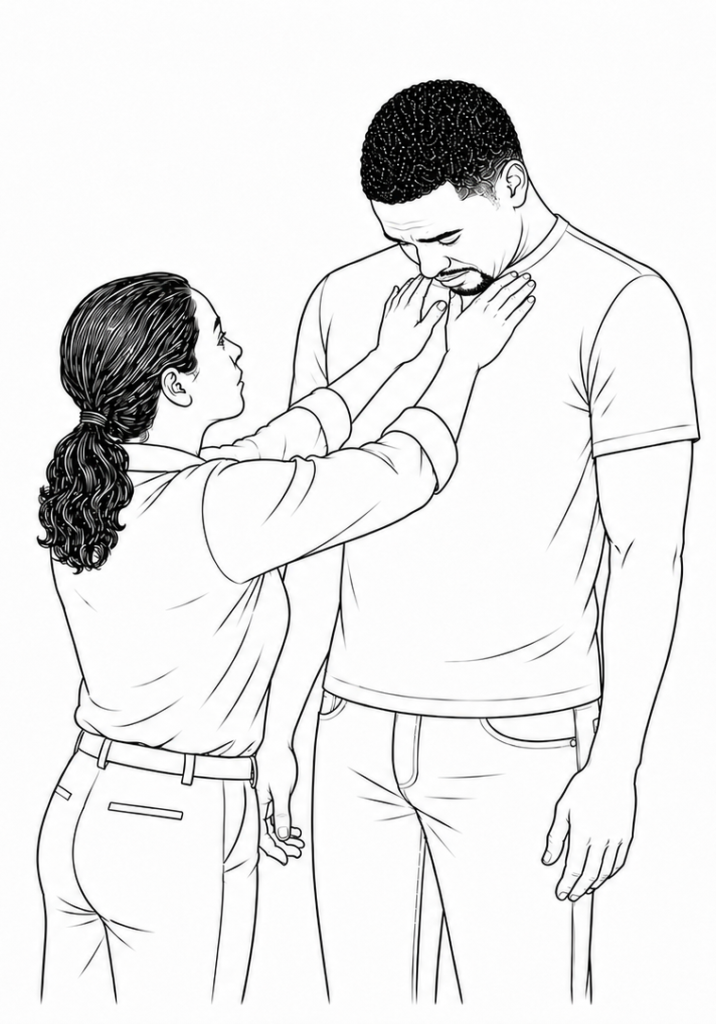
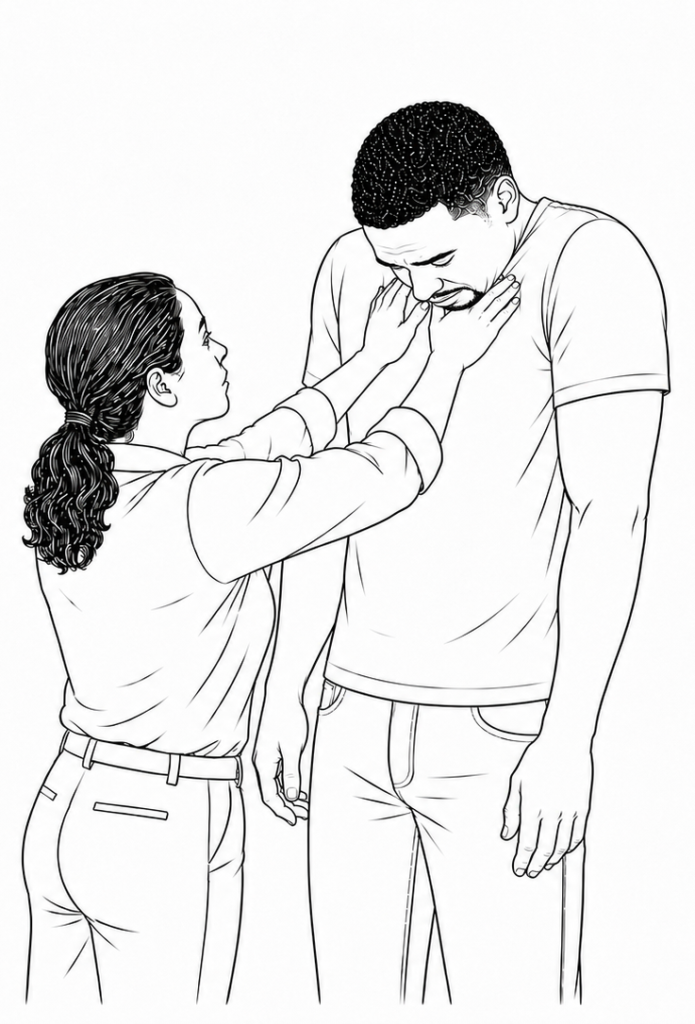
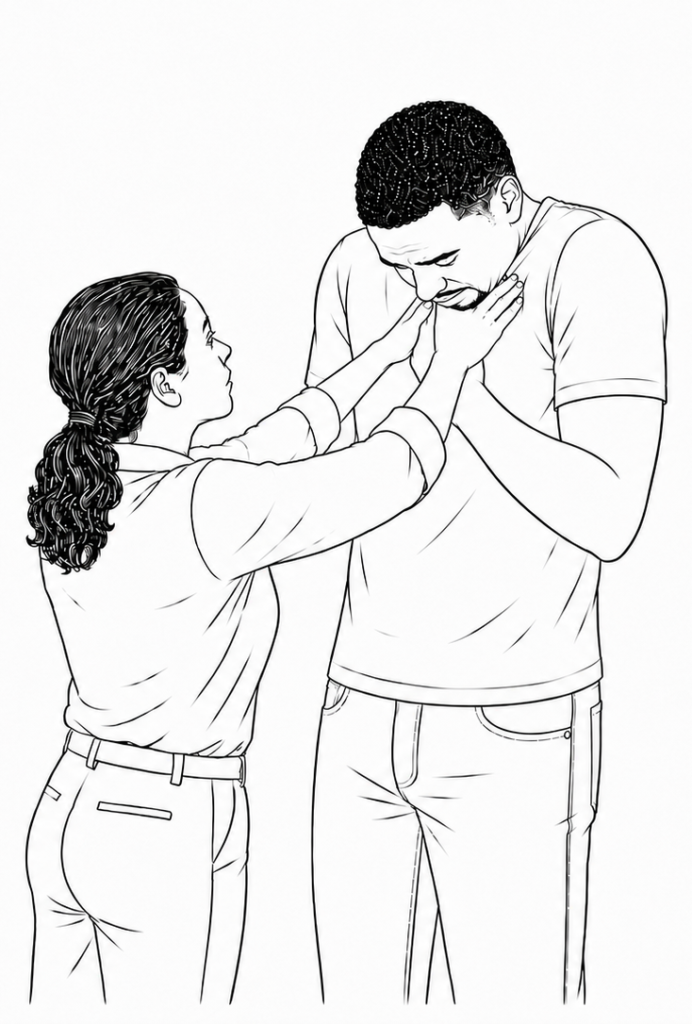
Because the thumbs are so far below the neck, the victim must help close the picture. He raises and rounds his shoulders while tucking his chin firmly toward his chest. His chin may come down as far as the aggressor’s thumbs, concealing the safe distance between her hands and his throat. He must keep his chin tucked throughout the action, or the illusion will be lost.
For the action, the aggressor presses downward toward the floor—never inward toward the throat. This engages the fine muscles of her hands and forearms, creating visible effort without endangering her partner. She keeps her arms straight but does not lock her elbows.
Here Marcus covers Marisol’s hands with his own. This gives the impression that he is struggling to pull them away, while actually helping to keep her hands safely in position. For an additional safety check, he may discreetly hook his fingers around her thumbs. If he feels her hands beginning to travel toward his throat, he can apply the slightest agreed-upon backward pressure as a warning. This is a cue, not a thumb lock: he must never yank, wrench or bend her thumbs.
Any shaking, pulling or struggling must be carefully choreographed and set in stone—no improvising. The partners should think of moving from side to side rather than forward and back, reducing the possibility of an accidental head-butt or broken nose. This is also why their heads must never be directly in line with each other.
Choke release
A standard release from an actual two-handed choke is to bring both hands and elbows together low in front of the body, then drive the joined arms straight upward, keeping the elbows close. As the arms rise between those of the attacker, they force even a very strong grip apart. In a real struggle, letting the hands travel slightly forward may also strike the attacker in the face—so much the better.
For stage, however, the hands and elbows must travel straight upward and remain close to the actor’s own body. The actor performing the choke should keep the arms as straight as possible and the head well back throughout the release. Otherwise, the rising fists or elbows can strike under the chin. The practical movement requires very little modification, but its path and the distance between the actors must be carefully set.
Single arm choke from behind
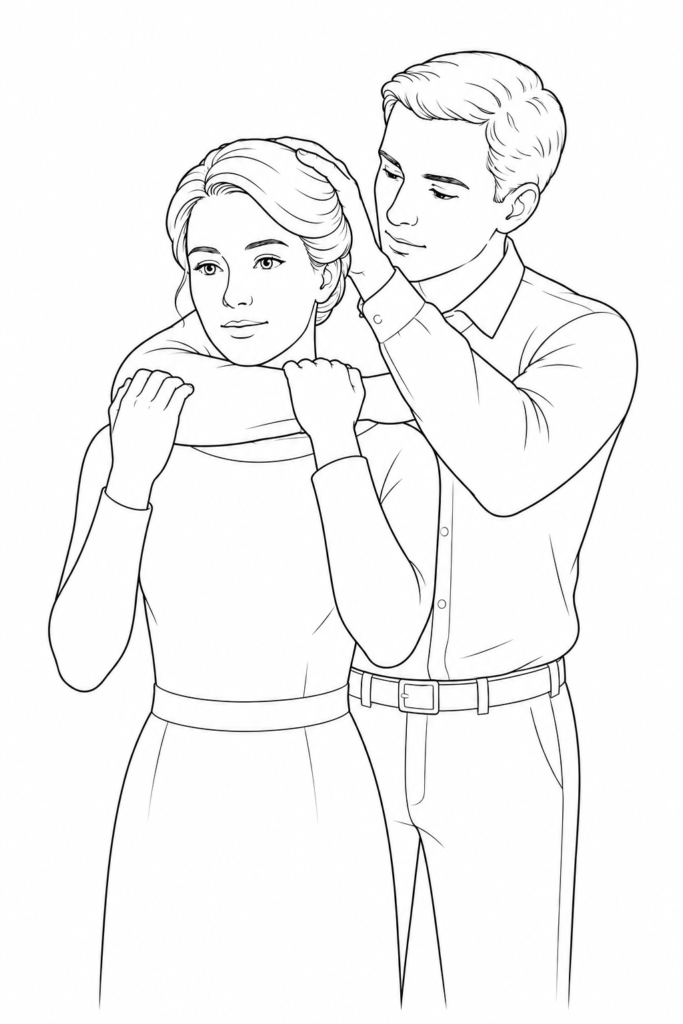
I think you can already guess how this works. The aggressor’s arm comes around from behind and rests across the victim’s collarbones, not the neck. The crook of the elbow remains outside the victim’s shoulder rather than surrounding one side of the neck, and the forearm passes in front of the victim without pressing across the throat. The victim tucks her chin toward her chest so that the audience cannot see the resulting gap.
The victim’s hands provide two additional points of safety. One hand can remain between the arm and the throat, preserving and monitoring the gap. The other can grasp the aggressor’s forearm so that the victim immediately feels any change in its position.
Although the victim appears to be pulling the aggressor’s arm away, she must not actually pull. Doing so might cause the aggressor to draw his arm inward toward the neck—not smart. Instead, the victim gently presses the aggressor’s arm toward her own chest. The aggressor responds by gently trying to pull his arm away, preserving the safe distance between the forearm and the throat.
The aggressor’s free hand may rest lightly against the top or back of the victim’s head. This prevents the victim’s head from suddenly snapping backward into the aggressor’s face. The hand is only a protective brace; it must never push the victim’s head forward.
To the audience, all these opposing forces look like a desperate struggle. In reality, they create and maintain the safety.
Choke with garrote
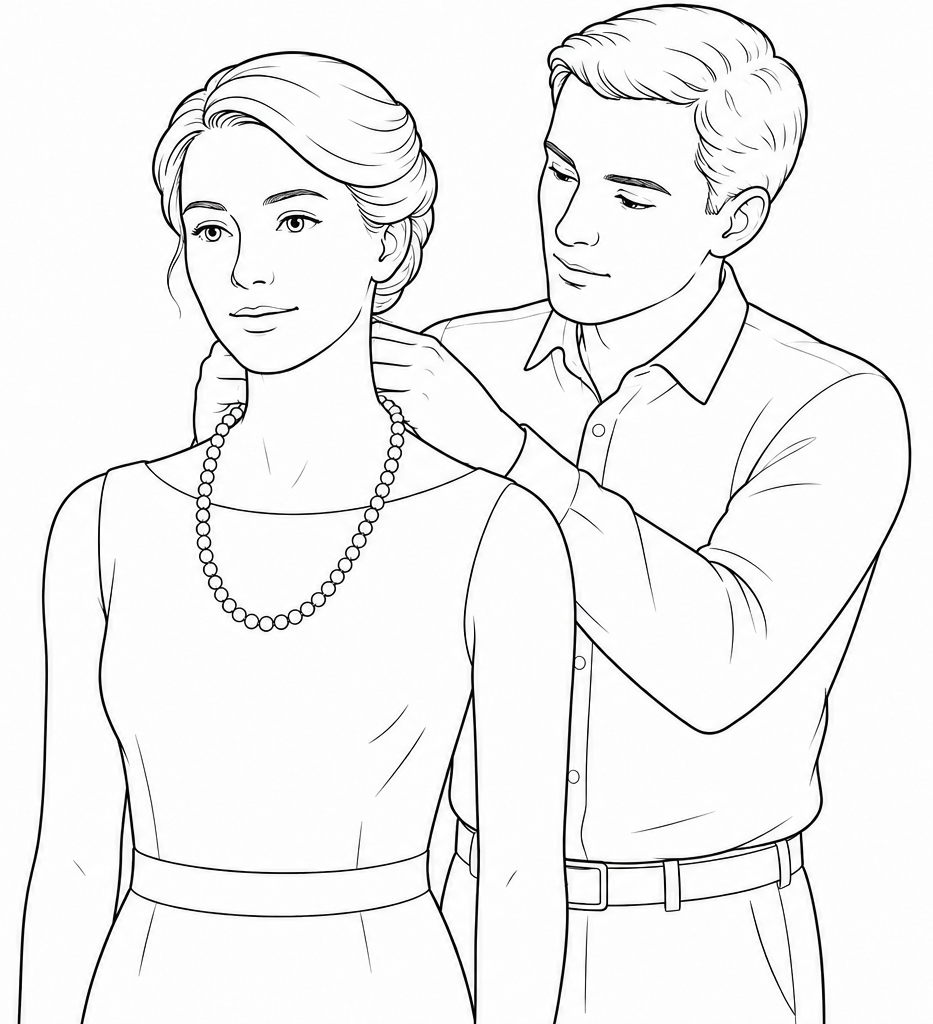
Any rope, cord, or wire used to strangle someone may be called a garrote. For stage combat, the mechanics are exactly the same as in the one-armed choke from behind described above.
The aggressor loosely passes the cord around the victim’s neck. The cord should be marked so that the aggressor can leave the same generous amount of slack every time. The aggressor then rests their hands and forearms against the victim’s neck and upper back and remains still. The cord must never tighten or place pressure on the throat.
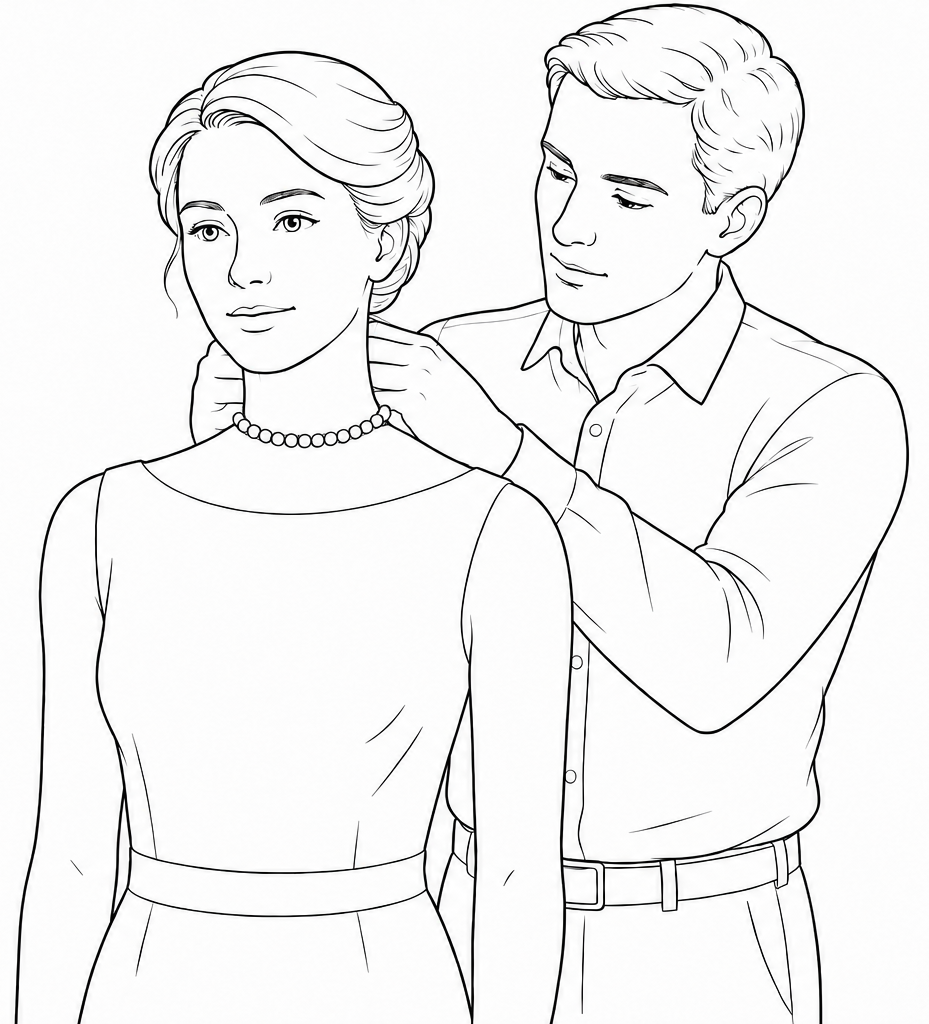
The victim creates the illusion by raising their shoulders and pressing forward gently until the predetermined slack is taken up. For added safety, the victim can reach up with one hand and grasp the cord, helping to control its position. This is also what a real victim would naturally try to do. All the apparent effort and distress of being choked must come from the victim. The aggressor should stand as still as a post.