The hilt is everything that is not the blade: the pommel, handle, and guard together. When a sword is carried in its scabbard, the blade is hidden and the hilt is the part that remains visible.
The Pommel
The pommel sits at the near end of the sword, immediately behind the handle. It often serves two purposes: helping to hold the hilt together and acting as a counterweight to the blade. In general, heavy blades require heavier pommels, while very light blades may require little counterweight—or sometimes none at all.
This is not a strict rule. Many military sabres, for example, have little or no substantial counterweight. Their forward balance gives greater authority to the cut, but also makes the blade more difficult to stop once it is moving.
The apparent heaviness of a sword is not determined by weight alone. Even a large two-handed sword more than five feet long may weigh only about seven pounds. If its center of balance lies relatively close to the hand, however, the blade exerts less leverage against the wrist and forearm. It still takes some strength to hold seven pounds, but the sword remains surprisingly manageable.
Compare that with a cavalry sabre weighing only two pounds. At first it seems light, but it may have almost no counterweight beyond a backpiece or cap nut projecting just beyond the fist. Since most of the weight lies forward of the hand, the forearm, wrist, and fingers must work constantly to control the weapon. Cutting with the sword—and especially stopping it once it is moving—places still more strain on the arm. In a short time, the sabre may feel heavier than the much larger two-handed sword.
When a removable pommel is threaded directly onto the tang, the threads that bear upon the tang should be steel. Threads cut into brass will strip much sooner, and aluminum threads are even less durable.
Pommels can loosen with use. A lock washer can help hold the pommel in place, as can a small amount of thread-locking compound. Once thread-locking compound has hardened, however, the pommel becomes more difficult to adjust or remove.
Some pommels are drilled completely through and held in place by a cap nut. Cap nuts generally loosen less frequently than pommels threaded directly onto the tang, although their threads can still be damaged by overtightening. They are often preferable for heavier two-handed swords.
A heavy pommel places considerable lateral stress upon the tang where the pommel meets the handle. Extending the tang completely through the pommel and securing it with a cap nut supports the pommel along its full length rather than concentrating all of the strain at its base.
Lastly, some decorative swords have completely hollow pommels intended primarily for appearance. These may collapse under repeated tightening and should not be relied upon for a fight-worthy sword.
The Handle
The handle is the part you hold. It is sometimes called the grip, but more precisely, the grip is the leather, wire, or other covering found on some handles. In the terminology used here, every sword has a handle, but not every handle has a grip.
On a sword with a through-tang, the handle is hollow so that the tang can run through it. It may be made from almost any material, although wood, plastic, and metal are the most common.
Never drill sideways through the handle and into the flat of the tang in an attempt to hold a fight-worthy sword together. Many a good blade has been ruined that way. Some historical swords, particularly Japanese swords and certain military sabres, use pins or rivets through the handle, but that construction must be designed into the weapon from the beginning.
Wood was the standard handle material throughout much of history and remains common in historical replicas. It looks and feels appropriate, but it can split, compress, or rot. Moisture retained within a deteriorating wooden handle may also cause concealed corrosion of the tang.
Some woods are better suited to handles than others. Pine is generally too soft and splits too readily along the grain. Maple, mahogany, and walnut have a more even grain and work reasonably well. Hickory, cherry, and ironwood are exceptionally durable but considerably more difficult to shape. Rattan resists rot, although it can split if its ends are not seated evenly.
Over time, pressure from a tightly seated pommel can compress a wooden handle. The problem becomes worse when the ends of the handle do not meet the guard and pommel squarely. An uneven fitting acts like a wedge, allowing the fittings to press into the wood and eventually split it.
Metal shims or washers placed at the ends of the handle can distribute that pressure across a wider area. They also help compensate for variations in the hardness of the wood and prevent split-ring lock washers from digging directly into the handle.
Shims create additional interfaces at which the sword might loosen, and they may slightly interrupt the clean appearance of the weapon. They can also change the way vibration travels from the blade into the hilt, sometimes allowing the sword to ring more clearly. Nevertheless, when properly used, they can substantially extend the life of a wooden handle.
Shims should not be used merely to fill a large gap between the handle and pommel. A stack of washers usually indicates that the handle is too short or that the pommel has reached the end of the available threading before tightening against the handle. The proper repair is to replace or correctly resize the handle, extend the usable threading, or alter the depth of the threaded pommel, as appropriate.
Metal handles are durable and do not compress. Their rigidity, however, provides little resilience to maintain tension as the sword vibrates under repeated impacts. A metal handle may therefore require flat washers and a lock washer to keep the assembly secure.
Plastic handles have some of the compressibility of wood without its grain, so they are less likely to split and do not absorb moisture as wood does. Moisture can still become trapped between the handle and tang, however. Their principal disadvantages are their appearance and their tendency to soften or distort under a combination of heat and sustained pommel pressure.
A handle may be left bare or covered with a grip of leather, wire, or a combination of the two. Leather grips occasionally need re-gluing and may deteriorate after repeatedly absorbing perspiration. Wire grips can last for many years, but once a strand breaks, the entire wrapping may begin to unravel.
Whenever appropriate to the production, actors should wear gloves while fighting with swords. A bare hand may be pinched by the grip or fittings, and repeated vibration can cause discomfort or fatigue precisely when secure control of the weapon is most necessary.
The Guard
The guard is the part of the hilt that protects the hand. It is sometimes wrongly called the hilt, but the hilt includes the pommel, handle, and guard.
The guard is positioned between the handle and the blade, although its bars, branches, or plates may extend around much of the hand. It may be as simple as a flat crosspiece or as complex and ornate as the swept hilt of a sixteenth- or seventeenth-century rapier.
With very few exceptions, guards are made of metal, usually iron, steel, or brass.
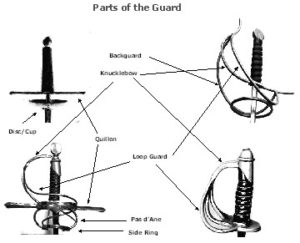
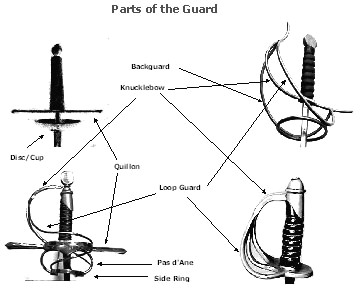
Parts of the Guard
Not every guard contains all of the following parts. Each provides a particular kind of protection or control.
Rear Pas d’Âne — The corresponding loop beneath the rear quillon. As rapier hilts became more elaborate, the two pas d’âne also provided attachment points for additional protective bars. In the later Italian fencing grip, the index and middle fingers pass through the forward and rear loops, bringing the thrusting blade more closely into line with the hand and forearm.
Knucklebow — The curved bar that protects the knuckles. On rapiers and smallswords, the knucklebow may be a relatively slender branch of metal. On military and sport sabres, it may broaden to form much of the guard.
Backguard — On some rapiers, additional bars support the knucklebow and sweep along the “back” of the hilt. Here, back means the side resting toward the wearer’s body when the sword is carried at the left hip. When the sword is held, the backguard protects the fingers and fingernails.
Forward Quillon — Quillons are the crosspieces extending from either side of the guard. Together, they prevent an opposing blade from sliding down the defender’s blade and into the hand or arm. The forward quillon is on the leading or knuckle side of the sword.
Rear Quillon — The quillon on the trailing side of the sword. On a symmetrical, double-edged sword, there may be no permanent forward or rear quillon; the designation changes with the orientation of the weapon.
Cup or Disc — A solid plate protecting the hand, particularly from thrusts. The largest cup guards, found on some seventeenth-century rapiers, form partial hemispheres around the fist. Smaller disc guards may barely extend beyond the hand.
Loop Guard — One or more curved bars protecting the outside or back of the hand from cuts. Loop guards are relatively light and strong but provide less protection against a direct thrust than a solid cup or disc.
Ring Guard — A loop projecting outward from one face of the blade at the center of the quillons. A dagger may have only one ring, while a sword may have one on either side.
Forward Pas d’Âne — A small loop below the forward quillon. Passing the index finger over the quillon improves point control but exposes the finger. The pas d’âne provides some protection for that finger. These loops appeared on some late-medieval swords and became important features of sixteenth- and seventeenth-century rapier hilts.
The Blade
The blade is the essential working part of the sword: the length of steel used for cutting or thrusting.
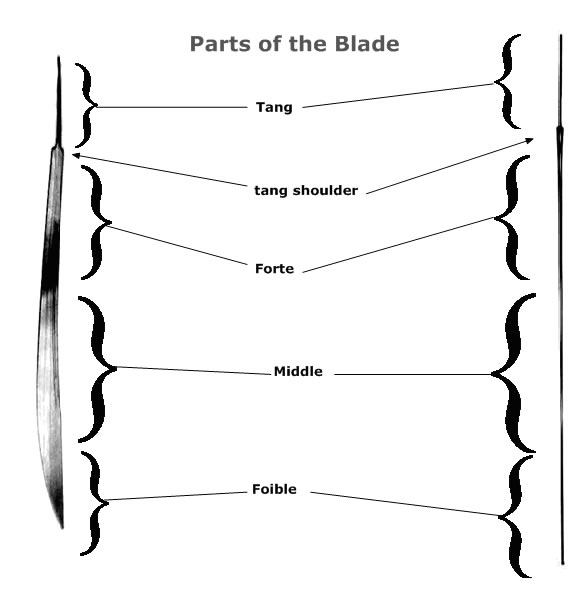
A blade has two principal parts. The blade proper is the exposed portion extending from the hilt to the point. The tang is the continuation of that same steel through the handle and, in many swords, into or through the pommel.
On most swords, the tang is narrower than the exposed blade. The place where the blade narrows to form the tang is called the shoulder. The guard normally seats against this shoulder.
The blade proper is loosely divided into the forte, middle, and foible. These divisions have no exact boundaries, but they provide a useful working vocabulary for stage combat. In general, cuts should make contact with the foible, while parries should receive the opposing blade upon the forte.
Ricasso — An unsharpened section of blade immediately above the guard. Not every sword has one. On swords held with the index finger over a quillon, including many rapiers, the finger rests against the ricasso rather than against a sharpened edge.
Forte — The strongest section of the blade, extending approximately through the third nearest the hilt. This is the principal defensive portion of the sword and the section best able to absorb an incoming cut.
Middle — The central third of the blade, between the forte and foible. It provides neither the defensive strength of the forte nor the reach and leverage of the foible. In the simplified system used for stage combat, it is primarily a transitional area rather than the preferred point of contact for either an attack or a parry.
Foible — The outer third of the blade and generally its weakest section. The blade usually becomes narrower and more flexible as it approaches the point, reducing its weight and the resulting fatigue upon the hand and arm. The foible is also the usual striking portion of the edge during a cut.
On very thin blades, the foible is particularly vulnerable to bending and fracture. When a cut meets a rigid parry, the flexible foible may bend around the opposing blade. Repeated bending of this kind makes it the most common fracture area on many lighter blades.
Edge — The part of the blade used for cutting, also called the leading or true edge. A double-edged straight blade has a cutting edge on both sides. On a single-edged sword, such as a sabre, the opposite side is called the back edge and is generally left unsharpened.
False Edge — A sharpened section of the back edge near the point of an otherwise single-edged blade. It reduces resistance during a thrust. It is part of the back edge, but the two terms are not interchangeable.
Spine — The thickest or most rigid longitudinal portion of the blade. On a single-edged sword, the back of the blade is commonly thickened to form the spine. On a double-edged blade, rigidity may be provided by a central ridge or by raised ridges running beside a fuller.
Fuller — One or more grooves running lengthwise along the blade. A fuller removes unnecessary weight while preserving much of the blade’s rigidity, allowing the sword to be lighter than a blade of comparable dimensions with a uniformly thick cross-section.
A fuller is sometimes gruesomely called a “blood groove,” supposedly because it prevents the blade from becoming stuck in the victim or makes the wound impossible to close. Neither claim is true. The fuller is a structural feature, not a channel for blood.
Tip — The point of the blade. On some thin sporting blades, the point is blunted with a wider, flat steel “nailhead” called a button. This may be covered with rubber or leather for additional protection during sporting practice.
Stage-combat swords never use a covered button. The covering gives actors a false sense of safety and may encourage them to treat the point as harmless. It is not. A blunted sword remains capable of causing serious injury and must always be handled with full control.ave noticed that actors trained with full mask and rubber tipped swords tend to develop poor and unsafe technique, putting their partners in danger.]
The Sheath/Scabbard
A sheath or scabbard serves two purposes:
To cover the blade, protecting it from direct exposure to moisture and preventing accidental injury.
To allow the weapon to be worn.
A sheath is made of a soft material, such as leather or cloth, and is flexible. Most knives are carried in sheaths.
A scabbard is rigid. It may be made of steel, wood, or plastic and may be covered with leather, cloth, or another softer material. Most swords are carried in scabbards, which remain firm even when empty.
A sheath or scabbard can trap moisture as well as exclude it. A blade should therefore be clean and dry before being put away, particularly if it will remain enclosed for an extended period.